Let me paint you a picture.
It is a rainy Saturday afternoon. The kids are bored. You have already heard “there is nothing to do” three times in the last twenty minutes. The television has been on since morning and you are starting to feel a little guilty about it.
Then one of your children wanders over to a little corner of the room. There is a small table there. A few bins of supplies. Some paper stacked neatly on a shelf. Markers in a cup. Scissors in a holder.
Without being asked, your child sits down, picks up some paper and markers, and starts creating.
You do not have to suggest anything. You do not have to set anything up. You do not even have to sit there and supervise every second. The space does the work for you.
That is what a well-designed craft corner does. And that is exactly what we are going to set up today.
I have helped set up creative corners in classrooms and homes for years. And I can tell you from experience, the right space changes everything. When supplies are accessible, organized, and inviting, kids create more independently, more frequently, and with more confidence than they ever would otherwise.
If you have been doing lots of fun crafts with your kids lately and you are starting to think about where to keep all those supplies, this is the post for you. And speaking of fun crafts, if you have not yet tried our recent project on How to Turn Old Crayons Into New Ones Using a Muffin Tin go check that one out too. It is, in fact, a perfect first project to do once your craft corner is all set up.
But first, let’s build that corner.
Why a Dedicated Craft Space Makes Such a Big Difference
Before we get into the practical steps, let me explain why having a dedicated craft corner matters so much more than simply having a box of supplies somewhere in the house.
When craft supplies are scattered across different rooms, stuffed in a closet, or buried under other things, there is too much friction between a child and their creative impulse. By the time they find the scissors, locate the glue, and hunt down the right color paper, the creative moment has often passed. As a result, crafting happens far less frequently than it could.
A dedicated craft corner, however, removes that friction completely. Everything is in one place. Everything is visible and accessible. Therefore, the moment a child feels like creating, they can simply walk over and start.
Furthermore, a craft corner sends a powerful message to your child. It says your creativity matters in this home. We have made space for it. It is valued here. That message, received consistently over time, does wonders for a child’s confidence and sense of identity as a creative person.
On top of that, a well-organized craft corner actually reduces mess in the rest of the house. When there is a designated place for crafting, children learn to keep their creative activities contained to that space. Consequently, supplies stay in one area instead of spreading across every room.
In short, a craft corner is one of the best investments you can make in your child’s development and your own sanity as a parent. And the best part? You do not need a lot of space or money to create one.
Step One: Choose Your Space
The first thing to figure out is where your craft corner will live.
Here is the good news. You do not need a whole room. You do not need to renovate anything. You do not even need a large space. In fact, some of the best craft corners I have ever seen were tucked into a small corner of a living room, a section of a playroom, or even a dedicated spot at one end of the kitchen table.
What you do need, however, is a space that meets a few basic criteria.
Easy to supervise. Especially for younger children, the craft corner should be somewhere you can easily keep an eye on things without hovering. A corner of the living room or kitchen, therefore, works better than an isolated bedroom for young kids.
Easy to clean. Crafting involves mess. Therefore, choose a space with hard flooring rather than carpet if possible. If carpet is unavoidable, a large plastic mat or vinyl rug protector under the craft area makes cleanup much easier.
Good lighting. Natural light is ideal. A spot near a window is perfect. However, if natural light is limited, a good lamp positioned over the craft table makes a big difference. Good lighting makes crafting more enjoyable and also helps kids see their work clearly.
Enough room for a small table and some storage. You do not need much square footage. Even a four by four foot area is enough for a functional craft corner if it is well organized.
Walk around your home right now and identify two or three spots that could work. Then pick the one that best meets these criteria.
Step Two: Choose Your Furniture
Once you have your space, the next step is choosing the right furniture.
The two essential pieces are a work surface and some storage. Everything else is optional.
The Work Surface
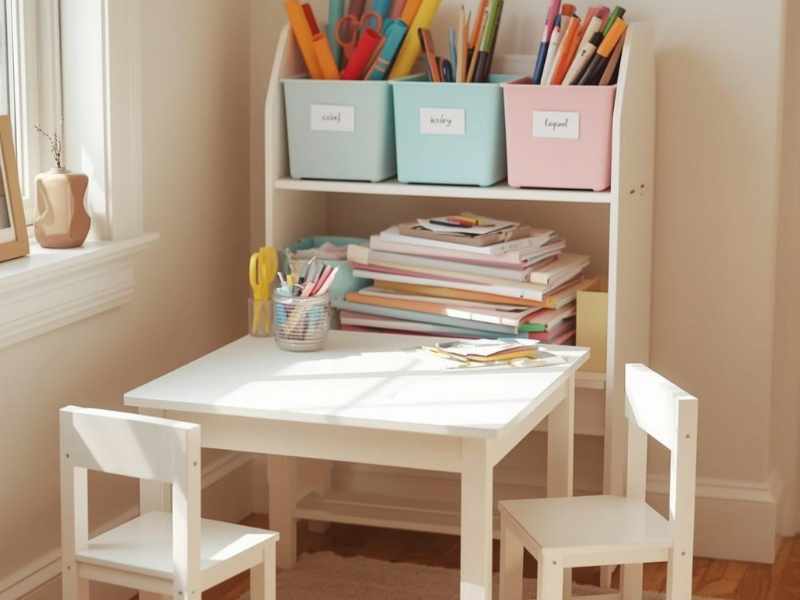
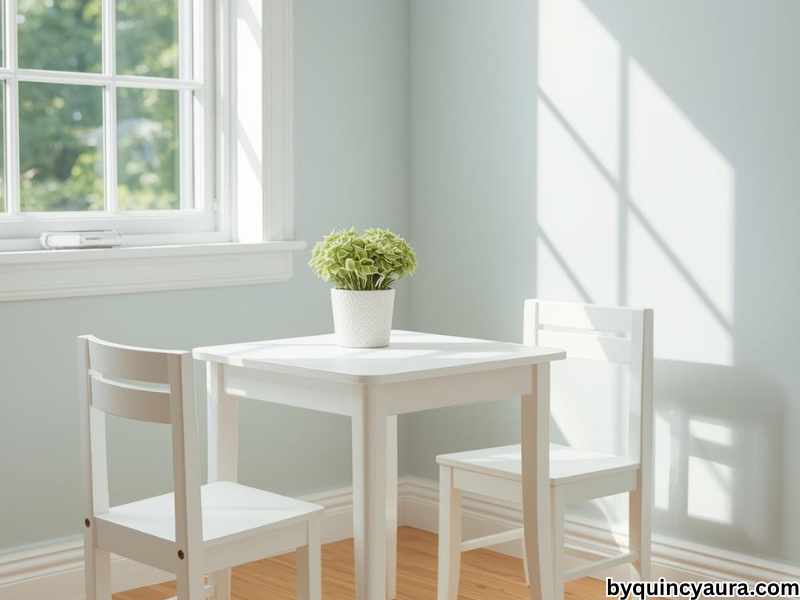
For toddlers and preschoolers, a small child-sized table and chairs is ideal. These are available very affordably at IKEA, Walmart, and Amazon. A child-sized table puts little ones at the perfect height for crafting and additionally gives them a sense of ownership over their space.
For older kids, on the other hand, a regular table or desk works perfectly well. The kitchen table is also a completely valid option if a separate table is not possible in your space.
Whatever surface you choose, protect it. A plastic tablecloth cut to size and taped down, a vinyl table cover, or a large silicone mat all work well. This protection means you never have to worry about paint or glue damaging the surface underneath.
The Storage
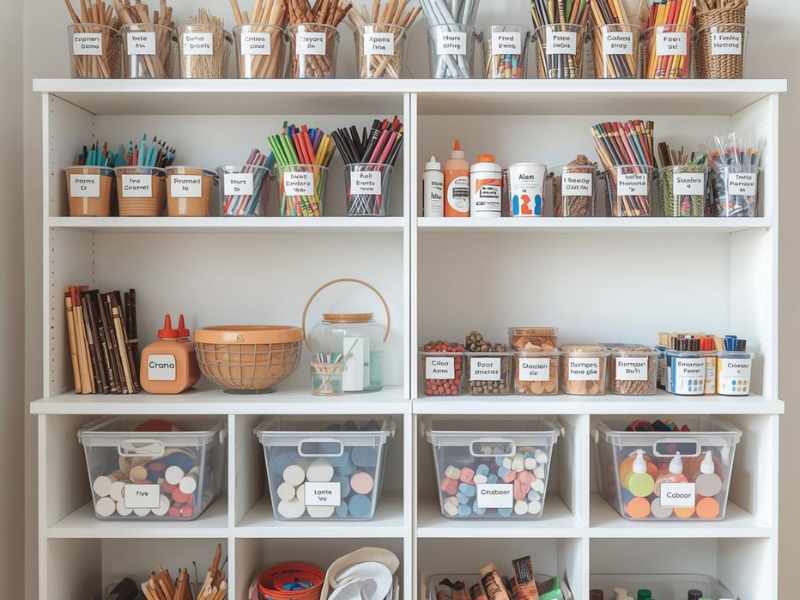
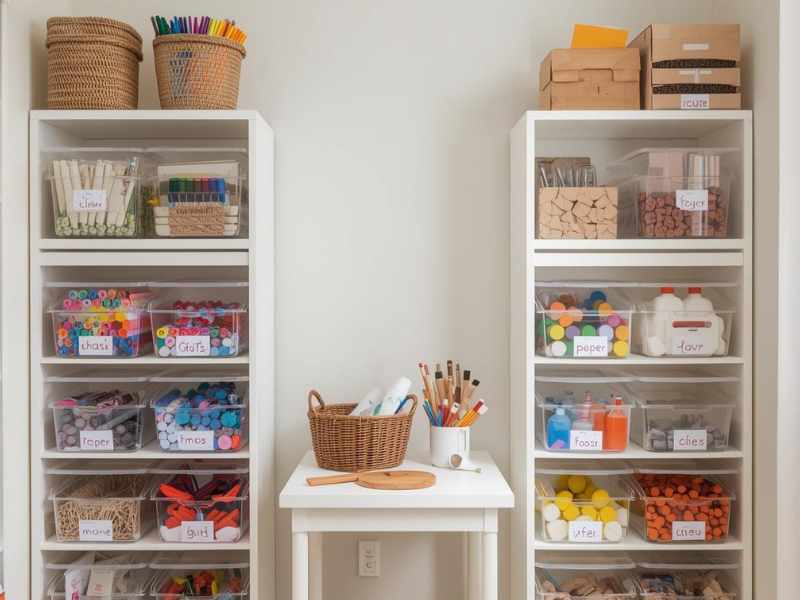
Storage is honestly the most important element of a functional craft corner. Without good storage, supplies become disorganized quickly and the corner stops working within a week.
The good news is that good craft storage does not have to be expensive. Here are the most effective options at every budget level.
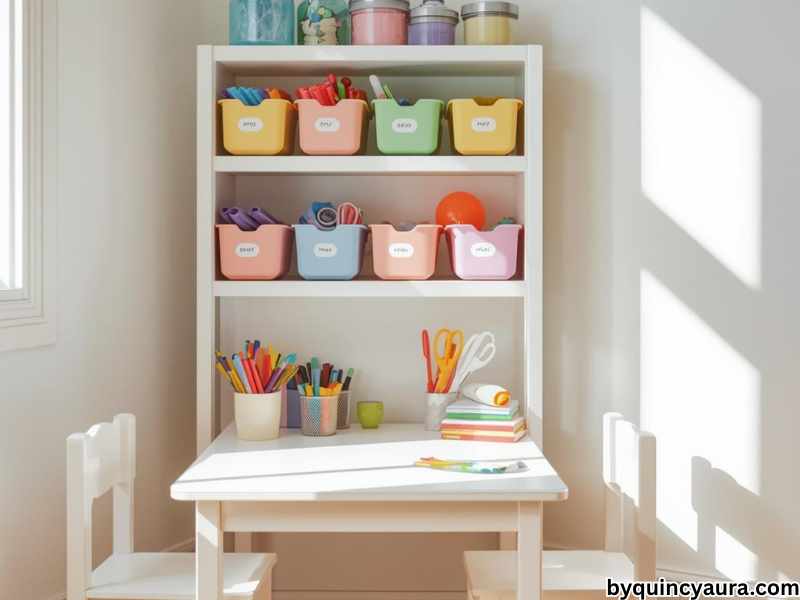
Budget friendly option: A set of small plastic bins or baskets from Dollar Tree arranged on a low shelf or in a small bookcase. Label each bin clearly, one for paper, one for markers and crayons, one for glue and tape, one for scissors, one for extras. This simple system works extremely well and costs very little.
Mid range option: A rolling cart with drawers, the kind made popular by craft enthusiasts everywhere. These are available at IKEA, Target, and Michaels craft store. They roll out when needed and tuck away when not in use. Each drawer can hold a different category of supplies. They are practical, portable, and surprisingly stylish.
Higher end option: A dedicated craft storage unit with shelves, drawers, and compartments designed specifically for art supplies. These are available at craft stores and online. They look beautiful and keep everything extremely organized, but they are certainly not necessary to get started.
Whatever storage solution you choose, the most important principle is this make everything visible and accessible. Supplies that are hidden behind closed doors get forgotten and unused. Open bins, clear containers, and low shelves that kids can reach independently are always more effective than closed cupboards.
Step Three: Stock Your Craft Corner
Now for the fun part…filling your craft corner with supplies.
The key here is to start with the basics and build up gradually over time. A craft corner does not need to be fully stocked on day one. In fact, starting with a smaller, well-chosen selection of supplies is often better than overwhelming the space with too much at once.
Here is what I recommend having from the very beginning:
The Must-Have Basics
Paper: A stack of white printer paper, a pack of construction paper in assorted colors, and a few sheets of cardstock. These three, in fact, cover the vast majority of craft projects.
Drawing tools: A set of washable markers, a box of crayons, and a few colored pencils. For younger kids especially, washable is non-negotiable. It saves so much stress.
Adhesives: A glue stick for younger kids and a bottle of white school glue for older ones. In addition, add a roll of clear tape and a dispenser.
Scissors: Child-safe scissors with rounded tips for little ones. A slightly sharper pair, however, works better for older kids who need more precision.
Paint: A set of washable tempera paints in basic colors. Red, blue, yellow, green, orange, purple, black, and white will cover almost every color mixing need.
Paintbrushes: A small pack with a few different sizes. Nothing expensive is needed here.
That is genuinely all you need to start. Everything else is a bonus that can be added over time as your child’s interests develop.
What to Add Once the Basics Are Covered
Once the basics are in place, it is time to think about extras. These additions do not all need to happen at once. Instead, build them up gradually over several weeks and months.
Popsicle sticks and craft sticks open up a huge range of building and construction projects. Similarly, pipe cleaners in assorted colors are endlessly versatile and work well across many age groups. Foam sheets, googly eyes, and pom poms also add fun and texture to almost any project.
Washi tape is one of the most underrated craft supplies for kids, it is colorful, easy to tear, repositionable, and produces beautiful results with zero mess. Stickers in various themes, meanwhile, add excitement for younger kids.
Air dry clay deserves a dedicated spot in any well-stocked craft corner. It is, in fact, one of the most open-ended and satisfying materials for kids of all ages. Store it in an airtight container to keep it fresh.
Ribbon, twine, and string open up weaving, threading, and tying projects. A hole punch, furthermore, makes it easy to add hanging holes to paper projects. A ruler, pencils, and an eraser round out the essential supplies for older kids who like more precise work.
Over a few months, your craft corner will naturally grow into a wonderfully stocked creative space without you ever having to spend a large amount at once.
Step Four: Organize Everything Clearly
Having supplies is only half the battle. Organizing them clearly is what makes the craft corner actually function well on a daily basis.
Here is the system I always recommend to parents because it is simple, intuitive, and easy for kids of all ages to follow.
Group by category
Keep all drawing tools together. Keep all paper together. Keep all adhesives together. Keep all paint supplies together. When everything in the same category lives in the same place, kids can find what they need quickly and put things back easily.
Label everything
Use simple word labels for older kids and picture labels for younger ones who cannot read yet. A picture of scissors on the scissors bin. A picture of crayons on the crayon bin. These visual cues help even very young children put things back in the right place independently.
Use clear containers where possible
When kids can see what is inside a container without opening it, they are much more likely to grab what they need and put it back correctly. Clear plastic bins, mason jars for markers and brushes, and transparent stackable drawers all work beautifully for this reason.
Keep the most used supplies most accessible
Paper, markers, crayons, and scissors are the things kids reach for most often. Therefore, these should be at the front of the storage, at the easiest height to reach, and in the most accessible containers. Less frequently used supplies like special paints or clay can be stored slightly further back or higher up.
Have a dedicated spot for works in progress
One of the most common craft corner problems is unfinished projects taking over the work surface. Solve this with a simple tray or flat basket labeled “in progress” where ongoing projects can be stored safely without taking up the whole table.
Step Five: Set Up Simple Rules
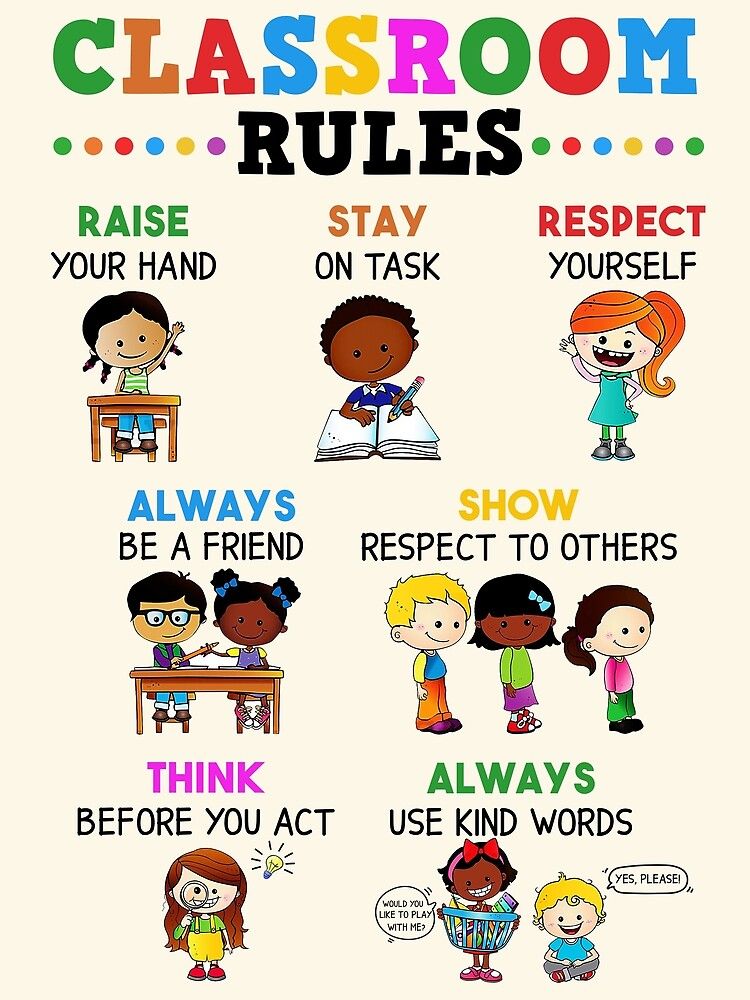
A craft corner works best when everyone understands a few basic ground rules. And the earlier you establish these rules, the easier everything becomes.
Here are the rules I always recommend for home craft corners:
Clean up before you leave. Before a child walks away from the craft corner, supplies go back where they belong. This is non-negotiable and the single most important rule for keeping the corner functional over time. Make it a consistent expectation from day one and it becomes habit very quickly.
Ask before using special supplies. Some supplies like the good acrylic paints, the air dry clay, or the glitter are special materials that require a little more supervision or care. Teach your children to ask before using these so you can be present when needed.
Keep food and drinks away from the craft corner. Water cups get knocked over onto paper. Snacks leave greasy fingerprints on artwork. Keeping eating separate from crafting protects both the supplies and the finished work.
Respect each other’s work. If multiple children share the craft corner, this rule is essential. No touching, moving, or talking negatively about a sibling’s work. The craft corner is a safe creative space for everyone.
Post these rules on a small card near the craft corner. For younger kids, use simple pictures instead of words. Review them together when you first introduce the space and revisit them if problems arise.
Step Six: Introduce the Craft Corner Properly
Once everything is set up, do not just point your kids in the direction of the new corner and walk away.
Instead, introduce it as a special occasion.
Sit down with your children at the new craft corner together. Show them where everything lives. Open each bin and explain what is inside. Let them touch and explore the supplies. Do a simple first project together right there at the new table so the space immediately becomes associated with fun and connection.
This introduction sets the tone for how the craft corner will be used going forward. It signals that this space is special, that the supplies are cared for, and that creating here is something to look forward to.
For younger children especially, this first shared experience at the craft corner creates an emotional anchor. They will associate that little corner with the warmth and fun of that first afternoon you spent there together.
Step Seven: Keep It Fresh and Inspiring
Even the best-stocked craft corner can start to feel stale after a few months if nothing ever changes.
The solution is simple, rotate supplies regularly.
Every few weeks, put some supplies away and bring out something different. Swap the markers for paint. Replace the construction paper with tissue paper. Introduce a new material like foam sheets or air dry clay. Add a seasonal element orange and black supplies in October, red and green in December, pastels in spring.
This rotation keeps the craft corner feeling fresh and exciting. It also prevents the overwhelm that comes from having too many options available at once. A craft corner with twelve carefully chosen supplies often produces more creative work than one with fifty options crammed in together.
Additionally, consider adding inspiration to the space. A small corkboard above the craft table where you pin example projects, seasonal crafts, or your child’s own finished work is a wonderful addition. It gives kids visual ideas to spark their imagination and makes the space feel curated and special.
How to Handle the Mess
Let’s be honest. A craft corner means mess. That is part of the deal.
However, with the right setup, the mess is very manageable.
A washable table cover means spills wipe up in seconds. A small trash bin right at the craft corner means scraps go straight in the bin rather than on the floor. A damp cloth kept nearby handles sticky fingers quickly. A mat under the table catches dropped supplies and makes sweeping up easy.
The cleanup rule supplies go back before you leave handles the majority of ongoing tidiness. When this rule is followed consistently, the craft corner resets itself naturally after each use.
That said, accept that some mess is inevitable and okay. A perfectly tidy craft corner is probably not being used much. A well-loved, slightly messy one is doing exactly what it should.
Craft Corner Ideas for Small Spaces
Not everyone has a spare room or large open area for a craft corner. However, a small space is absolutely no barrier to creating a wonderful creative setup.
A corner of the living room with a small table, a rolling cart of supplies, and a pegboard on the wall for hanging tools is completely functional in a very small footprint.
A section of a child’s bedroom with a low bookshelf of supplies and a mat on the floor works beautifully for older kids who like to craft independently.
A kitchen cabinet dedicated entirely to craft supplies with a plastic tablecloth ready to throw over the kitchen table when crafting time begins is a perfectly valid alternative to a permanent dedicated corner.
The principle is always the same regardless of space. Everything in one place. Everything organized and accessible. A clear surface to work on. Good lighting. Simple rules.
Space is not the limiting factor. Intention and organization are what make a craft corner work.
Your Action Step for This Weekend
Here is what I want you to do.
This weekend, walk around your home and identify the spot where your craft corner will live. It does not need to be perfect. It just needs to exist.
Then gather whatever supplies you already have crayons, paper, glue, scissors and put them in one place. Get a few small bins or baskets from Dollar Tree to organize them. Label everything. Set up a simple work surface.
That is it. That is your first craft corner.
It will grow and improve over time. New supplies will be added. Better storage will be introduced. The space will evolve as your children’s interests develop.
But the most important thing is to start. Because a simple, imperfect craft corner that exists is infinitely more valuable than a perfect one you are still planning.
Your kids are ready to create. Give them the space to do it.
Leave a Reply