If there is one craft supply I would recommend to every parent without hesitation, it is air dry clay.
No kidding.
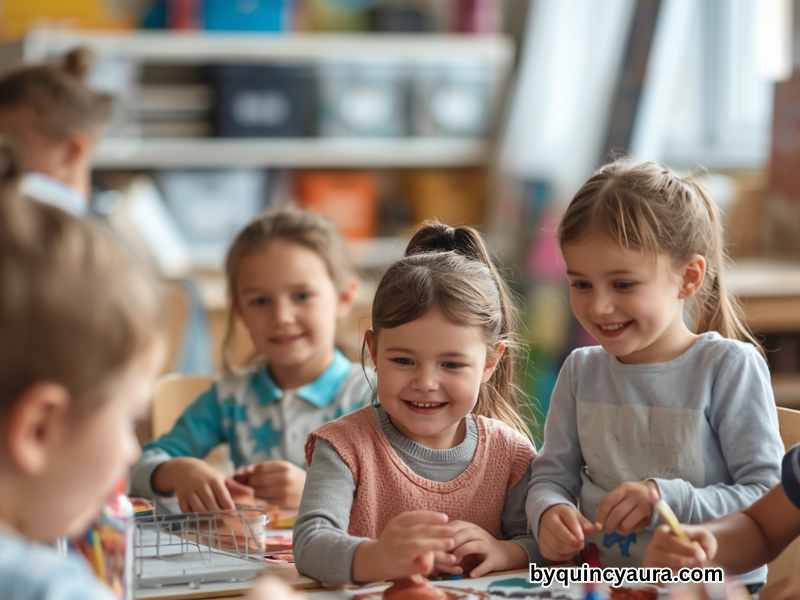
I have used it in my classroom more times than I can count. And every single time, something magical happens. Kids who are normally restless become completely focused. Kids who say they are not creative suddenly cannot stop making things. Even the ones who walk in saying “I don’t know what to do” are elbow deep in clay within five minutes.
There is just something about clay that speaks to every child.
The best part is that air dry clay requires no oven and no kiln. It dries completely on its own at room temperature, which means any parent can use it at home without any special equipment. You just open the pack, sit down with your kids, and start creating.
If you are completely new to working with clay, I have got you covered. Before you dive into this list, go check out my step by step guide A Step-by-Step Guide to Making Air Dry Clay Bowls With Your Kids where I walk you through everything from rolling out clay to painting and sealing your finished piece. It is the perfect starting point before you try any of the ideas below.
Now, for everyone who is ready to go, here are 20 fun air dry clay crafts your kids are going to absolutely love.
What You Need Before You Start
Before we get into the list, let me quickly cover the basics so you are fully prepared.
For most of the projects below, you will need the same core supplies. Having these on hand means you can jump into any project on this list without a last-minute supply run.
Air dry clay: White is the most versatile because it can be painted any color. Crayola Air Dry Clay and DAS Air Hardening Modeling Clay are both great options that are easy to find at Walmart, Target, or Amazon.
Acrylic paint: For decorating after the clay dries. Any basic craft store set works perfectly.
Paintbrushes: A few different sizes for painting details.
Mod Podge or clear acrylic sealer: For sealing finished pieces so the paint does not chip.
A rolling pin: For projects that require flat slabs of clay.
A butter knife or plastic clay tool: For cutting and detailing.
Toothpicks and skewers: For adding fine details and making holes before the clay dries.
Parchment paper or a silicone mat: Always work on a protected surface.
Now that you are stocked up, let’s get into the fun part.
The 20 Projects
1. Clay Bowls
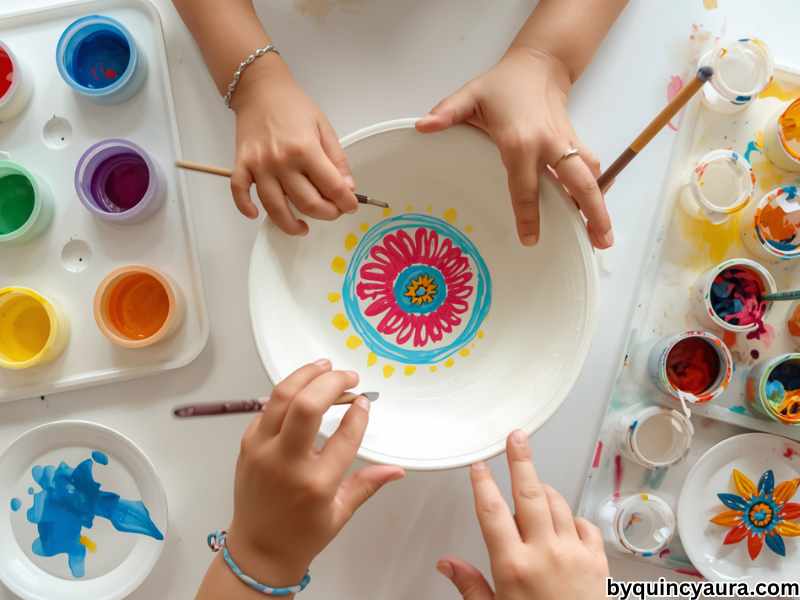
Let’s start with a classic.
Clay bowls are one of the most satisfying projects for kids of all ages. They are also genuinely useful, which makes them extra special. Your child can use their finished bowl to hold jewelry, coins, hair clips, or small treasures.
To make one, roll out a flat slab of clay and drape it over an upside-down bowl covered in plastic wrap. Let it dry completely, then paint and seal it. The result looks like something from a boutique shop and your child made it with their own hands.
For a full step by step tutorial on this project, head over to A Step-by-Step Guide to Making Air Dry Clay Bowls With Your Kids.
2. Handprint Keepsake Plaques
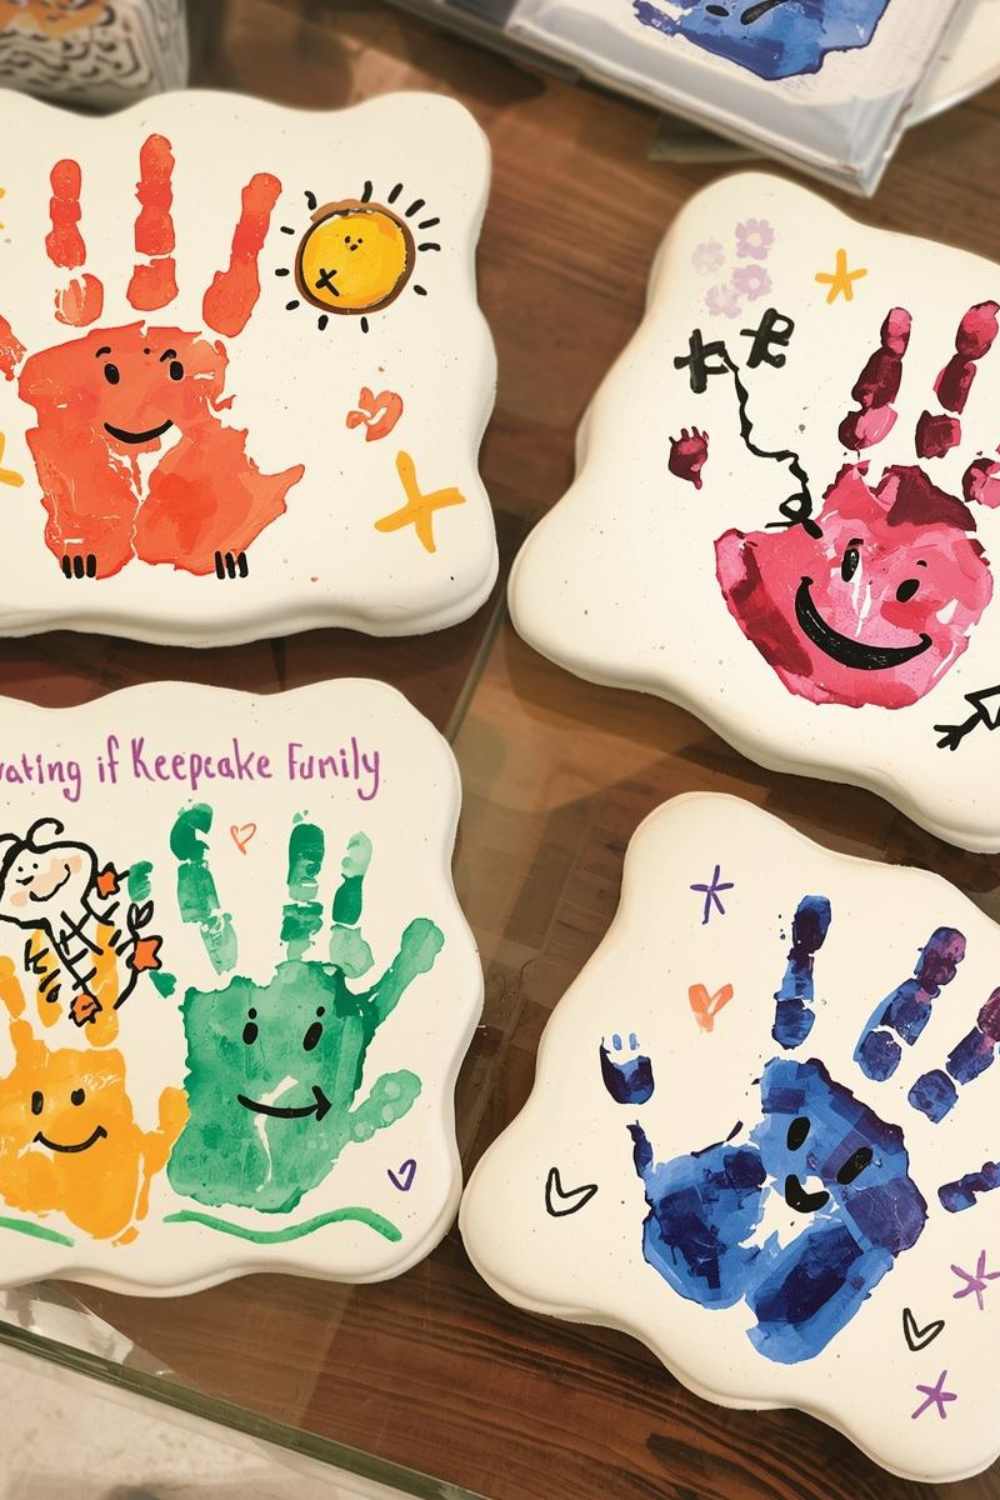
This one is especially perfect for parents of young children because it captures something that disappears too fast, the size of your child’s hand.
Roll out a flat slab of clay about half an inch thick. Press your child’s hand firmly into the surface to create a clear impression. Use a toothpick to write their name and the date underneath the print. Then cut around the impression in a circle or square shape.
Make a small hole at the top before it dries so you can hang it later. Once dry, paint it and seal it. This becomes one of those keepsakes families treasure for decades.
3. Animal Figurines
Kids absolutely love making animals out of clay, and the process teaches them basic sculpting skills without feeling like a lesson.
Start with simple shapes. A round ball for the body, a smaller ball for the head, four small logs for legs. Press them together firmly and smooth the seams with a damp finger. From there, add ears, tails, and details with small pieces of clay.
Dogs, cats, elephants, and dinosaurs are always the most popular requests. However, encourage your kids to make up their own creatures too. Some of the most imaginative things I have ever seen came from kids who were told they could make any animal, real or imaginary.
4. Cactus Plant Pots
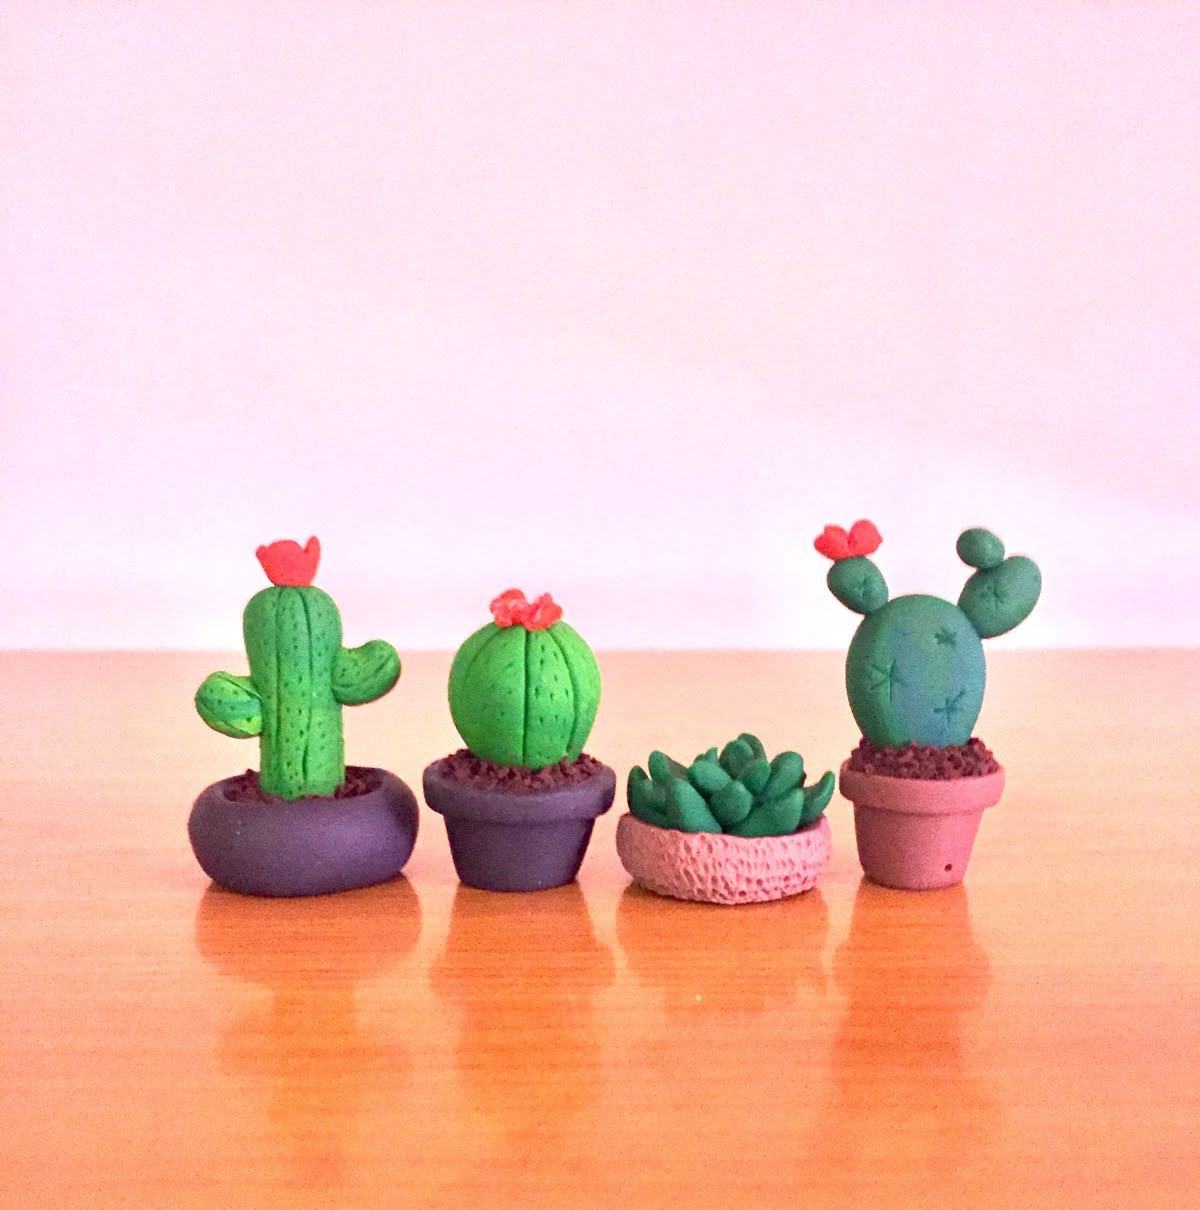
These are incredibly trendy right now and they look amazing on a windowsill or desk.
Roll a thick cylinder of clay for the cactus body. Use a toothpick or fork to press lines and dots all over the surface to create the texture of cactus skin. Add small arms by attaching smaller clay cylinders to the sides. Finally, press tiny thin clay spikes into the surface.
Once dry, paint it green with brown details and seal it. Display it on its own or tuck a small succulent into the top if you hollow it out slightly before drying.
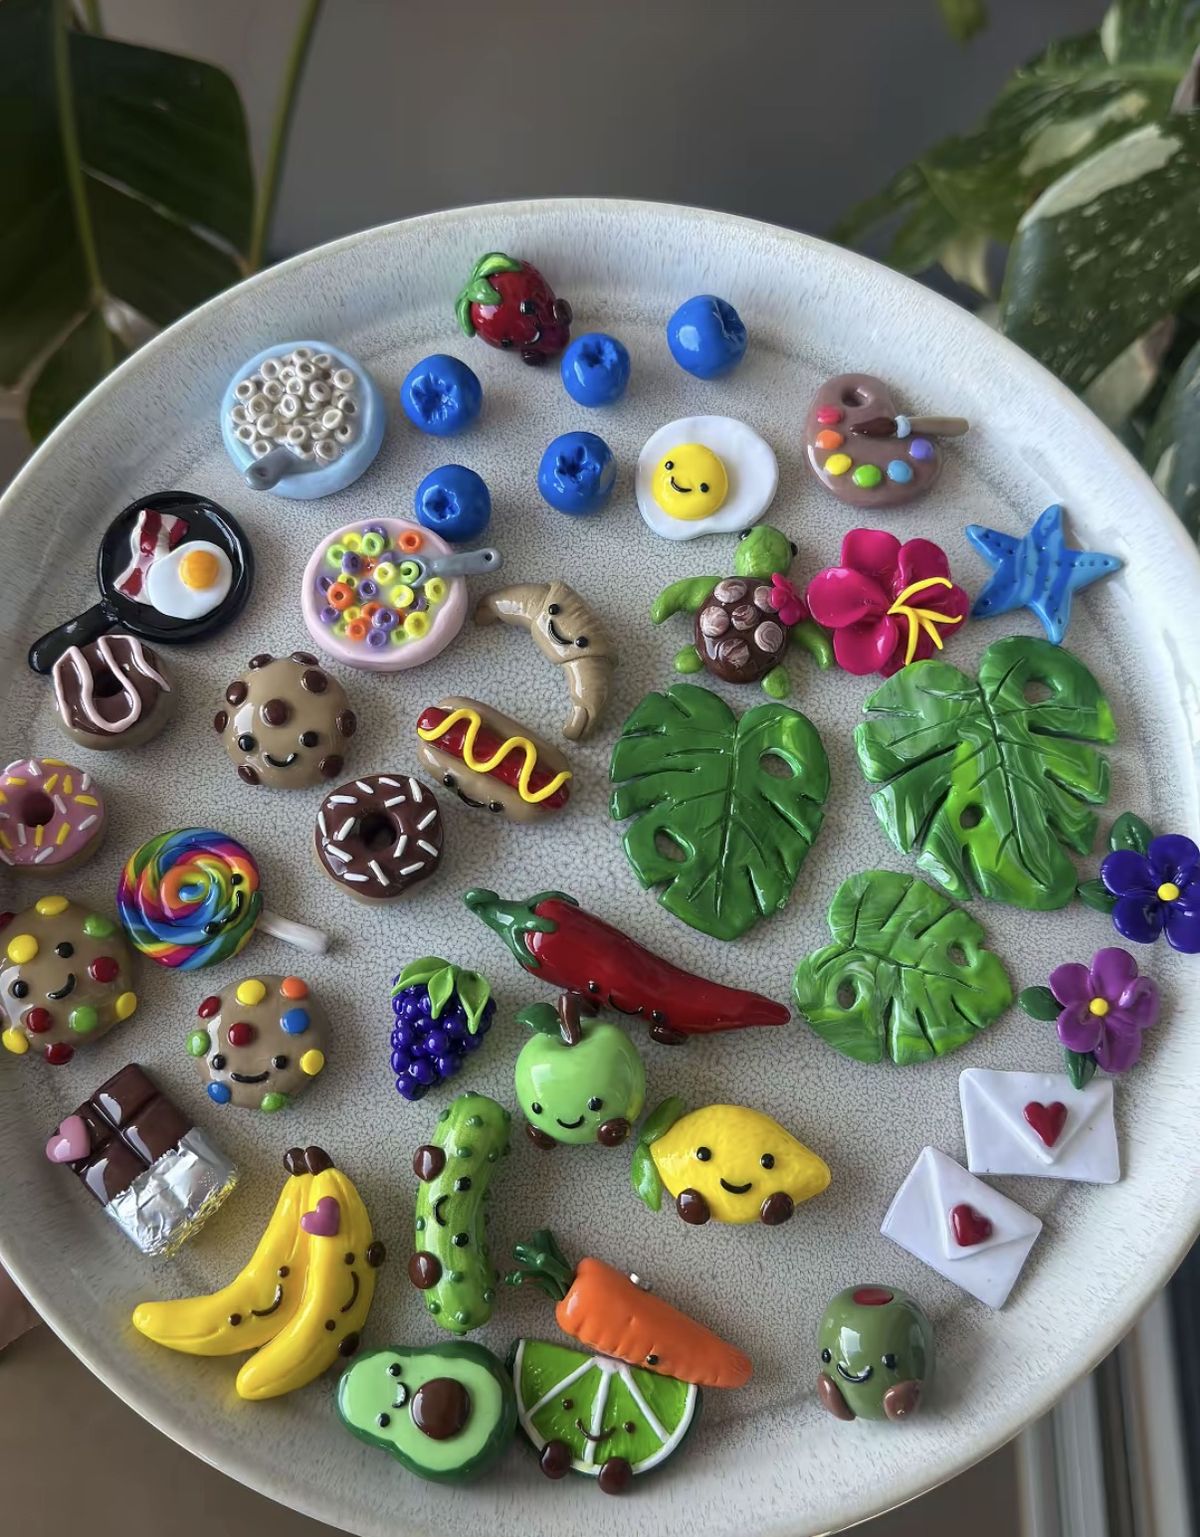
5. DIY Fridge Magnets
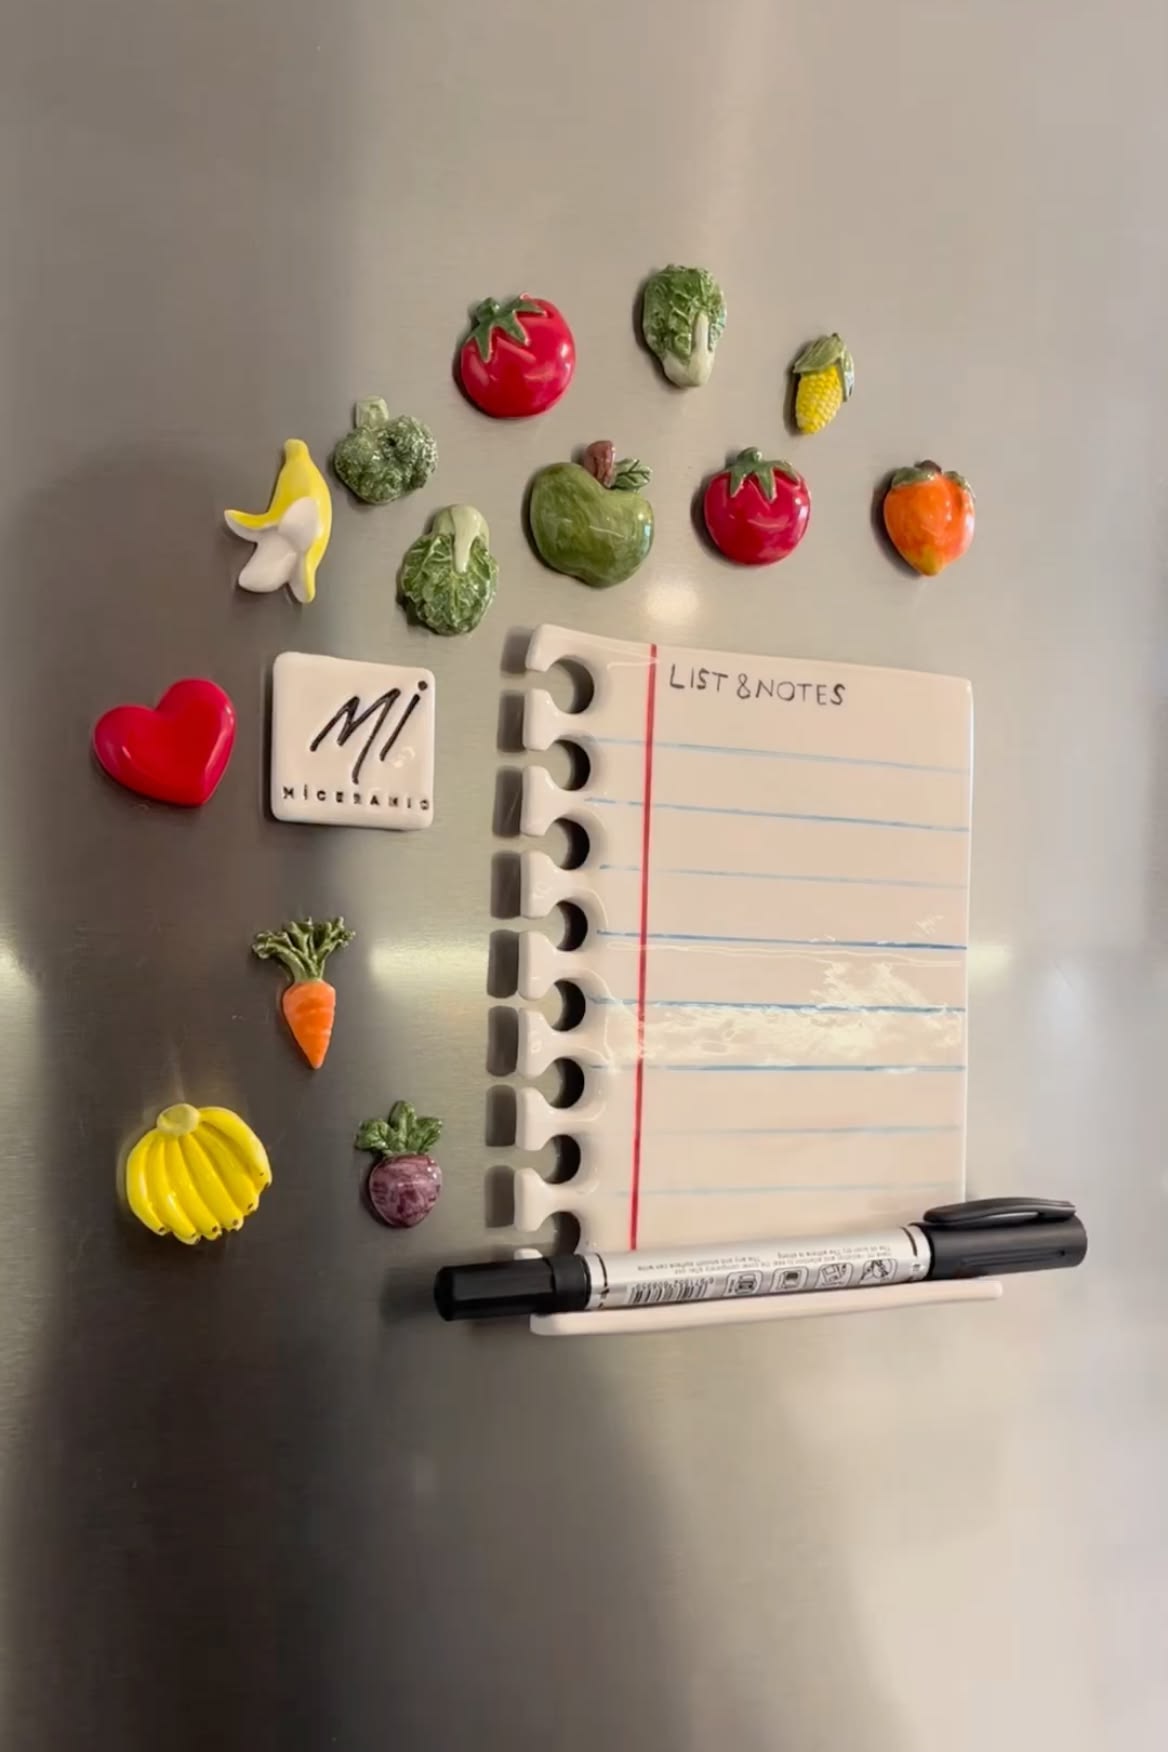
This project combines clay crafting with a functional finished product that kids see and enjoy every single day.
Roll out small flat pieces of clay and let your kids cut them into shapes using cookie cutters or freehand. Stars, hearts, rainbows, animals, and food shapes are all popular choices. Add details with a toothpick and make sure the back is completely flat for the magnet to stick properly.
Once dry, paint and seal the shapes. Then use strong adhesive to attach a small magnet to the back of each piece. Stick them on the fridge and watch your child beam every time they walk past.
6. Coil Pots
Coil pots are one of the oldest clay techniques in the world, and kids find them incredibly satisfying to make.
Roll long thin ropes of clay between your palms and the table. Then coil them on top of each other in a spiral, building up the walls of a small pot as you go. Press each coil gently to the one below it and smooth the inside with a damp finger to strengthen the joins.
The finished pot has a lovely textured, rustic look that is completely charming. Older kids in particular love this technique because it requires patience and focus and the results always reward that effort.
7. Sun Catchers and Wall Hangings
Roll out a flat slab of clay and use cookie cutters to cut out shapes like butterflies, suns, moons, stars, or flowers all work beautifully.
Before the clay dries, use a toothpick to make a small hole at the top of each shape for hanging. You can also press patterns into the surface using lace, stamps, or leaves for a beautiful textured effect.
Once dry, paint them in bright colors, seal them, and thread a piece of twine through the hole. Hang them in a window, from a curtain rod, or along a string for a stunning display.
8. Name Letters
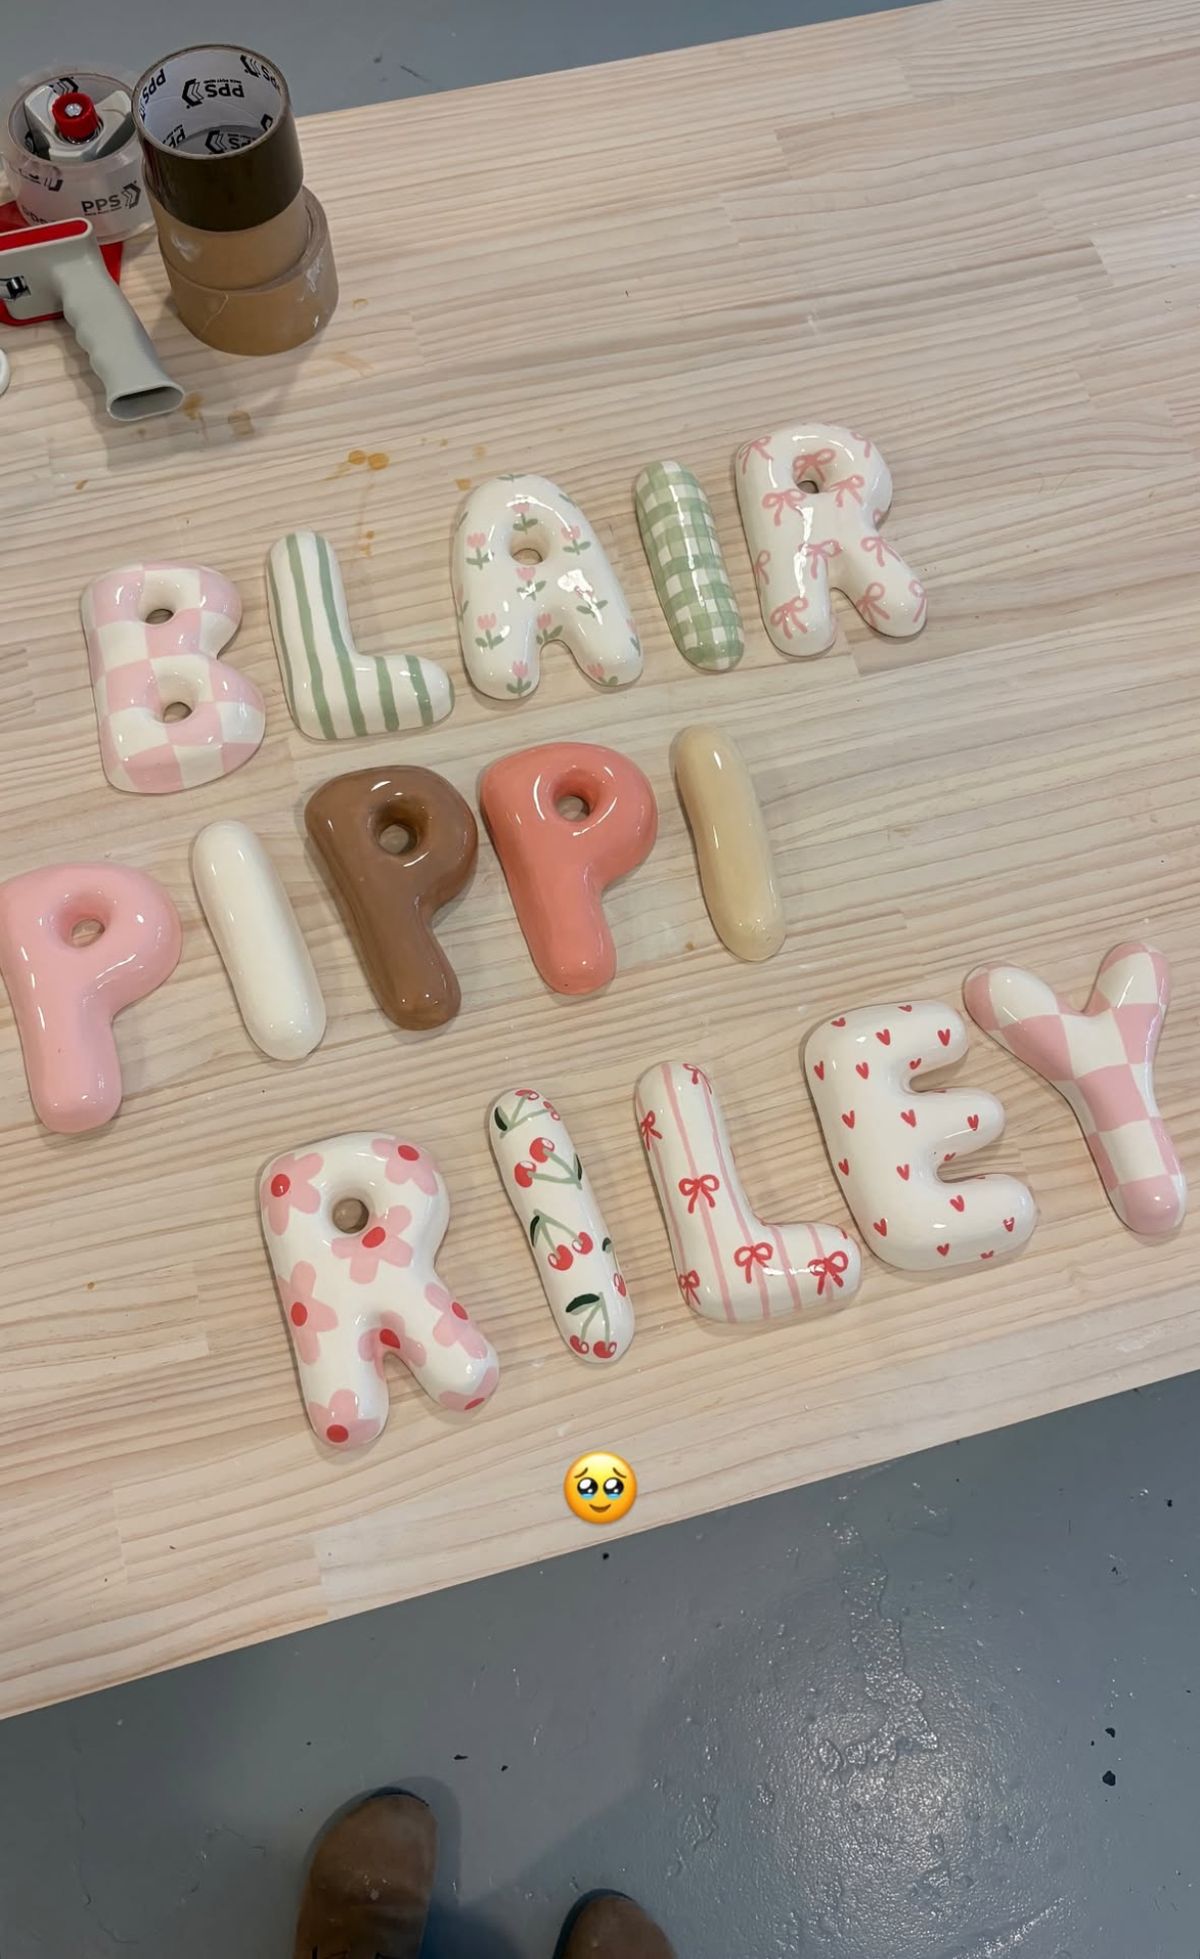
Spell out your child’s name in clay letters and display them on a shelf or hang them on their bedroom wall.
For each letter, roll a long rope of clay and bend it into the shape of the letter. Press the joins together firmly and smooth them with a damp finger. Flatten the back slightly so each letter sits flush against a surface.
Once dry, paint each letter a different color or stick to a single color palette for a coordinated look. Seal them and arrange them on a shelf. This makes a beautiful personalized bedroom decoration and a wonderful gift idea too.
9. Textured Tiles
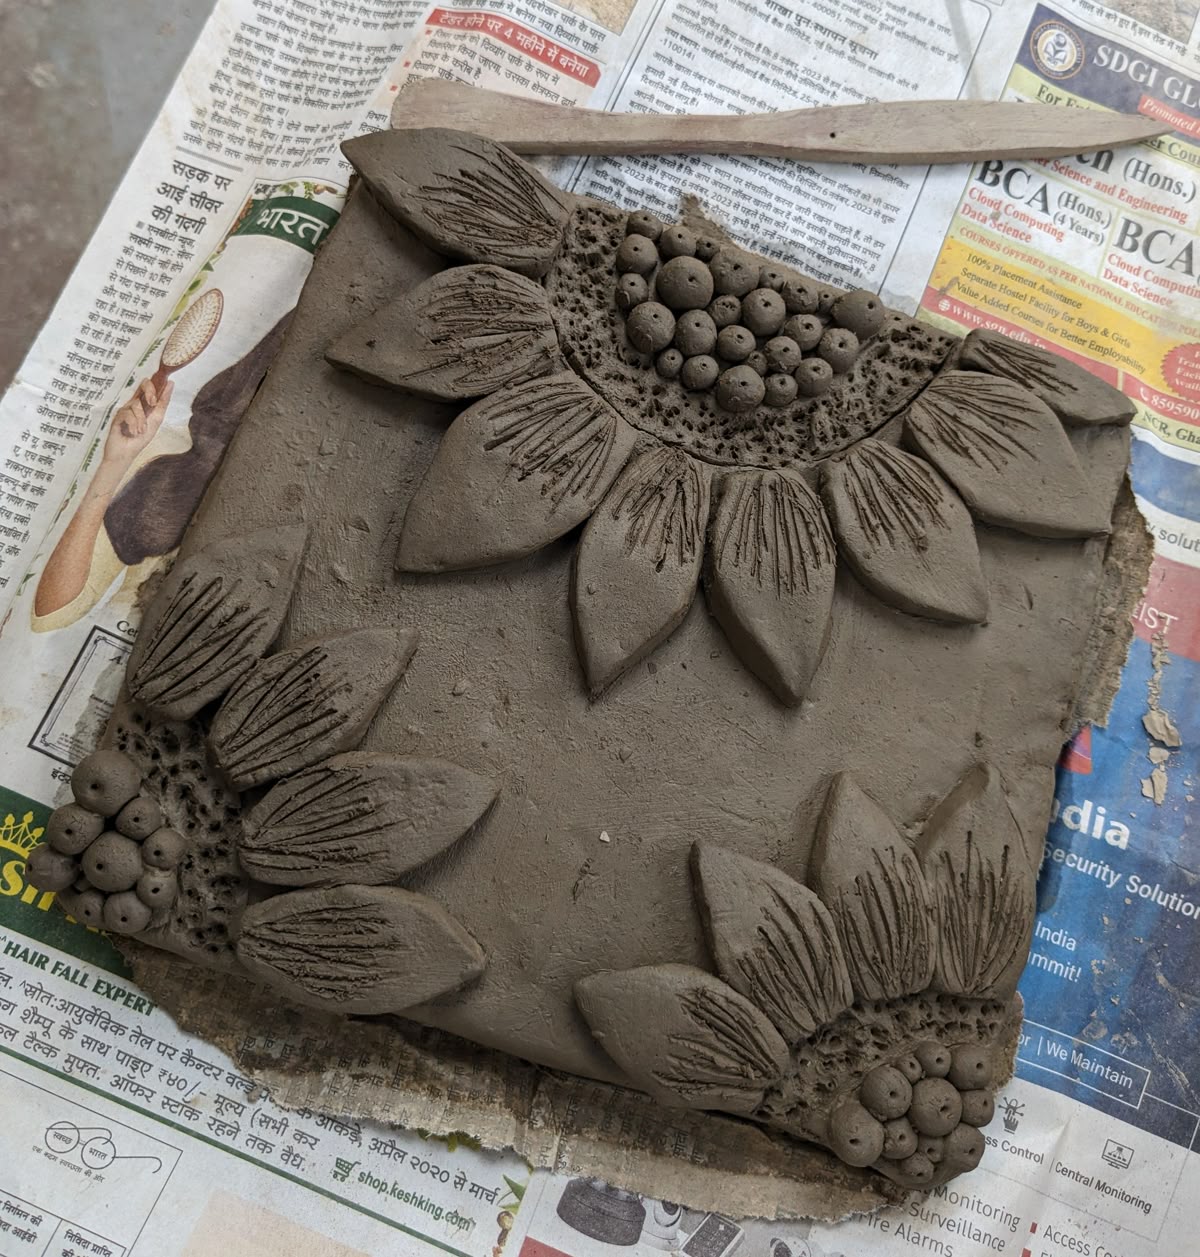
These are simple to make but look absolutely stunning displayed together on a wall.
Roll out flat squares of clay about a quarter inch thick. Then press different textured materials into the surface like lace, bubble wrap, leaves, corrugated cardboard, mesh fabric, or anything else with an interesting texture.
Once dry, paint them with one or two colors and use a dry brush technique to highlight the raised texture. Seal them and arrange several tiles together on a wall using adhesive strips. The effect is genuinely gallery worthy.
10. Pinch Pot Planters
Pinch pots are the very first clay technique most children learn, and for good reason. They are simple, quick, and produce functional results.
Take a ball of clay and press both thumbs into the center. Then pinch and rotate the clay slowly, working outward and upward to create the walls of a small pot. The walls do not need to be perfectly even in fact, the slight variations are what give pinch pots their handmade charm.
Once dry, paint and seal the outside. Add a small succulent or air plant and display it on a windowsill.
11. Dinosaur Fossils
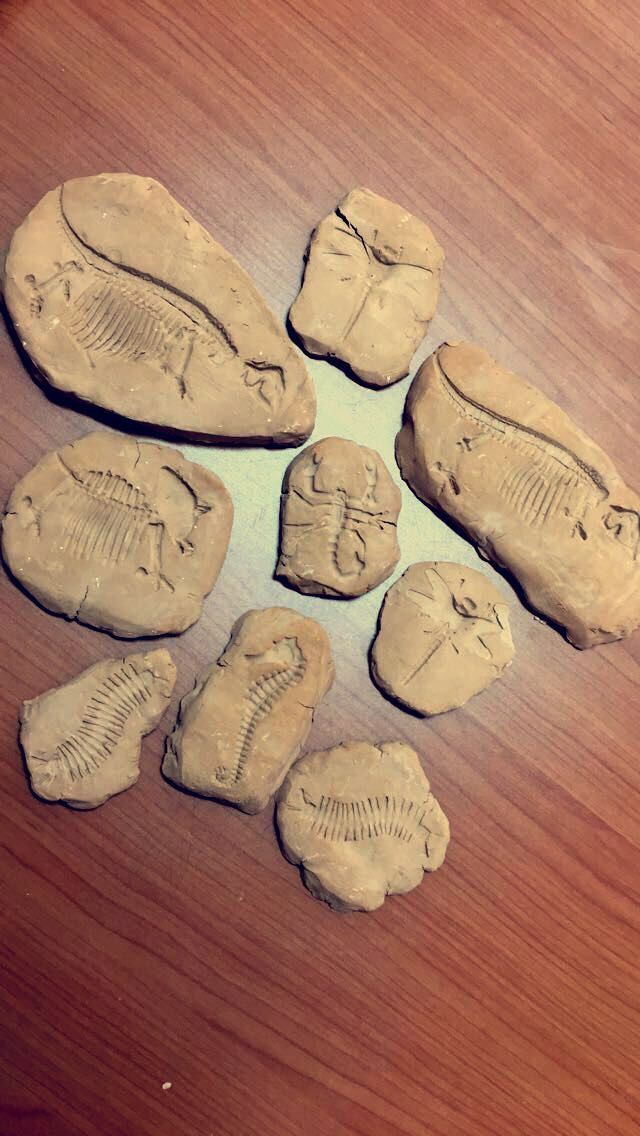
This project combines science and art in a way that older kids especially find fascinating.
Roll out a flat slab of clay. Then press plastic dinosaur toys firmly into the surface to create fossil impressions. Carefully remove the toys to reveal the detailed imprints left behind.
Once dry, paint the slab with earthy browns and tans. Dry brush a lighter color over the top to make the fossil impressions stand out. The finished piece looks remarkably like a real fossil and makes a fantastic bedroom decoration.
12. DIY Jewelry
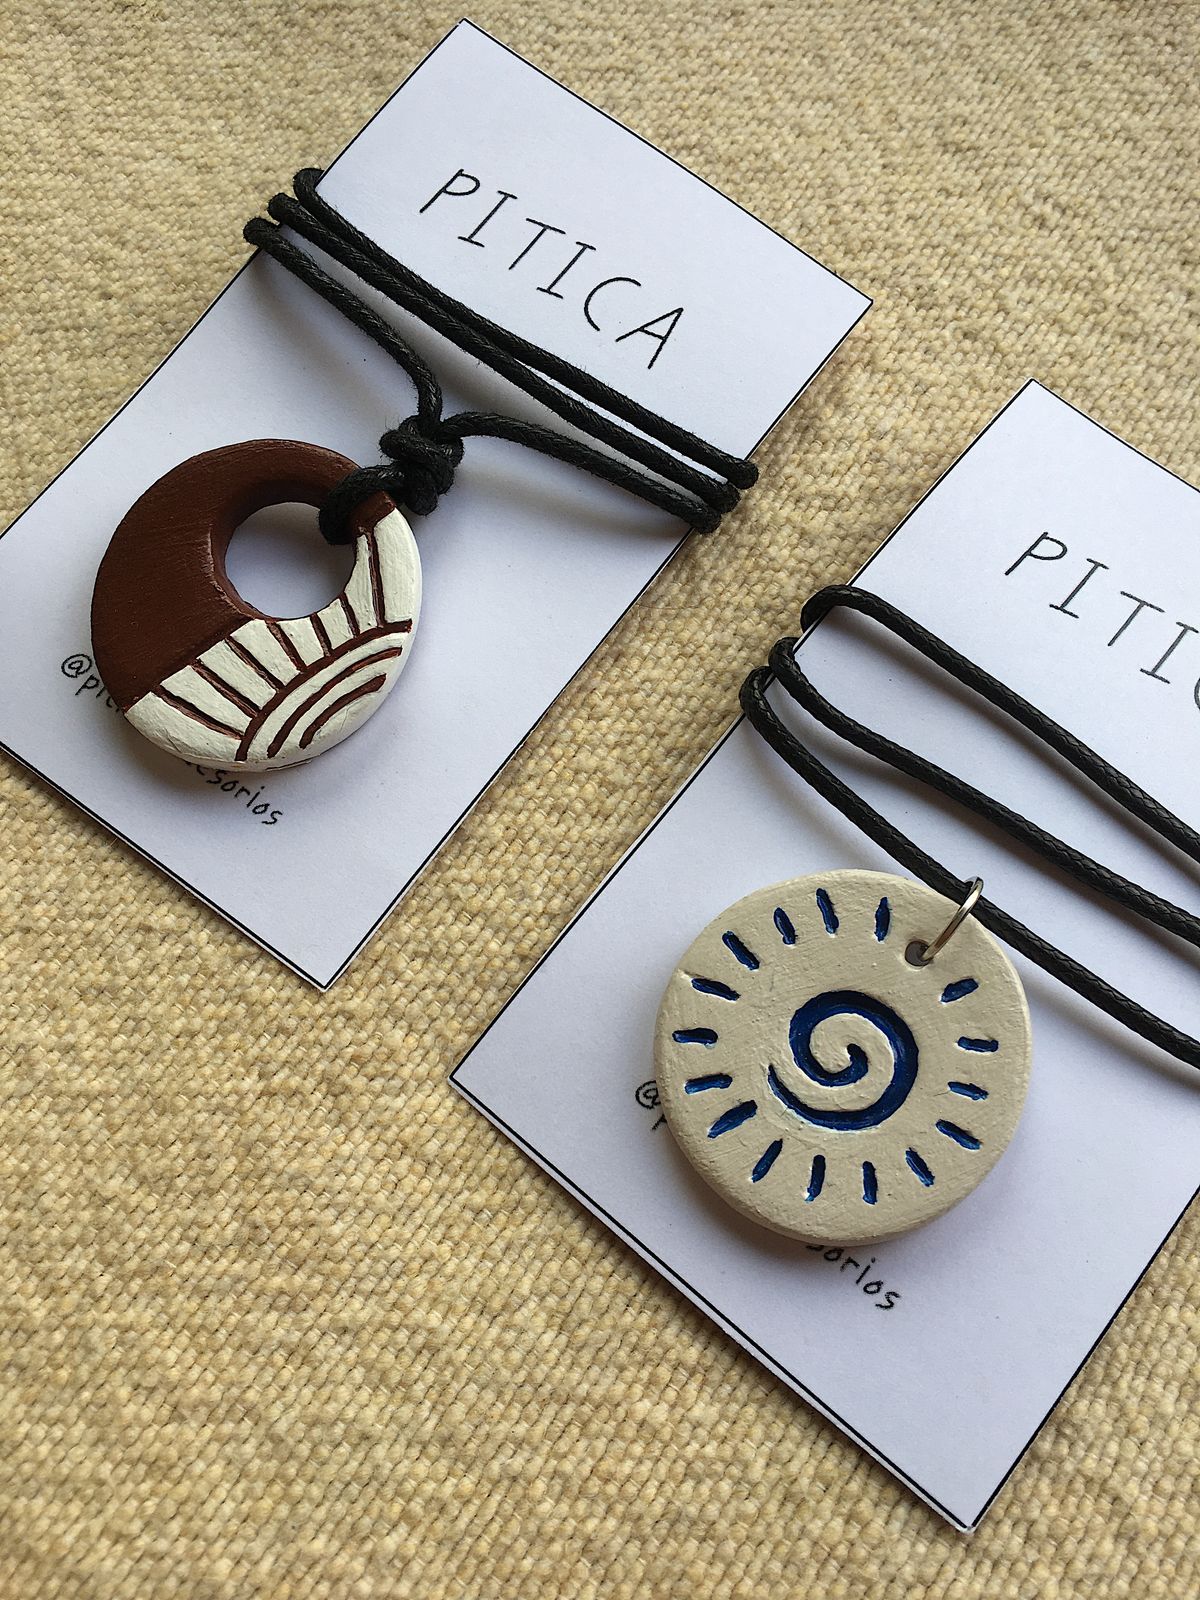
Kids love making things they can actually wear, and clay jewelry is both easy and impressive.
Roll small balls of clay for beads. Use a toothpick to pierce a hole through the center of each one before drying. Alternatively, roll flat discs and cut them into shapes for pendants.
Once dry, paint them with intricate patterns, geometric designs, or solid bright colors. Seal them with Mod Podge and thread them onto elastic cord or twine to make bracelets and necklaces. Older kids can make entire jewelry sets to wear or give as gifts.
13. Herb Garden Markers
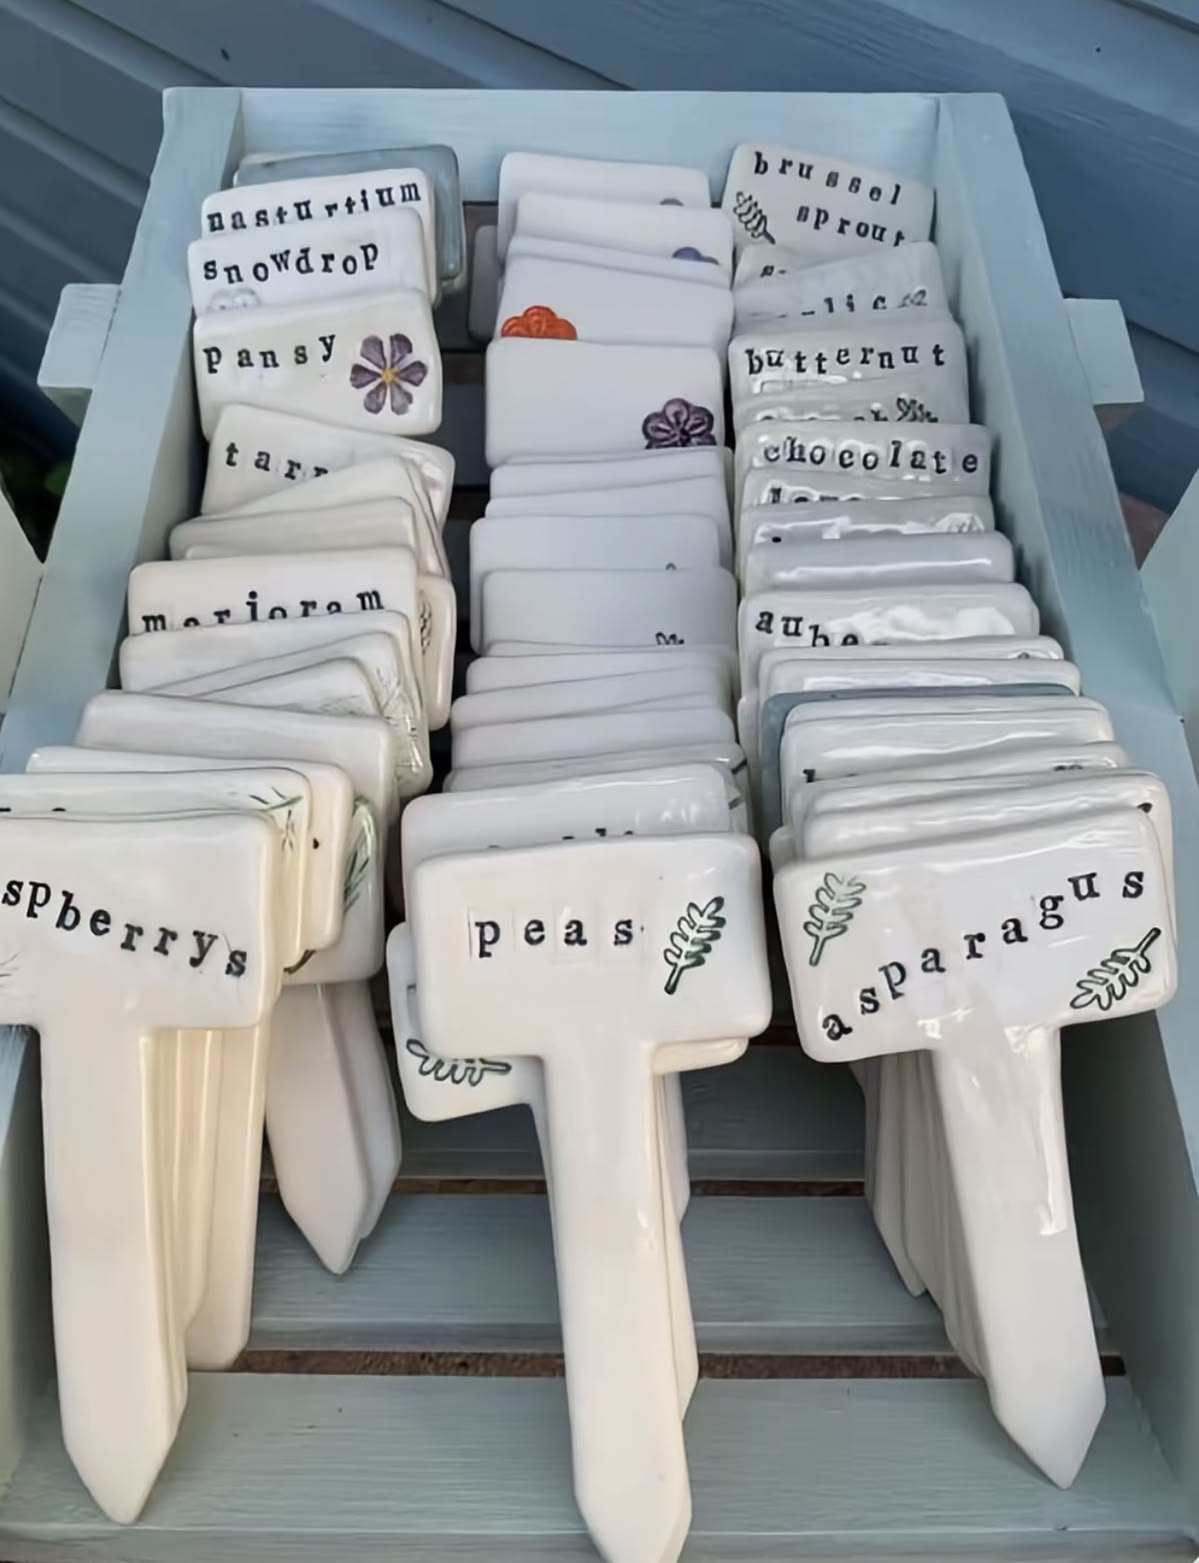
This is a wonderful project that combines crafting with gardening, two activities that are brilliant for kids.
Roll out small flat rectangles of clay. Use a toothpick or letter stamps to write the name of a herb on each one like basil, mint, rosemary, thyme. Press a wooden skewer into the bottom of each marker before drying so it can be pushed into soil.
Once dry, paint them in bright colors, seal them, and push them into your herb garden or window box planters. Every time your child waters the herbs, they will see the markers they made.
14. Treasure Boxes
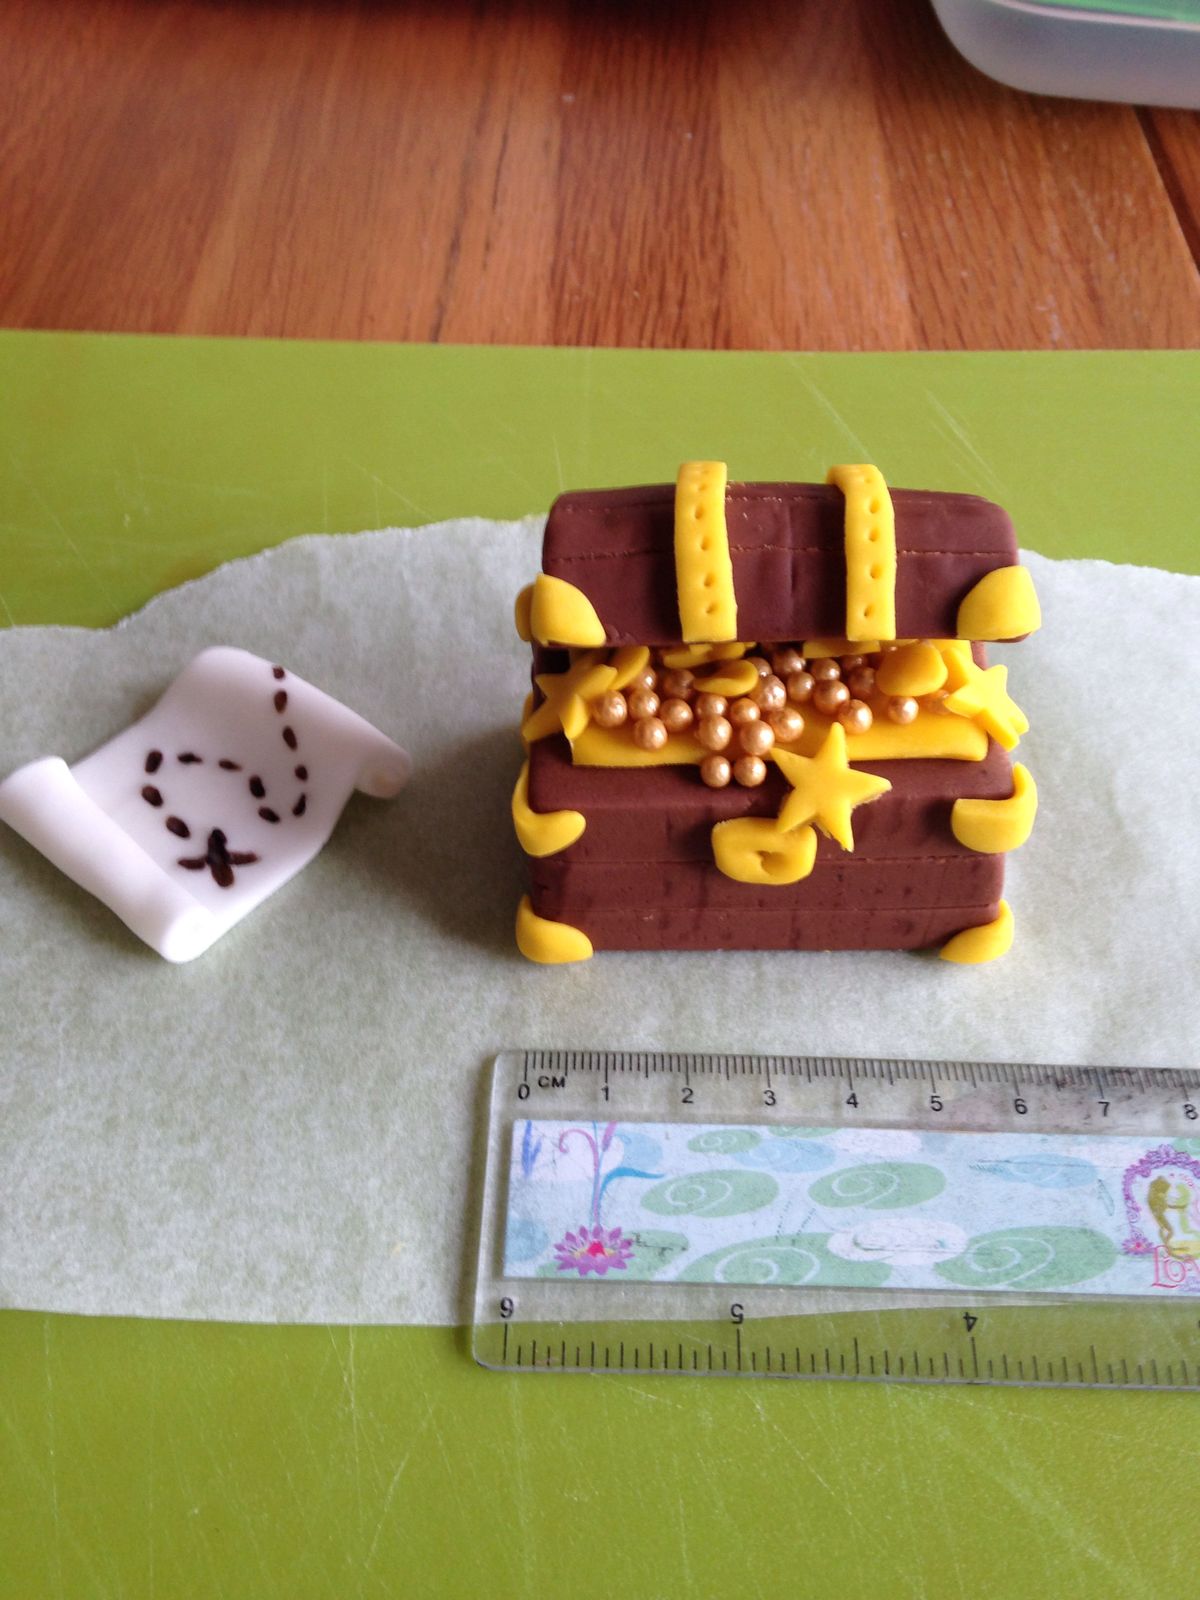
Every child loves having a secret place for their special things. A clay treasure box gives them exactly that.
Build a small rectangular box by rolling out flat slabs of clay and joining them together at the edges. Use a separate slab for the lid. Press a small clay ball onto the top of the lid as a handle.
Once dry, paint and seal the box inside and out. Fill it with small treasures, folded notes, or little keepsakes. This is also a beautiful gift idea, fill it with something special before giving it away.
15. Stamped Coasters

These make fantastic gifts and they are surprisingly easy to make.
Roll out a flat slab of clay and cut circles using a large round cookie cutter. Use stamps, lace, or carved foam to press patterns into the surface. Make sure the bottom is completely flat by gently pressing it against the table.
Once dry, paint and seal both sides. Add small adhesive felt pads to the bottom to protect surfaces. These handmade coasters look wonderful as a set and make incredibly thoughtful gifts for grandparents, teachers, or family friends.
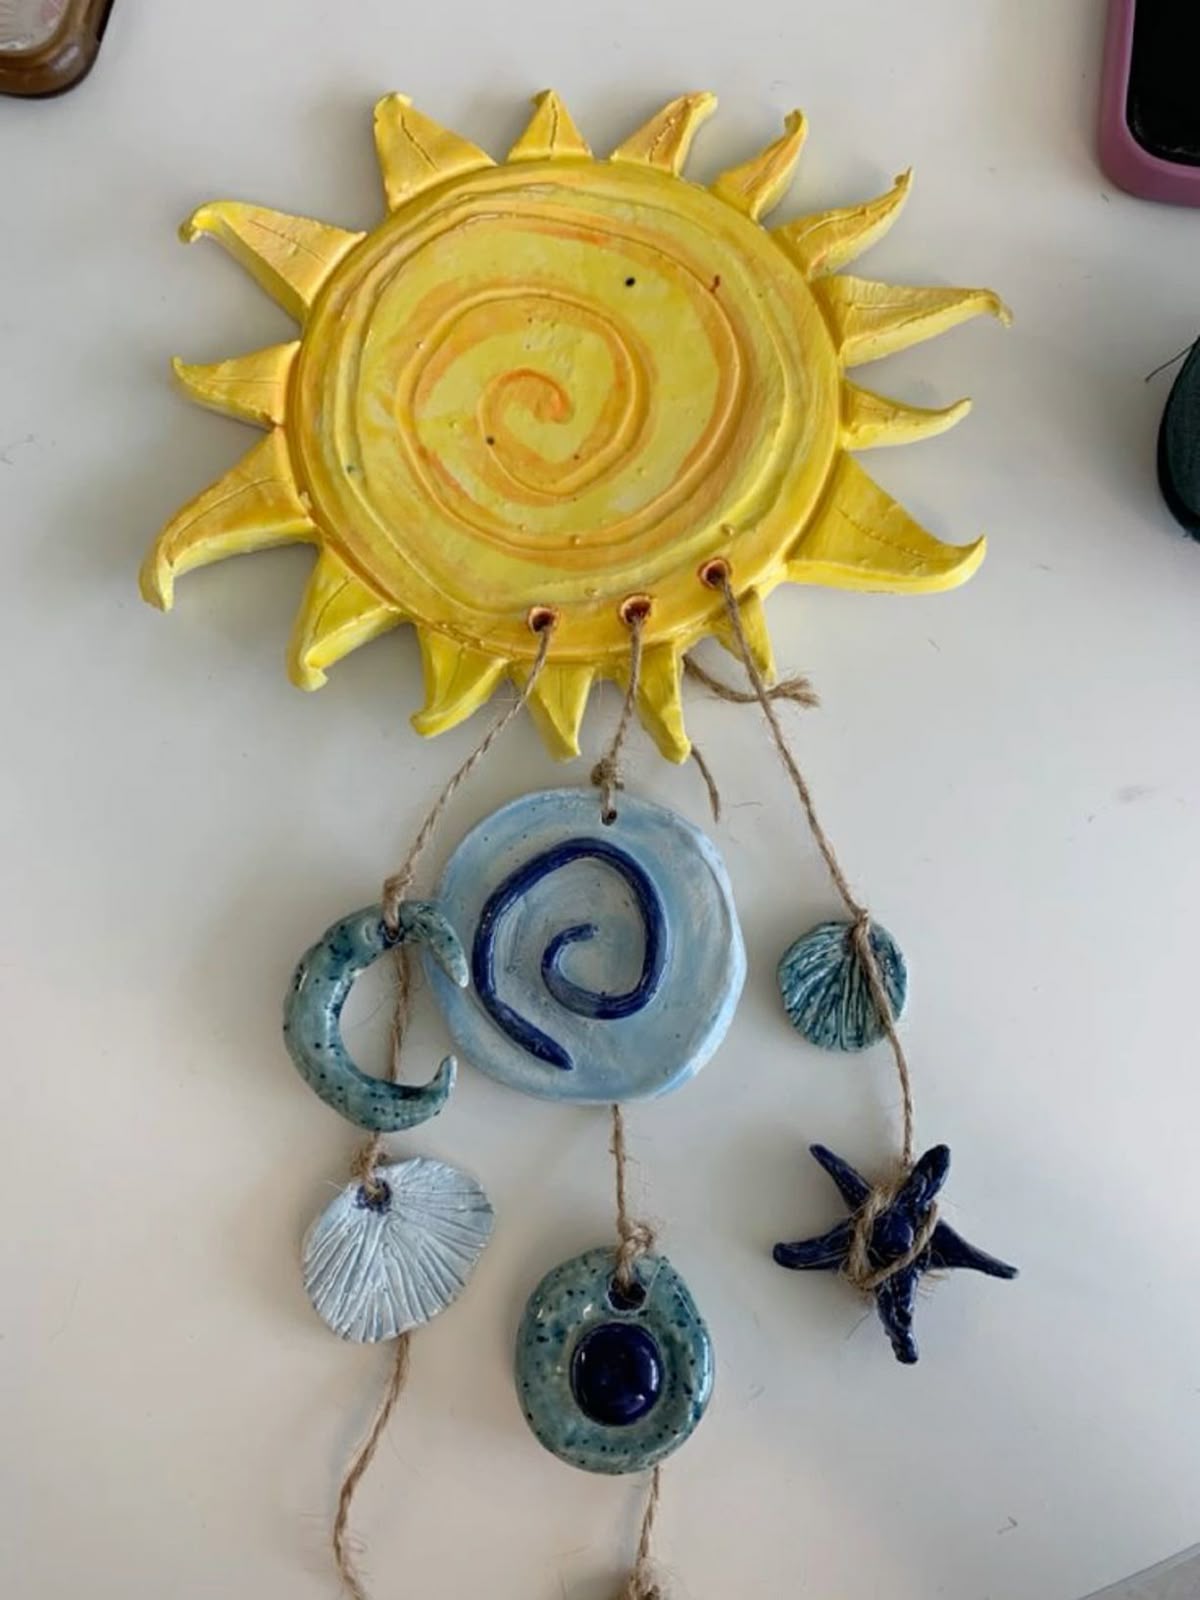
16. Hanging Moon and Stars Mobile
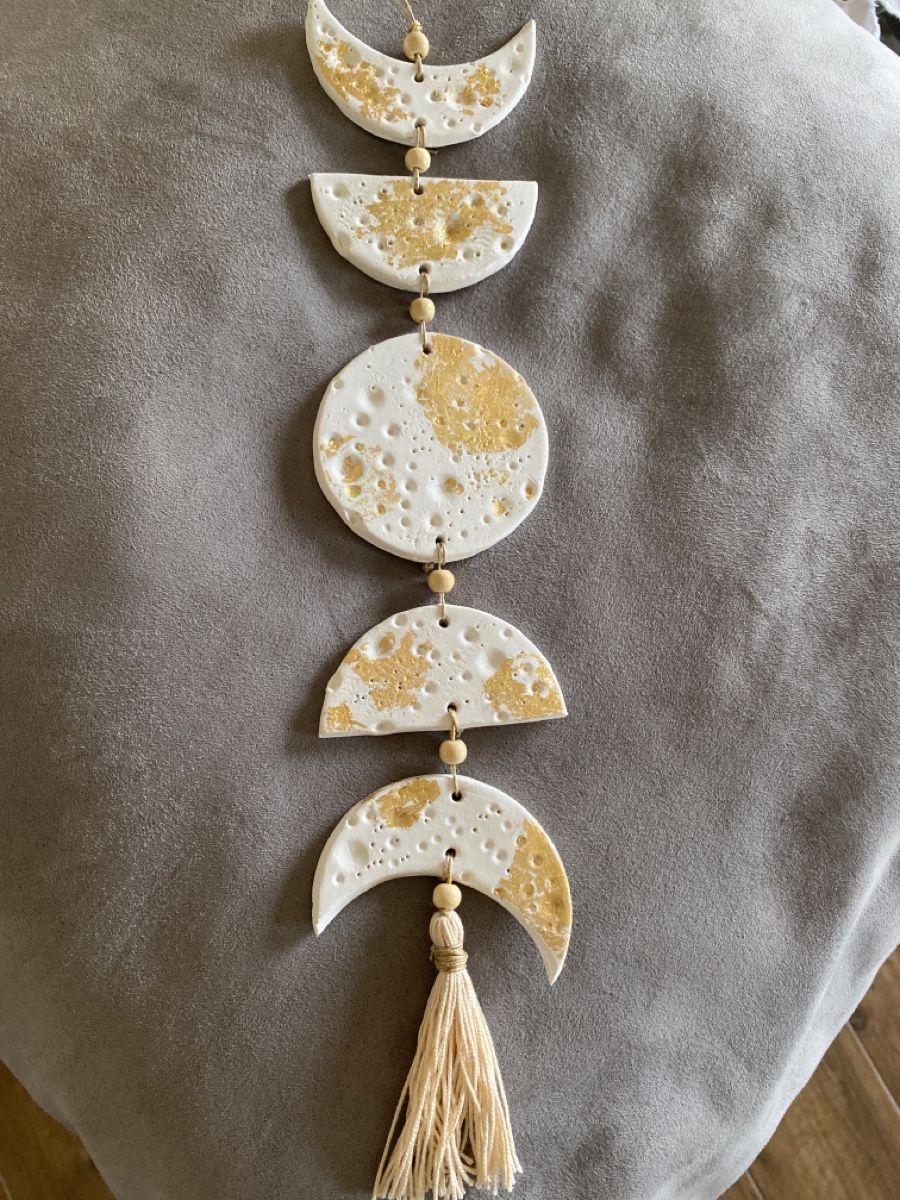
This one is a little more involved, but the finished result is absolutely breathtaking especially in a child’s bedroom.
Cut moon and star shapes from rolled clay using cookie cutters or freehand. Make a hole at the top of each shape before drying. Press patterns into them with a toothpick for extra detail.
Once dry, paint them in deep blues, purples, and silvers. Seal them and hang them at different lengths from a wooden dowel with twine. The finished mobile catches the light beautifully and looks like something from a high-end children’s boutique.
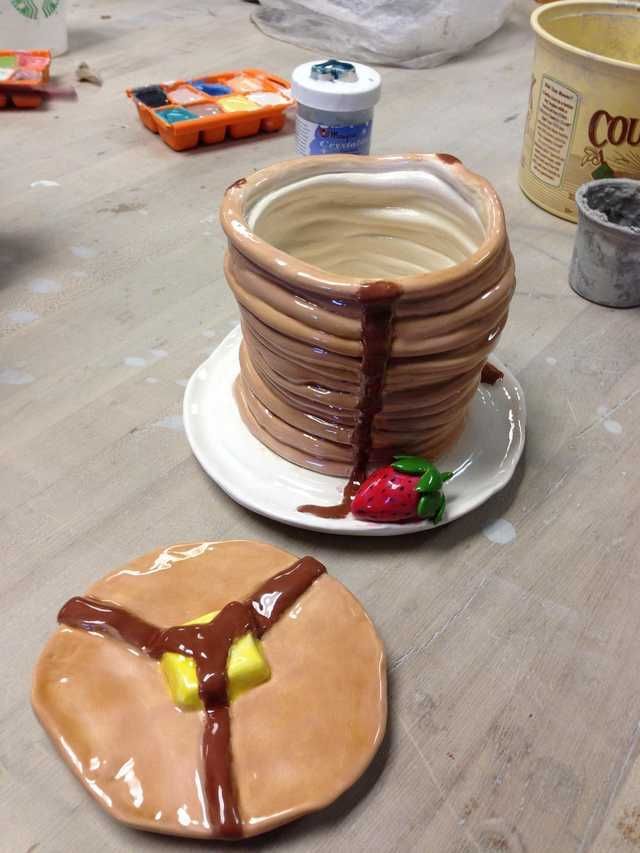
17. Mini Food Sculptures
Kids are endlessly entertained by making tiny clay food, and the results are adorable.
Miniature pizzas, sushi rolls, tiny donuts, small fruit, and little cakes are all incredibly popular. The trick is to work small and add lots of detail with a toothpick.
Once dry, paint them with realistic colors and seal them. Some families display these in a tiny wooden tray as a pretend food set. Others use them as unique fridge magnets by attaching magnets to the back. Either way, they are guaranteed to make people smile.
18. Pressed Flower Frames
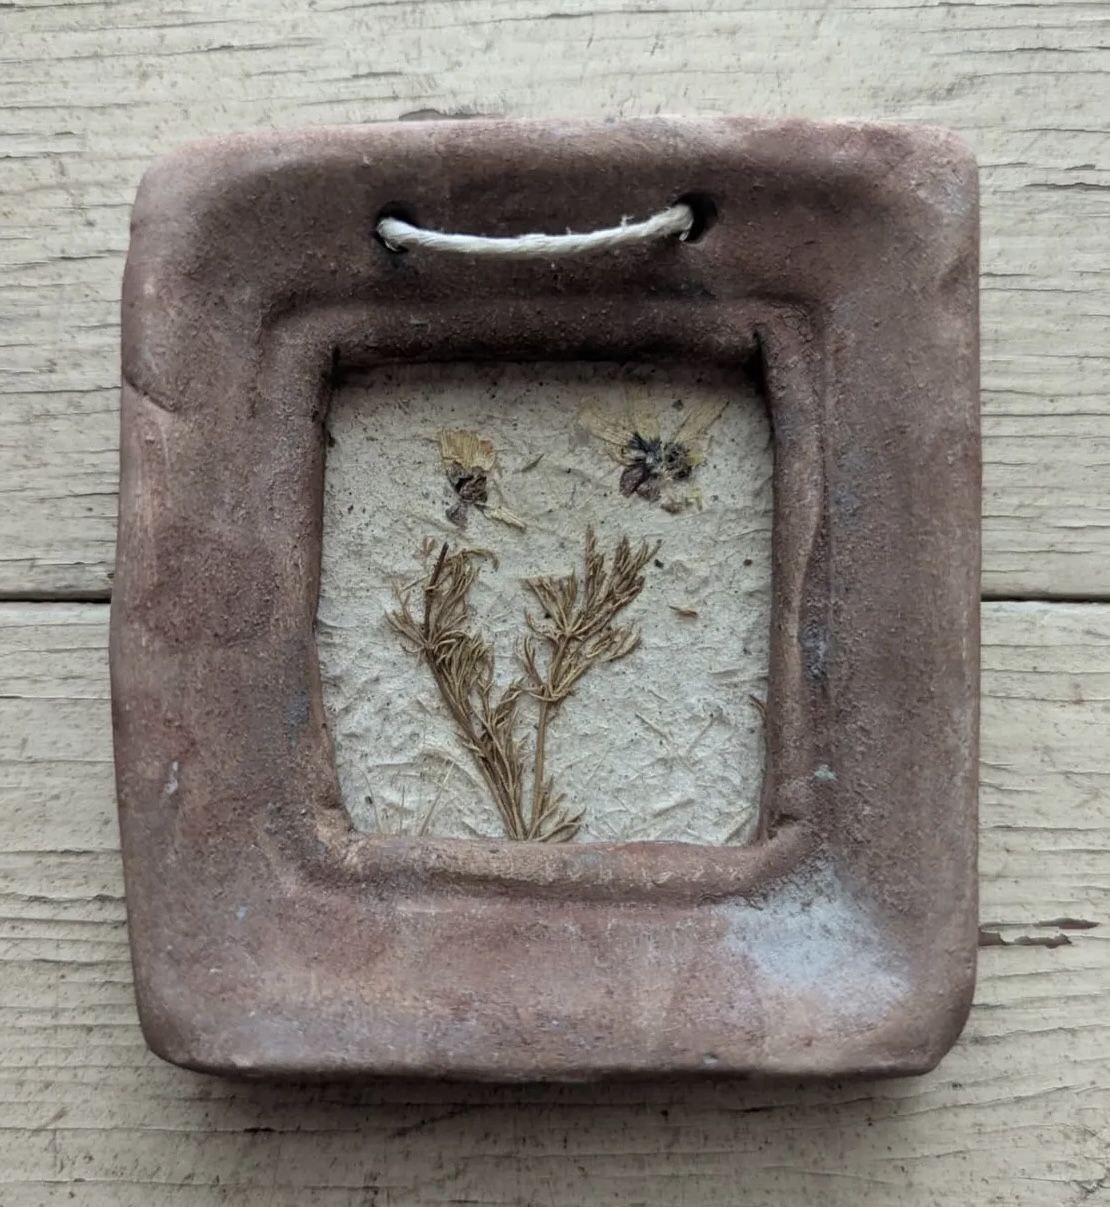
This project combines the beauty of nature with the permanence of clay to create something truly lovely.
Roll out a flat slab of clay and press fresh or dried flowers and leaves into the surface. Carefully remove them to reveal the delicate impressions they leave behind. Cut the slab into a frame shape around a central open square.
Make hanging holes at the top before drying. Once dry, paint the frame in soft, muted colors to highlight the floral impressions. Seal it and hang it as wall art or display it on a shelf.
19. Character Heads and Faces
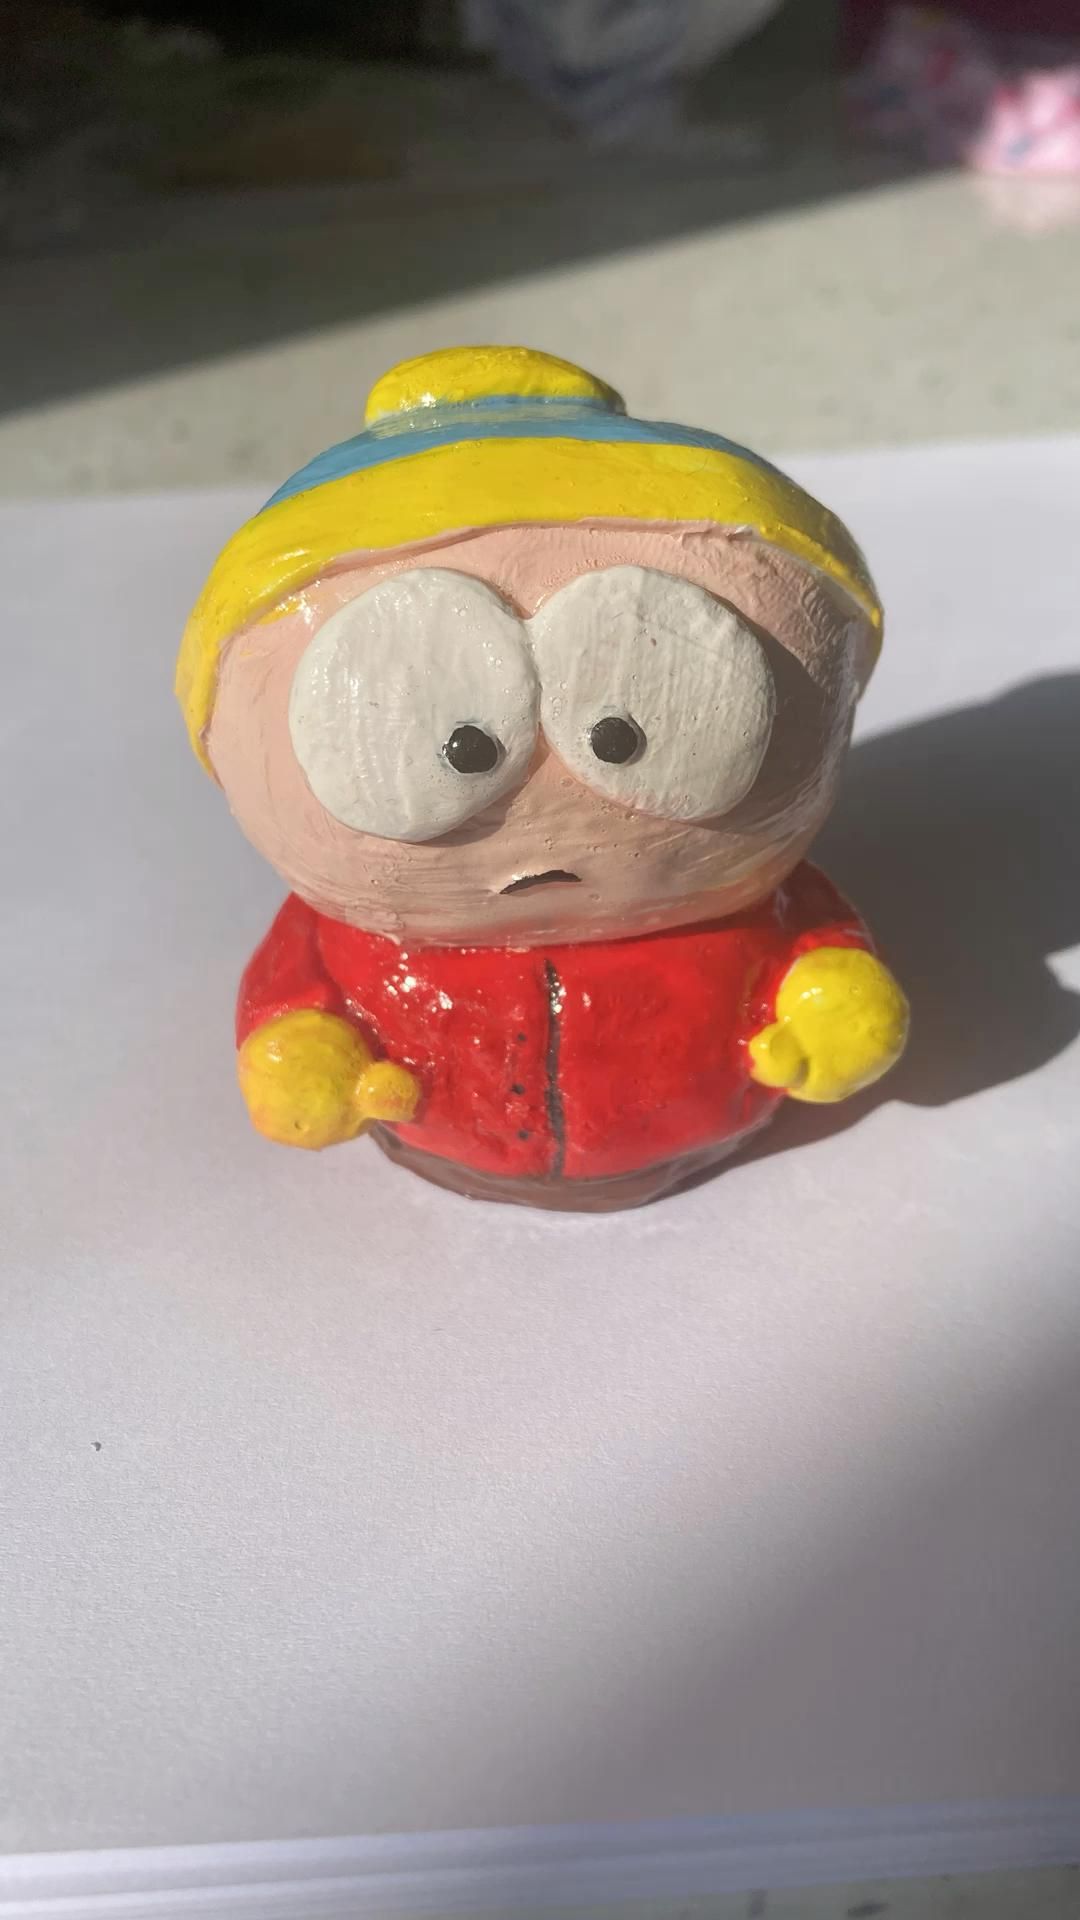
This project is pure fun from start to finish and the results are always hilarious.
Roll a large ball of clay for the head. Press two small balls of clay onto the face for eyes. Add a small sausage shape for a nose and a curved piece for a mouth. Stick on ears, hair made from thin clay ropes, and any other features your child wants to add.
The characters never look exactly like the plan, and that is completely fine. In fact, the unexpected results are usually the funniest and most charming. Display them on a shelf together for an instant conversation piece.
20. Custom Gift Tags and Ornaments
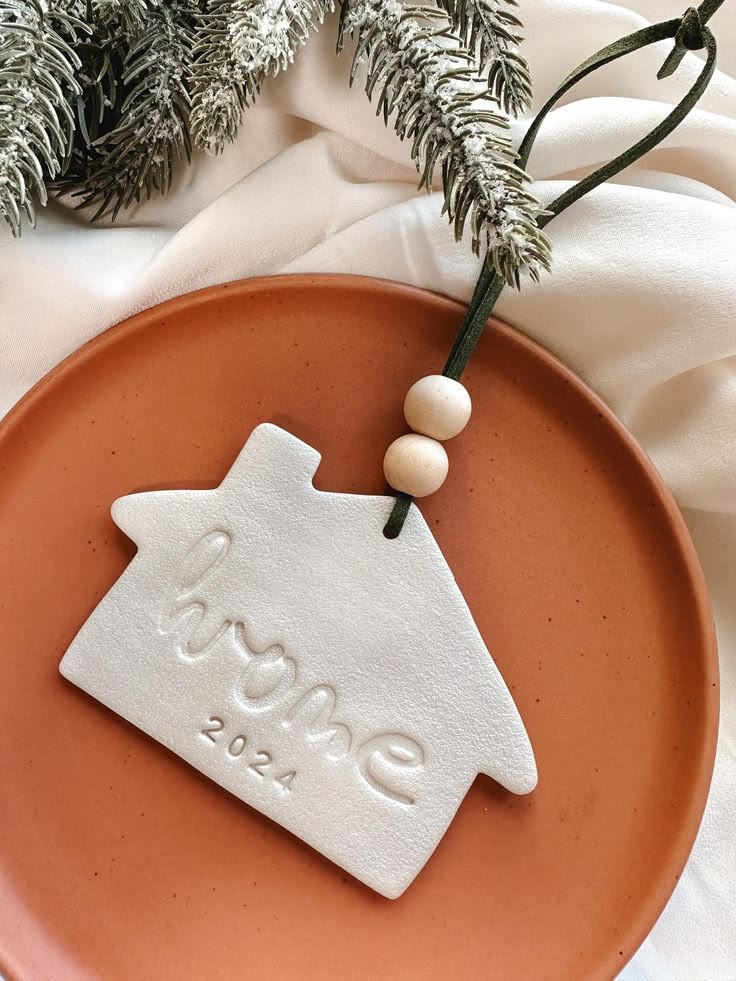
This last project is incredibly versatile because it works for every holiday and occasion throughout the year.
Roll out a thin slab of clay and cut it into small shapes hearts for Valentine’s Day, trees for Christmas, eggs for Easter, pumpkins for Halloween. Make a small hole at the top of each one before drying.
Once dry, paint them with holiday colors and seal them. Thread twine or ribbon through the hole. Use them as gift tags on wrapped presents, hang them as ornaments on a tree, or string several together as a garland.
These make the most thoughtful handmade gifts, and kids feel enormously proud knowing that something they created with their hands is going home with someone they love.
Your Action Step Today
Pick one project from this list just one and make it this weekend.
You do not need to do all twenty at once. Start with something simple like handprint plaques or fridge magnets if you are a beginner. From there, work your way up to the more detailed projects as your confidence grows.
And remember, the goal is never perfection. The goal is time spent together, hands covered in clay, and a finished piece your child is proud of.
That is always worth it.
Leave a Reply