Some crafts are fun once and then forgotten.
Block printing is not one of those crafts.
I first introduced block printing to my class on a Thursday afternoon. By Friday morning, three different kids had come back asking if we could do it again. One little girl had gone home and talked her mom into letting her print on an old pillowcase using a cut sponge and some fabric paint. She brought it in to show the class like it was a trophy.
That is the kind of craft block printing is.
It is one of those activities that feels like magic the first time you try it. You press a shape into paint. You press that shape onto paper. You lift it up. And there, clean, crisp, perfectly formed is your print. Every single time, kids gasp a little at that moment of reveal.
And the best part is that it is incredibly easy. You do not need special equipment. You do not need artistic skill. You just need a sponge, some foam, a pair of scissors, and some paint. That is genuinely it.
If you have recently set up a craft corner at home and you are looking for the perfect project to christen it with, this is the one. And if you have not set up your craft corner yet, go check out our post on A Parent’s Guide to Starting a Mini Craft Corner for Your Kids at Home first, it will help you get everything organized and ready before you dive into this project.
What Is Block Printing and Why Is It So Good for Kids?
Before we get into the how, let me quickly explain what block printing actually is because it is one of those techniques that sounds more complicated than it really is.
Block printing is simply the process of applying paint to a raised surface and then pressing that surface onto paper or fabric to create a repeated pattern or image. It is one of the oldest art techniques in the world.
For kids, however, we use much more forgiving materials like sponges, craft foam, and everyday objects. The result is the same beautiful printed effect without any of the complexity.
Furthermore, block printing is wonderful for kids for so many reasons beyond just being fun.
It teaches the concept of pattern and repetition, which is a foundational math and art skill. It builds planning and intentional thinking because kids have to decide on their design before they start cutting. It develops fine motor skills through the cutting and pressing process. And it introduces the idea of printmaking as a real art form with a long and interesting history.
On top of all that, block printing produces genuinely stunning results. The clean, graphic quality of a printed design looks intentional and polished in a way that freehand painting sometimes does not. As a result, even very young children produce work that looks impressive and display-worthy.
What You Will Need
Here is your full supply list. As always, everything here is easy to find and very affordable.
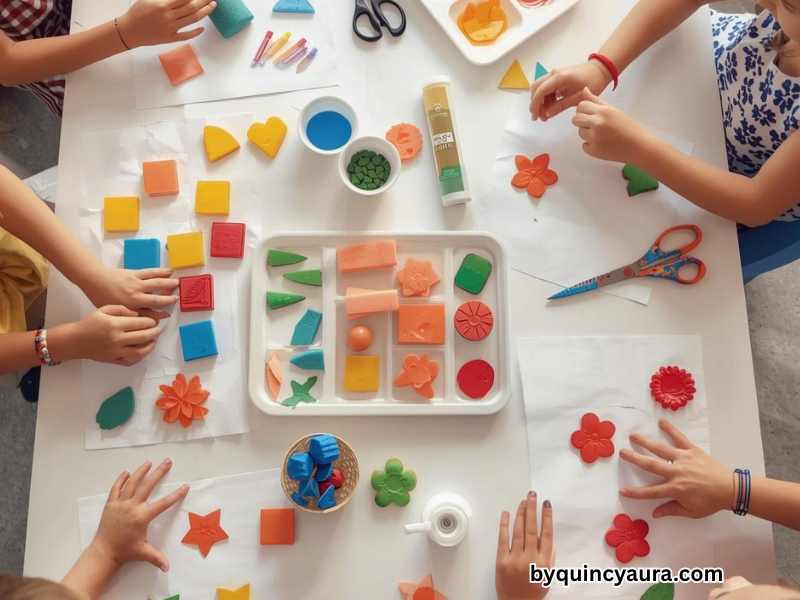
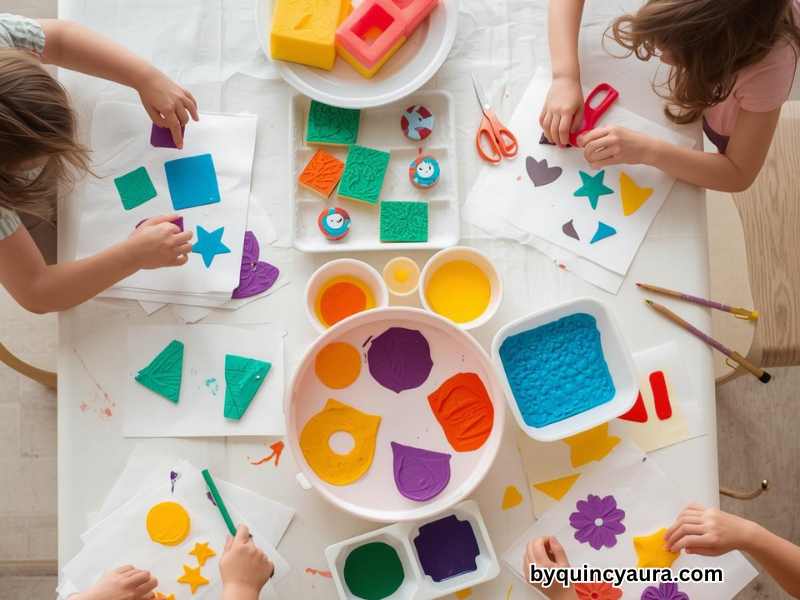
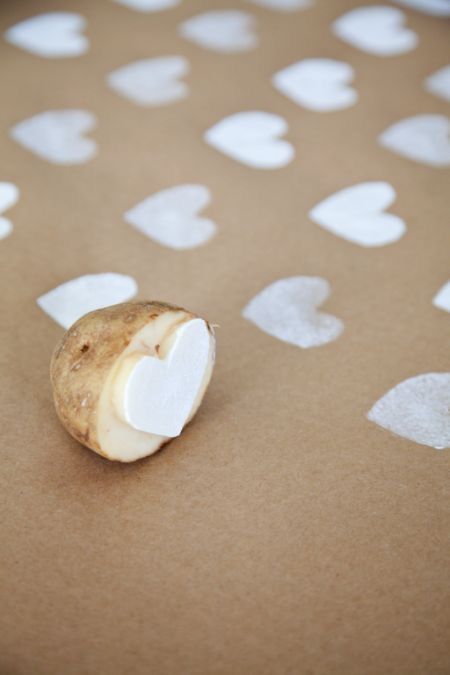
Craft foam sheets: These are the primary block printing material for this project. Craft foam is perfect because it is easy to cut into shapes, holds paint well, and produces clean crisp prints. It is available at Dollar Tree, Walmart, and any craft store in packs of assorted colors.
Kitchen sponges: Regular flat kitchen sponges work beautifully as both printing blocks and as paint applicators. Cut them into shapes or use them whole for larger prints. Dollar Tree sponges are perfect for this.
Acrylic craft paint or tempera paint: Both work well for block printing on paper. For fabric printing, use fabric paint specifically. Keep a good range of colors available.
A shallow tray or plate for paint: Pour a small amount of paint into a shallow tray or onto a paper plate. This is what you will press your block into before printing. An old muffin tin works perfectly for keeping multiple colors separate.
Paper: White cardstock produces the crispest prints because of its smooth surface and weight. However, construction paper, craft paper, and even newspaper work well too depending on the effect you want.
Scissors: For cutting foam and sponge into shapes. Regular scissors work fine for foam. For very young children, child-safe scissors are sufficient for cutting soft foam.
A pencil or marker: For drawing shapes onto the foam before cutting.
Optional Supplies Worth Having
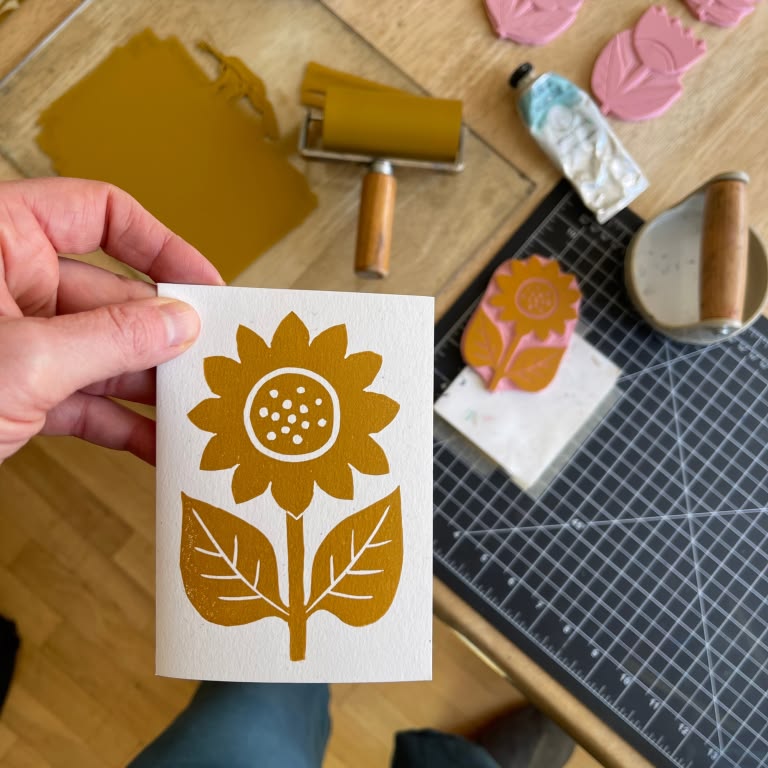
A brayer or foam roller: Optional but useful for applying an even layer of paint to larger blocks. Available cheaply at craft stores.
Fabric: Optional. If you want to print on fabric like tote bags, t-shirts, pillowcases pick up some fabric paint and plain fabric items. Fabric printing produces stunning results and makes wonderful personalized gifts.
Mod Podge or clear sealer: Optional. For sealing finished paper prints that will be framed or displayed.
Setting Up Your Workspace
Block printing involves paint, so a little preparation goes a long way before you start.
First, cover your table with a plastic tablecloth or a few layers of old newspaper. Paint will transfer onto surfaces during the pressing process, so protection is important here.
Next, set up your paint station. Pour small amounts of each paint color into separate sections of your shallow tray or onto separate paper plates. Keep the colors separate at this stage mixing happens on the paper, not in the tray.
Lay out your paper in the printing area. If you are working with younger children, tape the paper down at the corners with masking tape. This prevents it from sliding around when kids press their blocks down, which produces much cleaner prints.
Set out the foam sheets and scissors for the block-making station. Keep this separate from the paint station so kids can design and cut their blocks before moving over to print.
Additionally, have a damp cloth or paper towels nearby for quick cleanups between color changes. Block printing moves fast once you get going, and being able to wipe a block quickly between colors keeps things running smoothly.
Put on some music, call the kids over, and let’s get started.
Step by Step Instructions
Step One: Design and Cut Your Blocks
The first step is making the printing blocks themselves. This is where the creativity really begins.
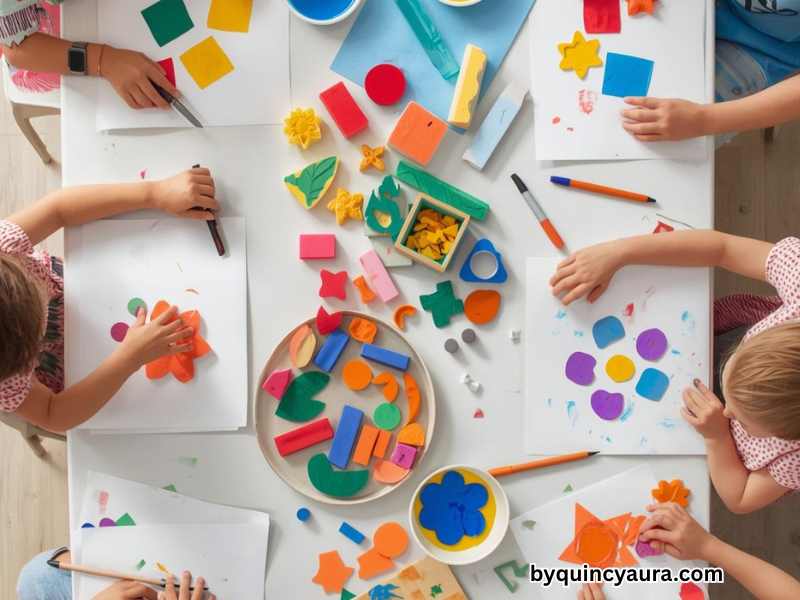
For craft foam blocks, draw a simple shape onto the foam sheet with a pencil or marker. Then cut it out carefully with scissors. The cut foam shape is your printing block.
Here are some shape ideas to get you started. Simple geometric shapes like squares, triangles, circles, and diamonds are perfect for beginners and produce beautiful geometric pattern prints. Natural shapes like leaves, flowers, stars, and moons are also popular and work wonderfully. Letters and numbers are fantastic for older kids like printing a child’s initials onto a tote bag or pillowcase makes a beautiful personalized gift.
For sponge blocks, simply cut kitchen sponges into whatever shapes you like using scissors. Sponges are slightly harder to cut precisely than foam, so simpler shapes work better here. Squares, rectangles, circles, and triangles all cut cleanly from a kitchen sponge.
For toddlers and very young children, skip the cutting entirely. Whole sponges, cookie cutters pressed into paint, and everyday objects like toilet paper rolls, bottle caps, and fork tines all make wonderful ready-made printing blocks that require zero preparation.
Encourage older kids to think carefully about their design before cutting. Ask them what pattern do you want to make? What colors will you use? Will you repeat the same shape or combine different shapes? This planning step makes the final print much more intentional and satisfying.
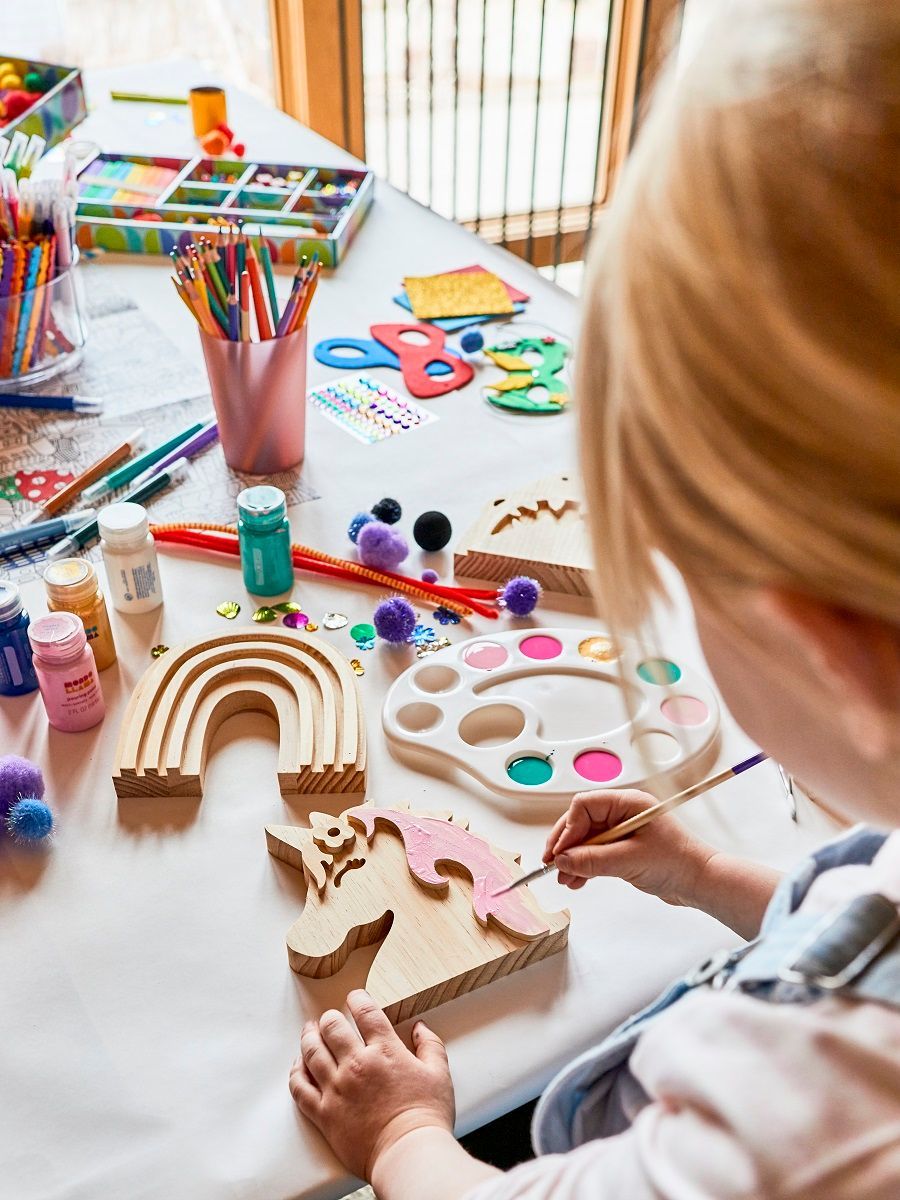
Step Two: Apply Paint to Your Block
Once your blocks are ready, it is time to add paint.
There are two ways to apply paint to a printing block, and each produces slightly different results.
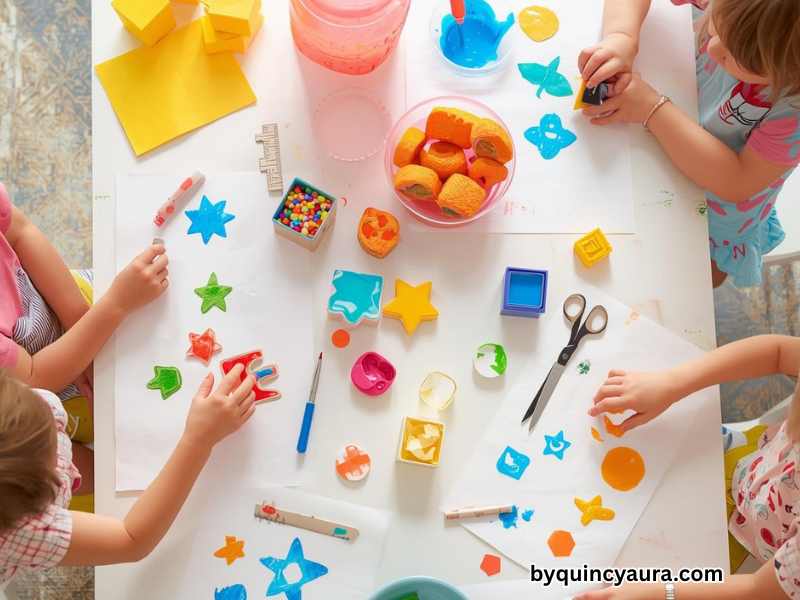
The dip method: Press your block directly into the shallow tray of paint. Make sure the surface of the block is evenly coated. Tap it gently on the edge of the tray to remove any excess paint before printing. This method is quick and works well for smaller blocks.
The brush method: Use a paintbrush or foam roller to apply paint directly onto the surface of the block. This method gives you more control over how much paint is applied and produces very clean, even prints. It is particularly useful for larger or more detailed blocks.
For younger children, the dip method is simpler and more intuitive. Older kids, however, often prefer the brush method once they realize it gives them more control over the result.
One important tip here is that less paint is almost always better than more. Too much paint causes the print to bleed and smear, losing the clean crisp edges that make block printing so satisfying. A thin, even layer of paint on the block produces the best results every time.
Step Three: Press and Print
Now for the most exciting moment….the actual printing.
Place your painted block face down onto the paper. Press down firmly and evenly with your palm. Do not slide or wiggle the block, just press straight down and straight up. This is what produces that clean, crisp print.
Then lift the block straight up off the paper in one smooth motion.
And there it is. Your print.
That moment of lifting the block and seeing the impression it left behind is genuinely magical every single time. I have never once done this activity with a child who did not react with delight at that moment.
Encourage your child to experiment from the very first print. Try pressing harder and softer. Try using more paint and less paint. Try overlapping two prints in different colors. Try rotating the block to different angles before pressing. Each variation produces a different result, and the experimentation is where a lot of the learning and joy happens.
Step Four: Build a Pattern
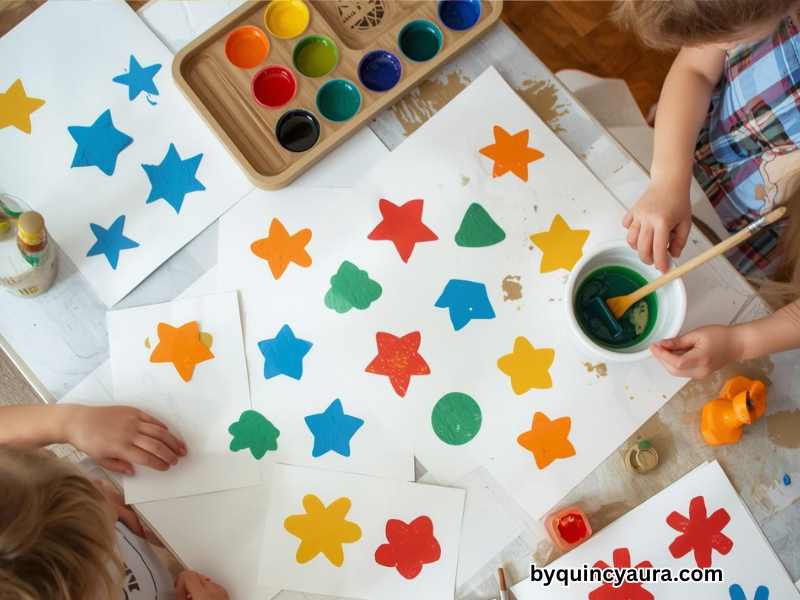
Once your child is comfortable with the basic pressing technique, it is time to start thinking about pattern.
Pattern is what transforms a single print into a piece of art. And for kids, understanding how to create a repeating pattern is both a math concept and an art concept at the same time.
Start by showing your child how to repeat their shape in a straight row across the paper. Print, move, print, move, print. That simple repeated action creates an instant border or stripe.
From there, introduce the idea of rows. Print a row of blue stars across the top. Then a row of red stars below it. Then yellow. The result is a beautiful striped pattern that looks like proper textile design.
For older kids, introduce more complex pattern structures. Alternating two shapes in a checkerboard layout. Rotating a shape 90 degrees between each print. Combining two different blocks in a regular sequence. These more complex patterns challenge older children and produce stunning sophisticated results.
For younger children, meanwhile, let go of the pattern idea entirely and just let them print freely. Random prints all over the page in different colors is completely joyful and produces its own kind of beautiful result.
Step Five: Let the Prints Dry
Once your child is happy with their printed design, set it aside to dry completely.
Acrylic paint and tempera paint both dry relatively quickly usually within fifteen to thirty minutes depending on how thickly the paint was applied. However, resist the temptation to touch or stack prints before they are fully dry. Wet prints smear easily and a smeared print is disappointing after all that careful work.
While the prints dry, this is a perfect time to clean the blocks. Rinse foam and sponge blocks under warm water immediately after use. Paint cleans off very easily when it is still wet. If paint dries on the block, it fills in the surface texture and produces less clean prints next time. So rinsing right away is important.
Fun Project Ideas Using Block Printing
Now that you know the basic technique, here are some wonderful ways to use it for specific projects. Each of these makes a beautiful finished product that goes well beyond a simple piece of printed paper.
1. Printed Gift Wrap
This is one of my all-time favorite uses for block printing with kids.
Cut plain brown craft paper or white butcher paper into gift wrap sized sheets. Then let your kids go to town printing all over it with their foam and sponge blocks.
Star shapes, geometric patterns, polka dots, simple flowers anything works beautifully as a repeating gift wrap pattern. The finished paper looks like something from a boutique stationery shop. And knowing that the wrapping paper was made by your child makes any gift feel even more special and personal.
This is also a wonderful activity to do in the weeks leading up to Christmas, birthdays, or any gifting occasion. Make a big batch of printed gift wrap and store it rolled up until needed.
2. Printed Tote Bags
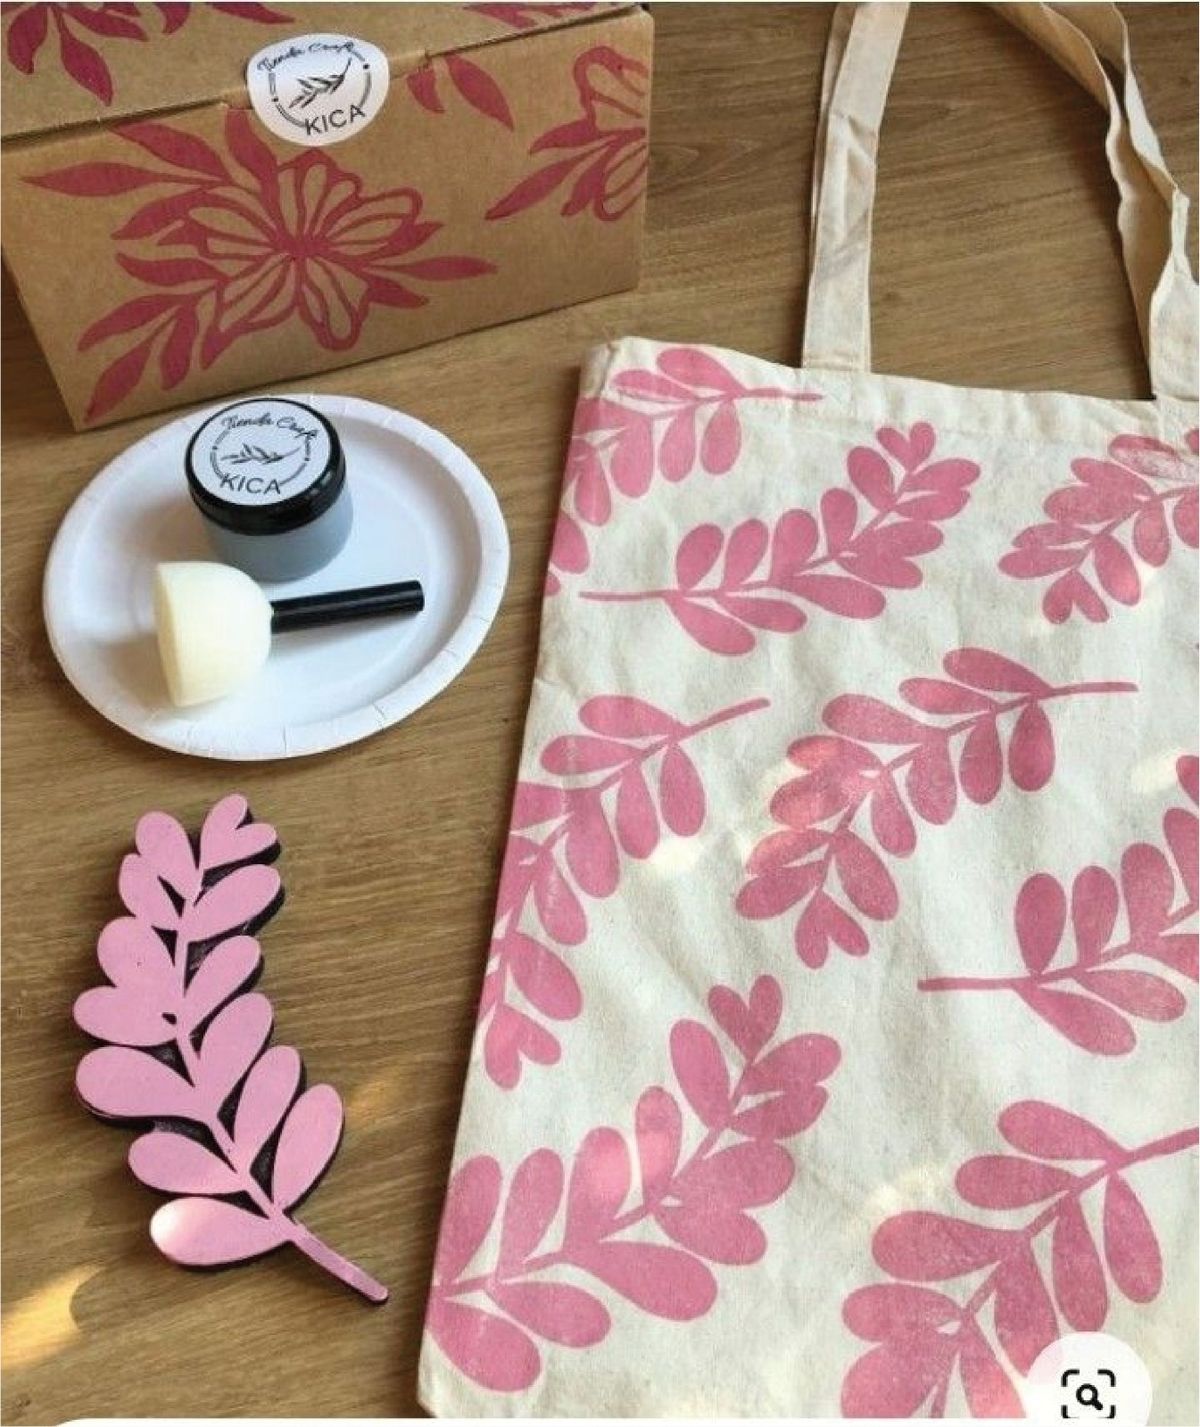
Plain canvas tote bags are available very cheaply online and at craft stores. They are the perfect surface for fabric block printing.
Use fabric paint instead of regular acrylic for this project. Fabric paint bonds with the fabric fibers and becomes permanent and washable once it is heat-set with an iron.
Let each child design their own tote bag using their foam blocks. A name initial printed large in the center. A border of flowers around the edges. A geometric pattern covering the whole surface. The results are always stunning and make the most wonderful personalized gifts.
3. Printed Cards and Stationery
Block printing is perfect for making handmade greeting cards. Cut cardstock into card sized pieces and let your kids print their own designs on the front.
Birthday cards, thank you cards, holiday cards, and just-because cards all look beautiful with a simple block-printed design. A printed star or flower in the corner of a card looks clean, intentional, and genuinely lovely.
Making a set of handmade cards together is also a wonderful ongoing activity. Build up a collection over several sessions and you will always have a beautiful handmade card ready for any occasion.
4. Printed Fabric Bunting
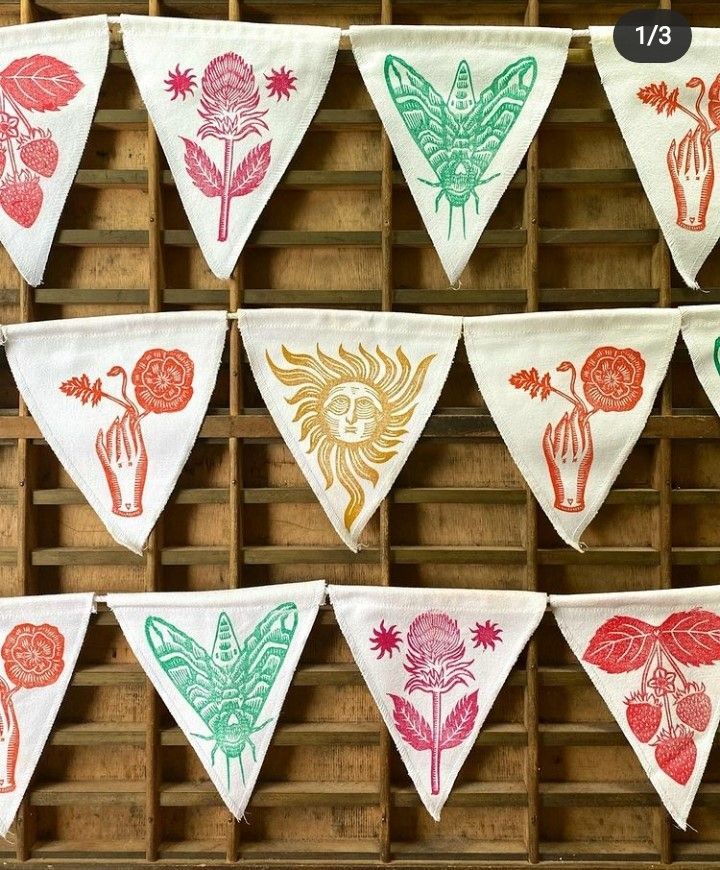
Cut fabric or felt into triangle shapes. Print a simple repeated pattern onto each triangle using fabric paint and foam blocks. Let them dry, then string them together on twine.
The result is the most beautiful handmade bunting that can be used as bedroom decoration, party decoration, or a permanent display piece. Every triangle is slightly different because it was printed by hand, which gives the finished bunting a charming handcrafted quality.
Tips for Getting the Best Prints
Here are some additional tips that make a real difference in the quality of your finished prints.
Always test your block first. Before printing on your good paper, do a test print on a scrap piece of paper. This shows you how much paint is on the block and whether the coverage is even. Furthermore, it lets kids practice the pressing technique before committing to their final piece.
Work on a padded surface. Placing a few sheets of newspaper or a thin foam mat under your printing paper creates a slightly padded surface. This padding helps the block make full contact with the paper and produces more even, complete prints. Without padding, the print can be patchy in places where the paper is not perfectly flat.
Clean blocks between colors. If you want to print the same block in a different color, rinse it thoroughly and pat it dry before dipping it in the new color. Otherwise the colors will mix in the paint tray and muddy the results.
Embrace the imperfections. Block printing by hand always produces slightly imperfect results and that is completely intentional. The slight variations in pressure, paint coverage, and alignment are what give handmade block prints their charm and character. Encourage kids to see these variations as features rather than mistakes.
Mount and frame the best prints. Once your prints are dry, pick out the most beautiful ones and mount them on a slightly larger piece of colored cardstock. The border created by the cardstock mount makes even a simple print look gallery-worthy. Frame it and hang it on the wall.
How to Extend This Project Over Multiple Sessions
Block printing is one of those activities that gets better the more you do it. Unlike some one-off crafts, in fact, block printing genuinely rewards practice and repetition.
Here are some ideas for extending it across multiple craft sessions.
To begin with, in the first session, focus on learning the basic technique with simple geometric shapes. Keep it low pressure and experimental.
Next, in the second session, introduce pattern building. Challenge kids to create a deliberate repeating pattern using two or three colors.
Then, in the third session, apply the technique to a specific project maybe a gift wrap, a tote bag, or a set of cards.
By this stage, most kids have developed a real feel for the technique and are producing genuinely impressive work. The progression from beginner to confident printmaker over just three sessions is wonderful to watch.
Your Action Step for This Weekend
Here is what I want you to do.
This weekend, pick up a pack of craft foam sheets and a few kitchen sponges from Dollar Tree. Next, get out your acrylic paints. Then, cut a few simple shapes. And print.
To begin with, start simple use either a circle, a star, a square. Press it into paint and press it onto paper.
After that, watch your child’s face when they lift the block and see that first clean print.
That reaction, that little gasp of delight is why block printing has been around for thousands of years. In fact, it never gets old. Not for kids. Not for adults. Not for anyone who has ever pressed a painted shape onto paper and lifted it up to see what was left behind.
Finally, it is waiting for you this weekend.
Leave a Reply