Can I tell you something that happens in almost every household with kids?
Crayons multiply. And then they break.
One day you buy a fresh box of 64 crayons. Everything is perfect. Every color is sharp and whole and beautiful. Then two weeks later you open the crayon box and it looks like a tiny crayon disaster zone. Broken pieces everywhere. Missing wrappers. Colors snapped in half. A few sad little stubs that are too small to hold properly.
Sound familiar?
I thought so.
Here is the thing though. Those broken crayons are not rubbish. They are actually the perfect raw material for one of the most satisfying kids’ crafts I have ever done in my classroom.
Melted crayon shapes.
The idea is simple. You peel the wrappers off the broken crayons, sort them by color, pop them in a muffin tin, melt them in the oven, and let them cool into brand new chunky rainbow crayons in fun shapes. The kids go absolutely wild for it every single time.
And the best part? It is a recycling project. So while the kids are having fun, they are also learning something really valuable about not wasting things and giving new life to something old.
If you have been looking for more creative ways to do hands-on projects with your kids lately, also make sure you check out our recent post on How to Create a Mini Herb Garden Planter Craft With Kids another wonderful project that combines creativity with real life skills.
But right now, let’s rescue those broken crayons and turn them into something amazing.
Why This Craft Is So Good for Kids

Before we get into the how, let me tell you why this particular project works so well for families with children of all ages.
First of all, it is a recycling project at heart. As a teacher, I always looked for natural opportunities to weave environmental awareness into activities without making it feel like a lesson. This craft does that beautifully. Kids see with their own eyes that something broken and unwanted can be transformed into something new and useful. That is a powerful message delivered in the most hands-on way possible.
On top of that, this project involves sorting, color mixing, and predicting outcomes, all of which are fantastic early learning skills. When a child puts red and orange crayons together in one muffin cup and then sees the swirled result after melting, they are doing color science without even realizing it.
Furthermore, the finished crayons are genuinely better to use than regular ones in some ways. The chunky round shape is easier for little hands to grip. The mixed colors produce beautiful multicolored marks on paper. And because they are made from multiple layers of different crayons, every stroke produces a slightly different color effect.
In short, this project is fun to make, educational in the process, and produces something the kids will actually use afterward. That combination is hard to beat.
What You Will Need
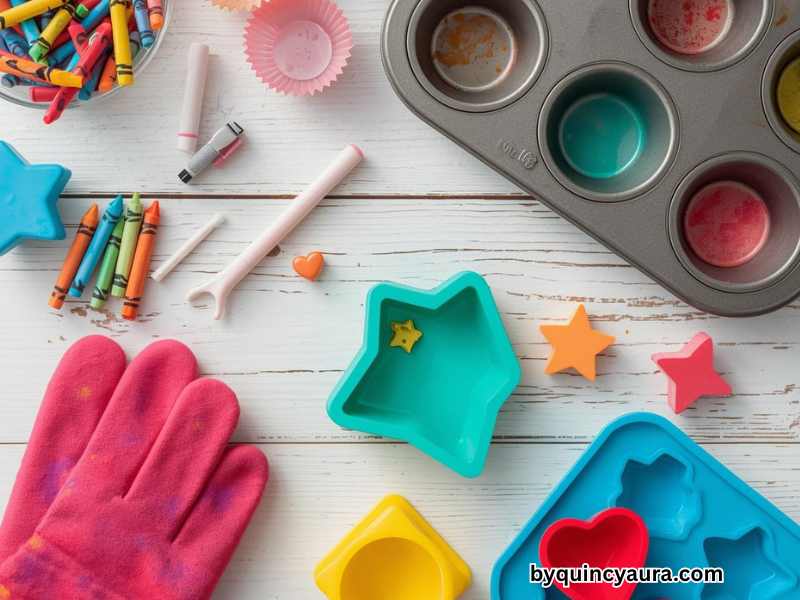
Here is your full supply list. The great news is that you probably already have most of this at home right now.
Broken crayons: The more the merrier. Dig through every crayon box, every art supply drawer, and every bottom of every bag. Broken pieces, stubby ends, crayons without wrappers, all of it is usable. The only ones to set aside are any that are extremely dirty or covered in something other than crayon.
A muffin tin: A standard 12-cup muffin tin works perfectly. Silicone muffin tins are actually ideal for this project because the finished crayons pop out much more easily. However, a regular metal muffin tin works just fine with a little extra care.
Silicone muffin cups or cupcake liners: If you are using a metal muffin tin, line each cup with a silicone muffin cup or a foil cupcake liner. This makes removal much easier and protects your tin from waxy residue.
A crayon peeler or your fingers: You need to remove the paper wrappers from all the crayons before melting. More on the easiest way to do this in a moment.
An oven: Set to a low temperature. More on this shortly.
Oven mitts: For safely handling the hot muffin tin.
A flat surface and cooling rack: For setting the tin on after it comes out of the oven.
Optional extras: Silicone molds in fun shapes like stars, hearts, dinosaurs, or letters are a wonderful alternative to a muffin tin if you want more exciting shapes. These are available very affordably on Amazon and produce the most adorable finished crayons.
Step by Step Instructions
Step One: Collect and Sort the Crayons
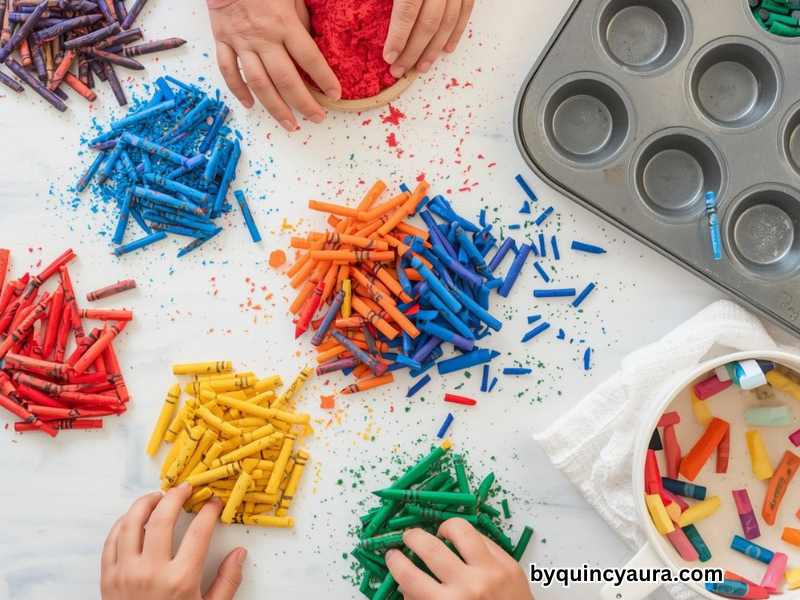
Start by gathering every broken crayon in your house.
Tip them all out onto the table and let the kids help sort through them. This sorting step is actually a wonderful activity on its own especially for younger children. Sorting by color, grouping similar shades together, and deciding which colors will go together in each muffin cup all involve real thinking skills.
As you sort, think about what kind of finished crayons you want to make. Here are the three most popular approaches:
Rainbow swirl crayons: Put a mix of many different colors into each muffin cup. The melted result will be a gorgeous swirled multicolor crayon that produces rainbow marks when used. These are always the most popular with kids.
Single color crayons: Group all the reds together, all the blues together, all the greens together. The finished crayons will be one solid color but much chunkier and easier to grip than a standard crayon.
Complementary color pairs: Put two colors that look beautiful together into each cup. Red and orange. Blue and purple. Yellow and green. The melted result will be a two-tone swirled crayon that is stunning to use.
Let the kids decide which approach they want to try. Giving them this choice makes them feel invested in the outcome right from the start.
Step Two: Peel the Wrappers
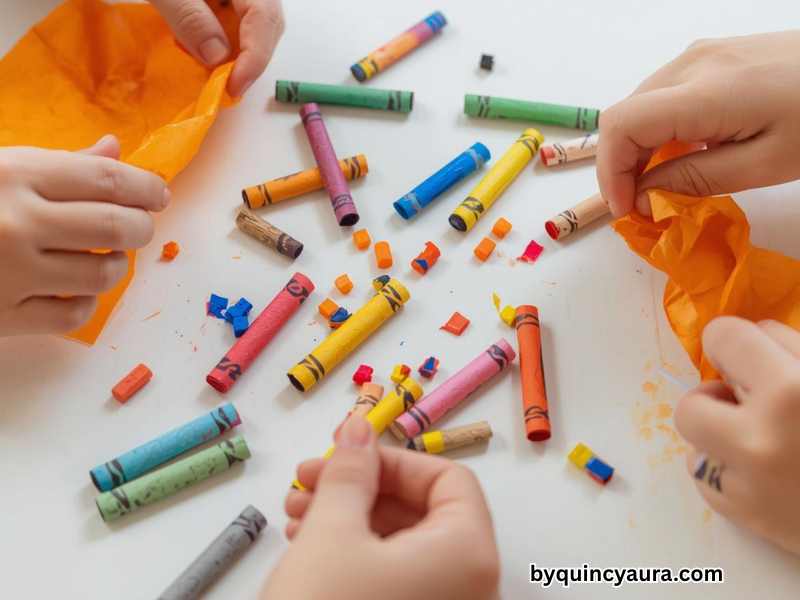
This is the most time-consuming step. However, it is also surprisingly satisfying once you get into a rhythm.
Every crayon needs its paper wrapper completely removed before melting. Paper wrappers do not melt and will leave unwanted bits in your finished crayons if they are not removed first.
Here are the easiest ways to remove crayon wrappers depending on the age of your kids:
For toddlers and preschoolers: Score the wrapper with your fingernail down the length of the crayon and then peel it away in one strip. This is the quickest method and easy enough for little fingers to help with once you have made the initial score.
For older kids: Let them do this step almost entirely independently. Show them the scoring trick and then let them work through a pile of crayons on their own. Many older kids find this step deeply satisfying in a fidgety, tactile way.
Warm water shortcut: If a wrapper is being stubborn, soak the crayon in warm water for about thirty seconds. The wrapper will slide off much more easily afterward.
As you peel, break or chop the crayons into roughly equal small pieces about half an inch to an inch long. Smaller pieces melt more evenly and fill the muffin cups more efficiently than large chunks.
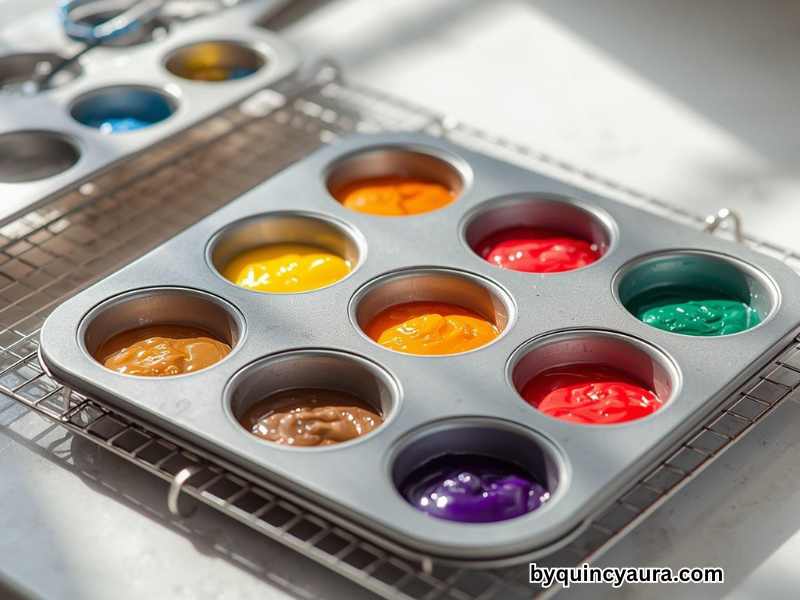
Step Three: Fill the Muffin Cups
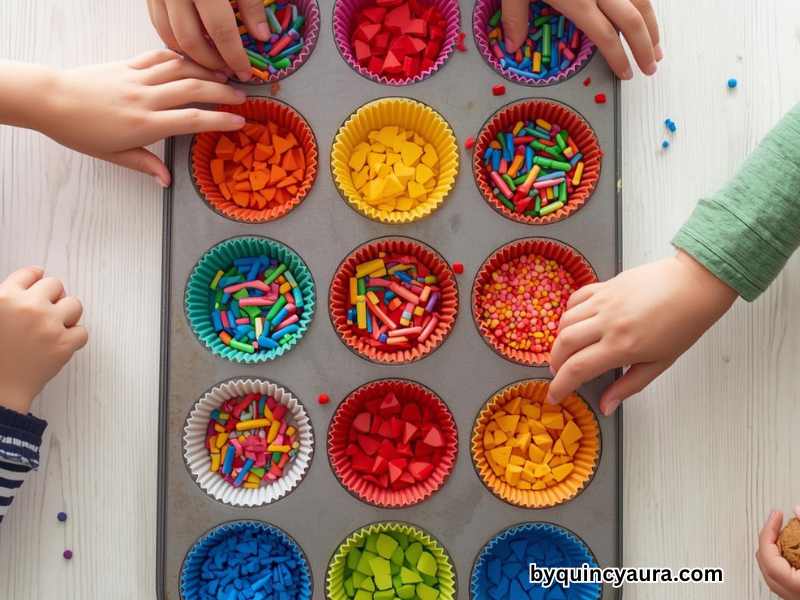
Now comes the fun part of the prep stage…filling the cups.
Line your muffin tin with silicone cups or foil liners if you are using a metal tin. Then let the kids fill each cup with their chosen crayon pieces.
Fill each cup about two thirds full. As the crayons melt, they will settle and compress, so the finished crayon will be slightly thinner than the filled cup. Two thirds full usually produces a nicely chunky finished crayon that is satisfying to hold and use.
Press the crayon pieces down gently as you add them to pack them in a little. Do not overfill, crayon wax can expand slightly as it melts and overflow the cup if it is too full.
This filling step is perfect for kids of all ages. Toddlers love dropping pieces in. Older kids enjoy arranging the colors deliberately, placing contrasting colors alternately or creating a specific pattern they hope will show in the finished crayon.
Step Four: Melt in the Oven
This step is for adults only. Make sure the kids stand back and watch from a safe distance while you handle the oven.
Preheat your oven to 230 degrees Fahrenheit or 110 degrees Celsius. This is a very low temperature low enough to melt the wax gently without burning it or producing fumes.
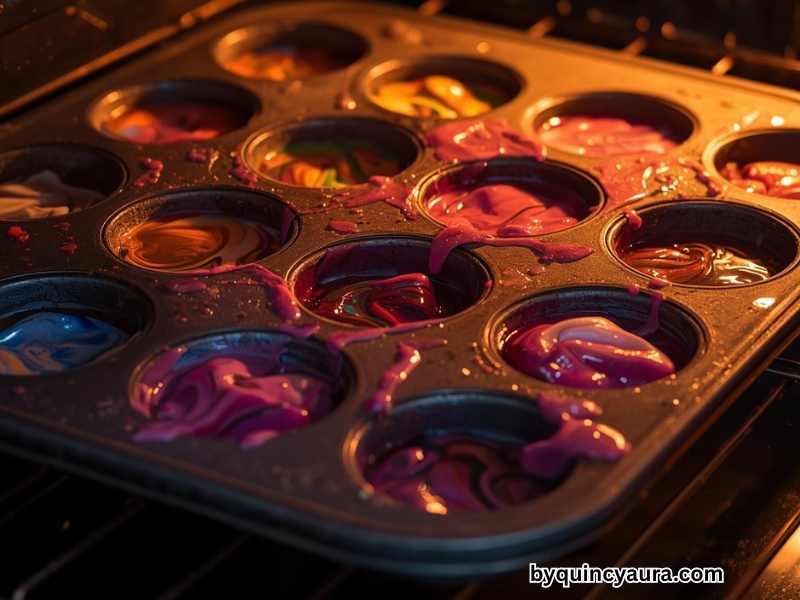
Place the filled muffin tin on the middle rack of the oven. Let it melt for approximately 15 to 20 minutes. Check at the 15 minute mark by looking through the oven window. The crayons are ready when all the pieces have completely melted into smooth liquid pools of color.
Do not stir the melted wax while it is in the oven. The beautiful swirled effect happens naturally as the different colors melt at slightly different rates. Stirring disrupts this natural process and can result in a muddy mixed color rather than a beautiful swirl.
Once everything is fully melted, put on your oven mitts and carefully remove the tin from the oven. Place it on a flat, heat-safe surface or cooling rack.
At this point the melted wax looks absolutely stunning, pools of swirling liquid color sitting in the muffin cups. Let the kids look but remind them firmly not to touch. The wax is extremely hot at this stage.
Step Five: Let Them Cool Completely
Now comes the hardest part for kids…waiting.
The filled muffin tin needs to cool and harden completely before the crayons can be removed. This takes approximately one to two hours at room temperature.
Do not move the tin while the wax is still liquid. Even a slight tilt can cause the colors to run together more than intended and produce an uneven finish.
For faster cooling, you can place the tin in the refrigerator once it has cooled enough to handle safely usually after about thirty minutes at room temperature. The fridge speeds up the hardening process significantly and the crayons are usually ready to remove within another thirty minutes.
Use this waiting time wisely. Clean up the workspace together. Have lunch or a snack. Do a quick activity. Build the anticipation by talking about what colors might have swirled together and what the finished crayons might look like.
Step Six: Remove the Finished Crayons
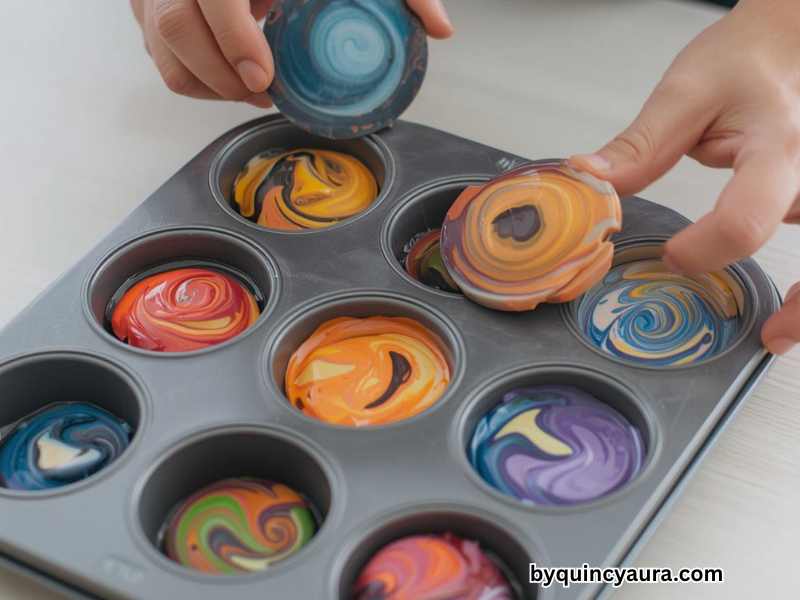
Once the wax is completely hard and cool, it is time for the most exciting moment of the whole project, the reveal.
If you used a silicone muffin tin, simply flex the tin gently and the crayons will pop right out. It is as easy and satisfying as popping ice cubes out of an ice tray.
If you used a metal tin with foil liners, simply peel the foil liner away from each crayon. It peels off cleanly and easily.
If you used silicone cups inside a metal tin, pop each silicone cup out of the tin first. Then flex it gently to release the crayon.
As each crayon comes out, hand it to your child and watch their reaction.
Every single time I have done this with kids, the reaction is the same. Eyes wide. A sharp intake of breath. Then “Whoa.”
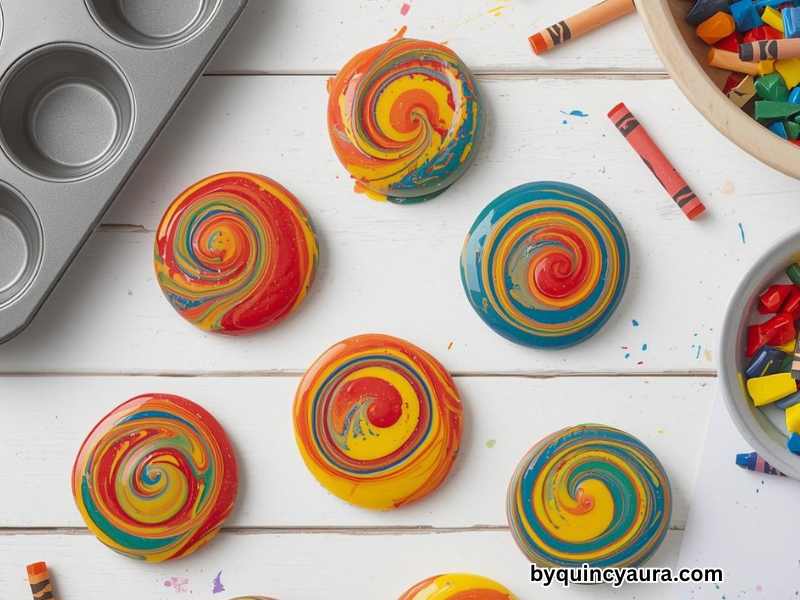
The swirled colors that looked like separate pieces going into the tin have merged into something genuinely beautiful. Every crayon is unique. No two look exactly the same.
Step Seven: Test the New Crayons
Before you pack the new crayons away, take a few minutes to test them out right away.
Get a piece of white paper and let the kids color with their new creations. The chunky round shape feels different from a regular crayon in a really good way. The wide surface area means bigger, bolder marks. The mixed colors produce those beautiful multicolored strokes that kids absolutely love.
Let them experiment with pressing lightly versus pressing hard. Light pressure produces softer, more delicate marks that show the individual colors more clearly. Firm pressure blends the colors together more fully and produces richer, more saturated marks.
Watch how excited they get about using something they made themselves. There is a totally different energy around a crayon your child created compared to one that came from a box.
Tips for the Best Results
Here are some extra tips to help everything go smoothly and produce the most beautiful finished crayons possible.
Keep light and dark colors separate. When you mix very light colors like white and yellow with very dark ones like black and brown, the dark colors tend to dominate and the result can look muddy. For the most vibrant finished crayons, group warm colors together and cool colors together.
Use more crayon pieces than you think you need. Melted wax settles and compresses, so the finished crayon will always be thinner than the filled cup looked. Filling the cup two thirds full is the sweet spot.
Do not rush the cooling. Crayons that are removed before they are fully cool and hard can crack or crumble. Patience here pays off with a clean, solid finished crayon.
Try different molds for different occasions. Heart shaped crayons make adorable Valentine’s Day gifts. Star shaped ones are perfect for patriotic holidays. Letter shaped ones can spell out a child’s name. The possibilities are endless once you start experimenting with different silicone molds.
Make them as gifts. A set of homemade rainbow crayons wrapped in a clear cellophane bag with a ribbon makes the most thoughtful and unique gift for a child. Teachers, classmates, cousins, and neighbors all love receiving them. And knowing that a child made them by recycling old broken crayons makes the gift even more special.
How to Make This Project Even More Special
Once you have mastered the basic version, here are some fun ways to take it further.
Themed color palettes are a wonderful creative challenge for older kids. Ask them to make an “ocean” crayon using only blues, greens, and whites. Or a “sunset” crayon using oranges, pinks, and purples. Or a “forest” crayon using greens, browns, and yellows. Thinking about color in this deliberate way is a genuine art education moment wrapped up in play.
Layered crayons are another beautiful variation. Instead of filling the cup all at once, melt one layer of color, let it cool partially, then add a second layer of a different color on top. Repeat for a third layer if you like. The finished crayon will have distinct horizontal stripes of color that look absolutely stunning when used on paper.
Crayon set gifts are a project that older kids especially love organizing. Sort the finished crayons into themed sets, a rainbow set, a cool colors set, a warm colors set and package them in small boxes or bags. These make wonderful handmade gifts that feel personal, creative, and genuinely useful.
What to Do With Crayon Leftovers
After you have made your muffin tin crayons, you will likely still have some peeled crayon pieces left over. Here are a few ideas for using them up.
Sprinkle small crayon shavings between two sheets of wax paper and press with a warm iron to create beautiful melted crayon art panels. These look stunning hung in a window where the light shines through them.
Alternatively, melt leftover pieces in small silicone ice cube trays to make tiny novelty shaped crayons. Mini heart crayons, star crayons, and flower crayons are all wonderful additions to a homemade crayon set.
The goal is zero waste. Every single crayon piece has value. Teaching kids this lesson through a hands-on project is far more powerful than simply telling them about it.
Your Action Step for Today
Here is what I want you to do right now.
Go find your crayon box. Or your junk drawer. Or the bottom of your kids’ backpack. Collect every broken, stubby, unwrapped crayon you can find.
Then this weekend, peel the wrappers, fill the muffin tin, and melt them together.
It will take less than an hour from start to finish not counting the cooling time. And the result will be something your kids use, enjoy, and proudly tell their friends about.
“I made these crayons myself.”
Those words are worth every minute of the process.
So go rescue those broken crayons. Because something amazing is waiting inside every one of them.
Leave a Reply