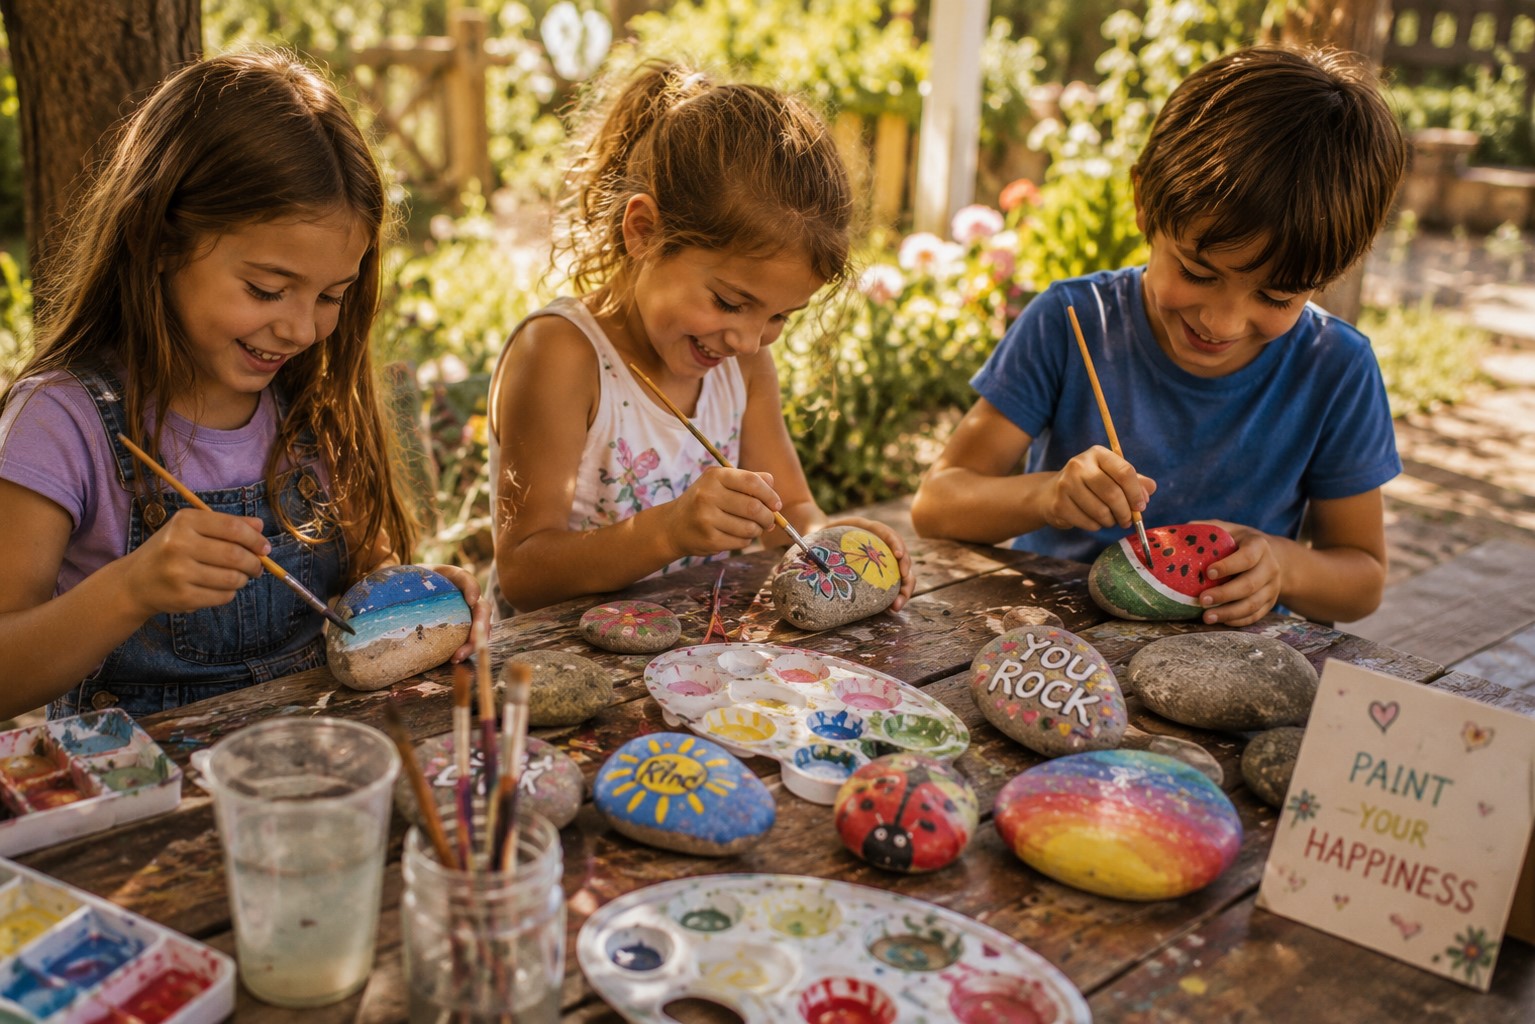
There is something deeply satisfying about picking up a plain rock and turning it into something beautiful. Rocks are free. They are everywhere. And they are honestly one of the best canvases for kids’ art that nobody talks about nearly enough.
Rock painting has exploded in popularity over the last few years and for very good reason. It combines the meditative quality of painting with the tactile satisfaction of working on a three-dimensional surface. The results look impressive even when the technique is simple. And kids who discover rock painting tend to become completely obsessed with it almost immediately.
If you have been following along here on the blog, you will remember our last post on 15 Easy Paper Crafts Kids Can Make in Under 10 Minutes. That project was all about fast, accessible creativity using the simplest possible materials. This one, however, invites kids to slow down a little. To sit outside in the summer warmth, pick up a brush, and lose themselves completely in the process of turning something ordinary into something extraordinary.
The best part about rock painting is how genuinely forgiving it is as an art form. Mistakes get painted over. Wobbly lines become intentional texture. An accidental smear becomes a background. There is no ruining a rock painting. There is only the next brushstroke.
Today we are covering twenty rock painting ideas that kids will genuinely obsess over this summer. Some are simple enough for toddlers. Some will challenge older kids and teenagers. All of them produce results worth keeping, displaying, and sharing.
So let us get into it.
Setting Up for Rock Painting Success
Before we dive into the twenty ideas, let us talk briefly about setup. Because the right preparation makes an enormous difference to how smoothly your rock painting session goes and how beautiful your finished rocks look.
Bookmark this: How to Create a Scrapbook With Your Child to Document Summer Memories
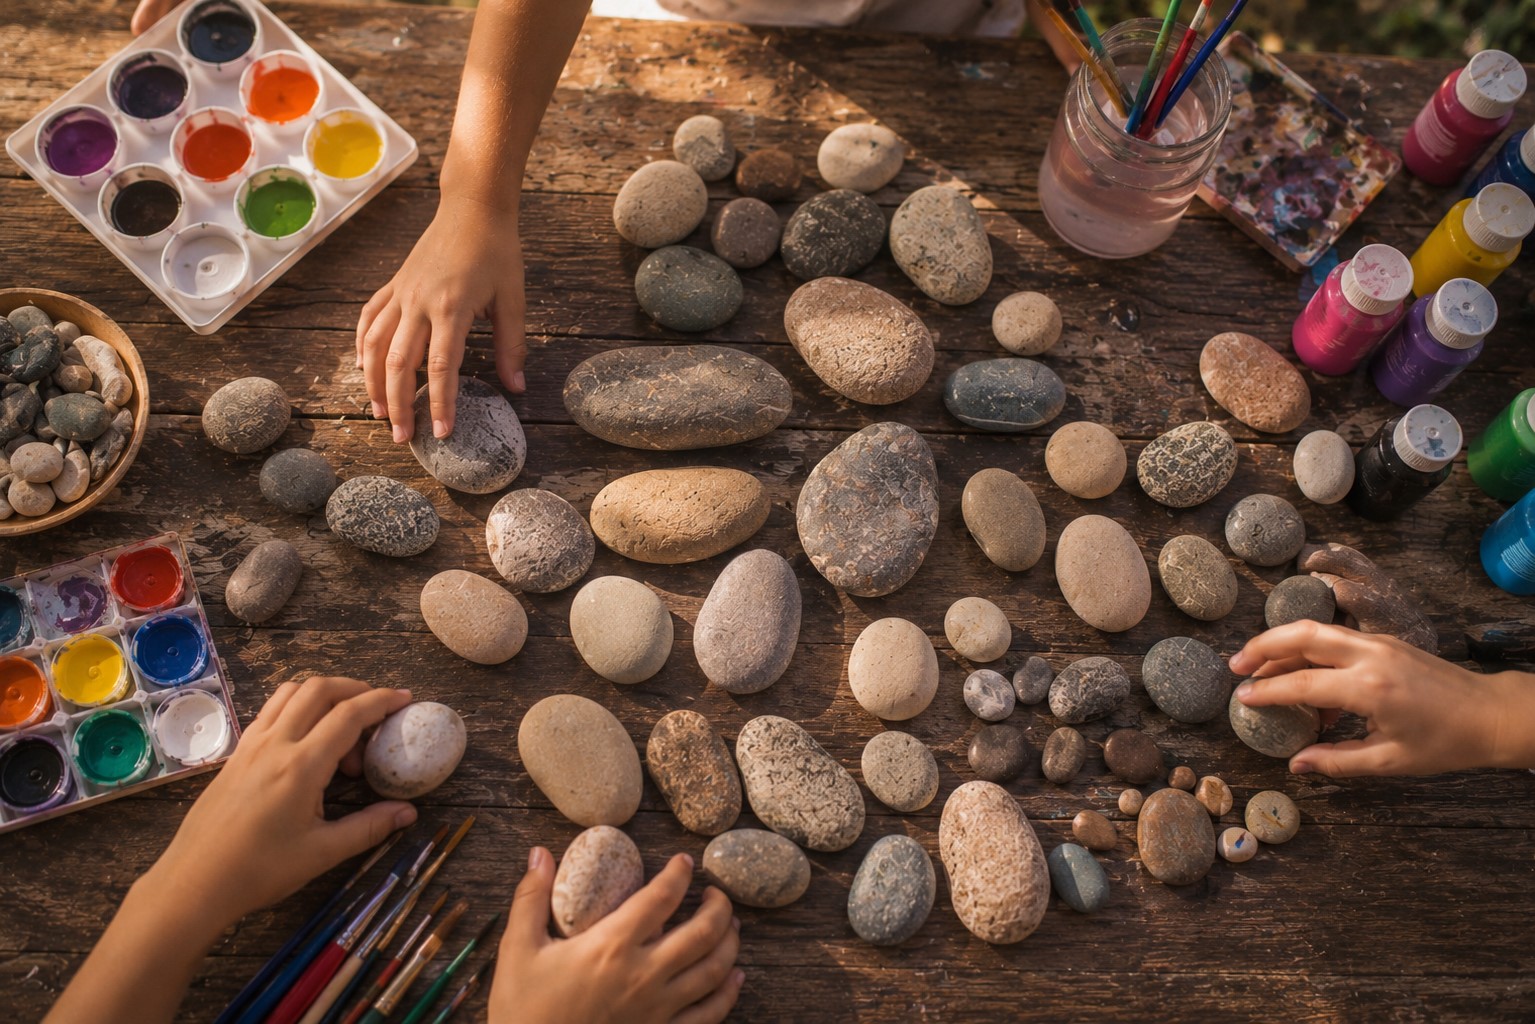
Choosing and Preparing Your Rocks
First of all, rock selection matters more than most people realize. The best rocks for painting are smooth, flat, and palm-sized. River rocks and beach pebbles are ideal because water smoothing gives them an even surface that paint adheres to beautifully. Look for rocks without deep cracks or very porous surfaces as these absorb paint unevenly and make detailed work much harder.
Collect rocks on walks, at the beach, or from garden centers that sell decorative stones. Additionally, many craft stores sell bags of smooth painting rocks specifically for this purpose. These are perfectly sized and consistently smooth, which makes them a genuinely good investment for a dedicated painting session.
Before painting, wash every rock thoroughly with soap and water. Remove all dirt, dust, and grit completely. Let them dry fully before applying any paint. Furthermore, a light sanding with fine-grit sandpaper smooths any remaining rough patches and opens up the surface slightly so paint bonds more effectively.
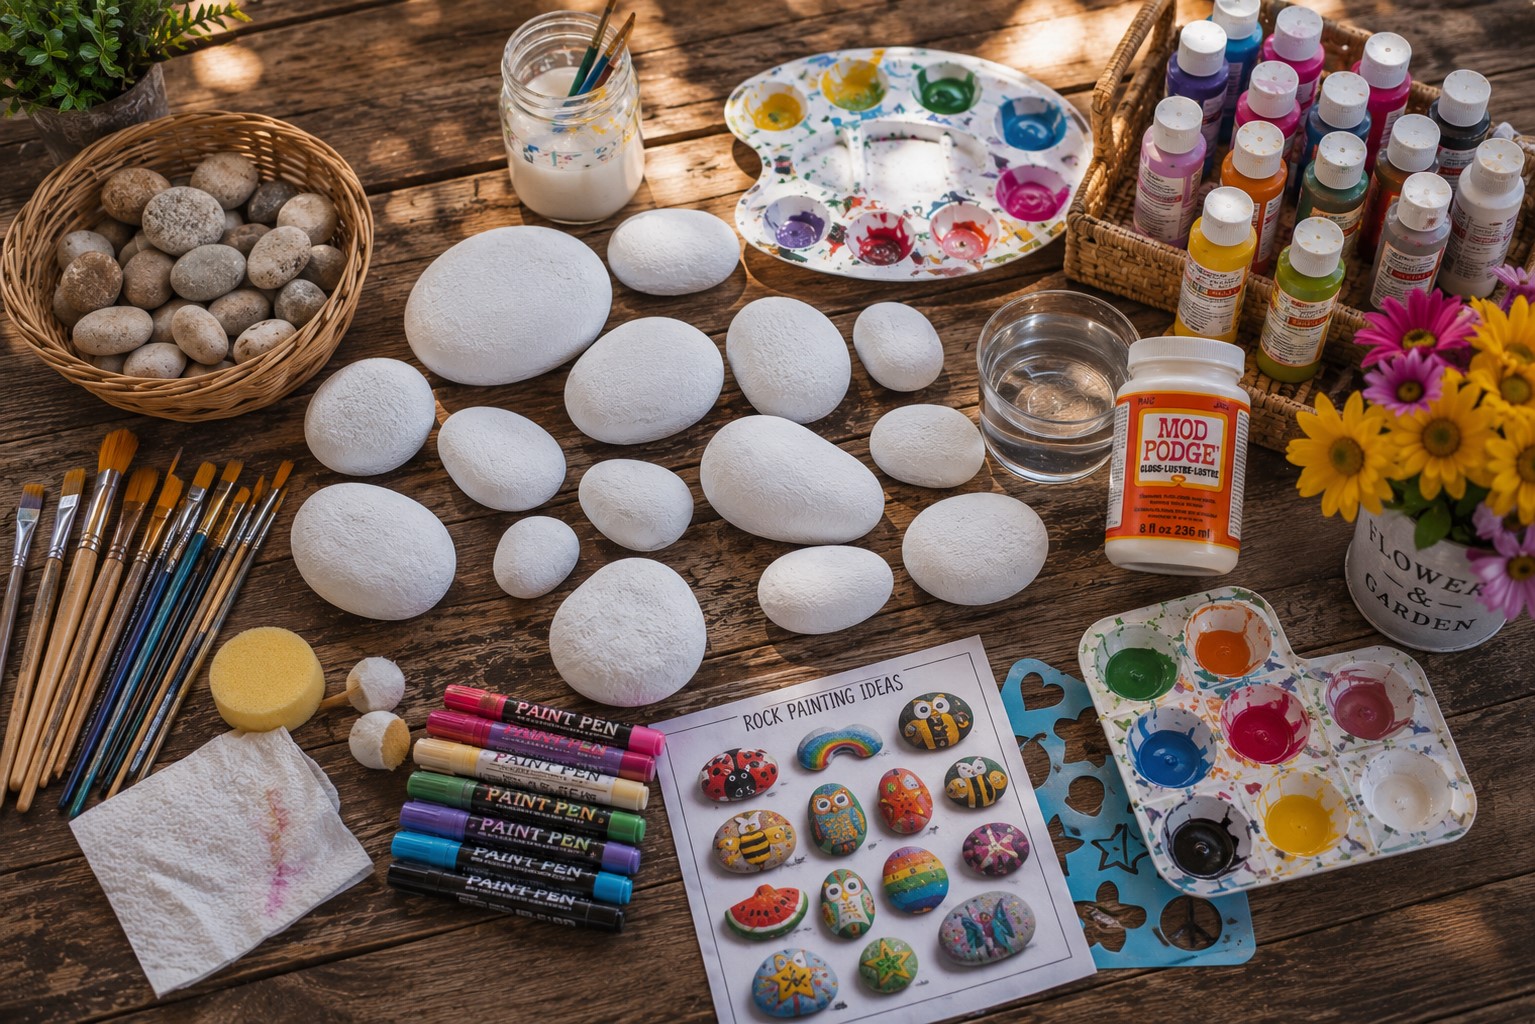
The Right Supplies to Have Ready
Acrylic paint is the best choice for rock painting without question. It is vibrant, dries quickly, adheres well to stone, and is waterproof once sealed. Avoid watercolor paint because it fades on rocks and washes off easily outdoors.
Paint pens are honestly one of the best investments for rock painting with kids. They give clean, precise lines with almost no mess. They work beautifully for details, outlines, and lettering that brushes simply cannot achieve with the same consistency.
Paintbrushes in multiple sizes. Wide flat brushes for base coats. Medium round brushes for general painting. Fine detail brushes for small precise work. Having all three sizes available means kids are never limited by their tools.
A white base coat. This is the single most important preparation step that beginners consistently skip. Painting a solid white base coat over your rock before adding any color makes every subsequent color appear dramatically more vibrant and true. Without a white base, dark rock color mutes everything painted on top of it significantly.
A sealant spray or Mod Podge. This protects finished rocks from fading, chipping, and weathering. Apply one or two coats over a completely dry finished rock. This step is what makes your rock paintings last for years rather than fading after a single season outdoors.
The 20 Rock Painting Ideas
Now let us get into the actual ideas. Consequently, I have organized these roughly from simpler designs suited to younger kids through to more detailed ideas for older children and teenagers.
Pin this: How to Make a DIY Kite With Kids That Will Actually Fly
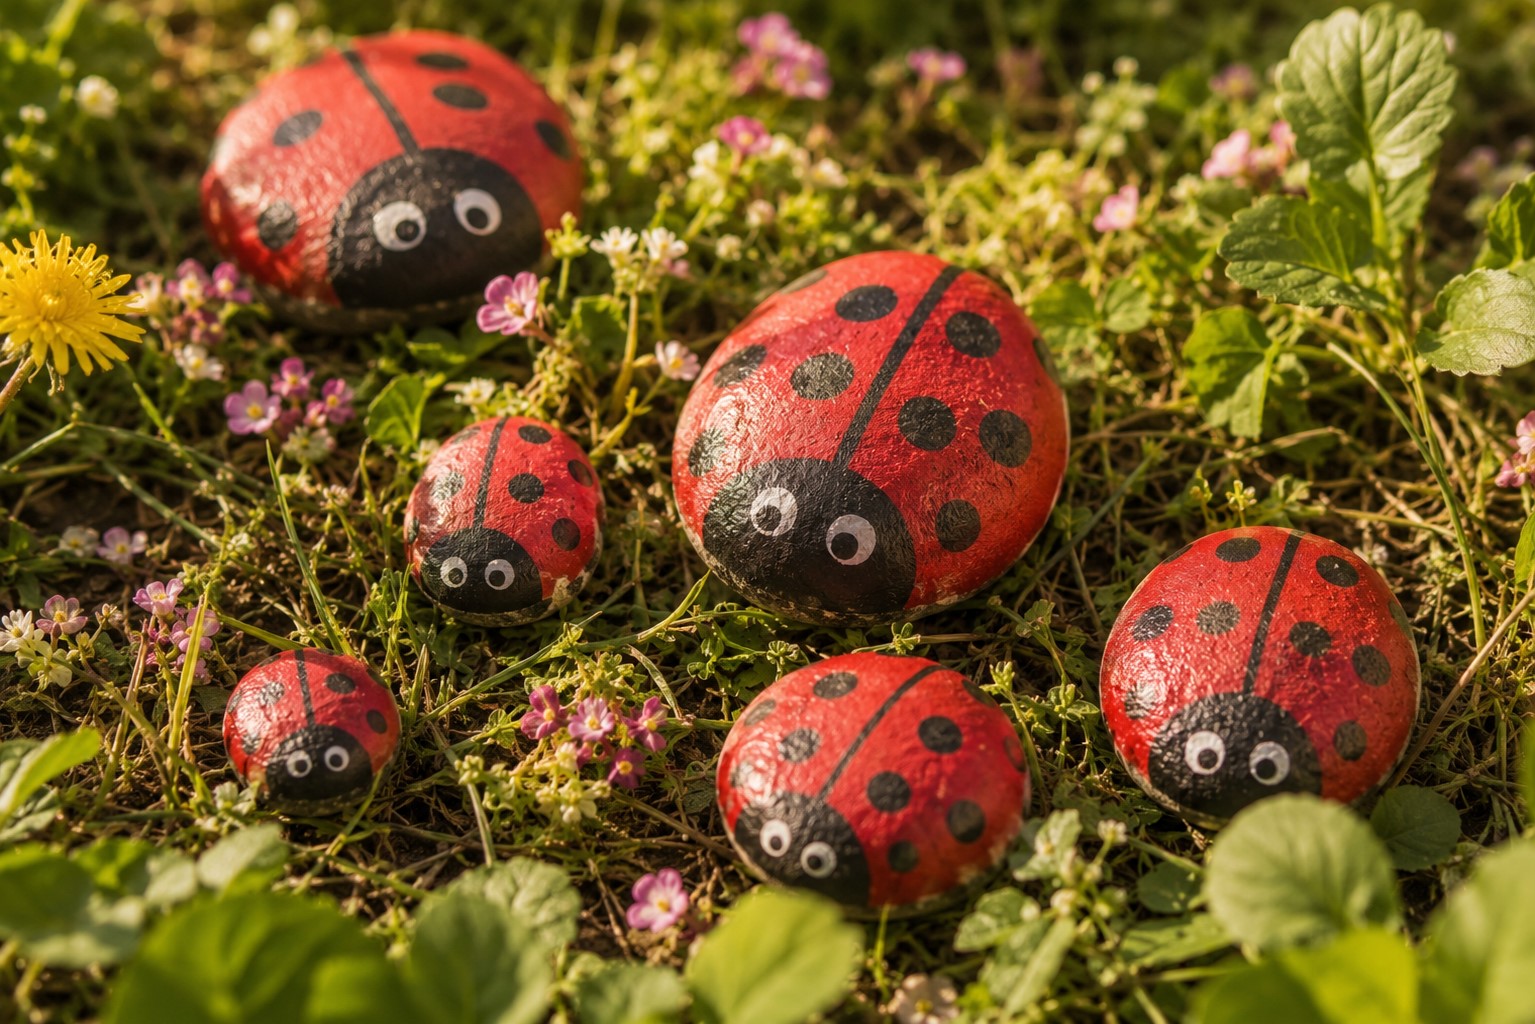
1. Ladybug Rocks
Ladybug rocks are the perfect starting point for younger painters. They require only two colors, a simple shape, and very basic technique. Yet the finished result is undeniably charming every single time.
Paint the entire rock red. Let it dry completely. Then paint a black oval at one end for the head. Draw a black line down the center of the red body. Add black dots scattered across the red wings using the end of a paintbrush dipped in paint. Finally, add two small white dots to the black head for eyes.
The result is an adorable ladybug that looks intentional and polished even when made by a four-year-old. Therefore, this is always a great first rock for nervous beginners who need an early confidence boost before attempting anything more detailed.
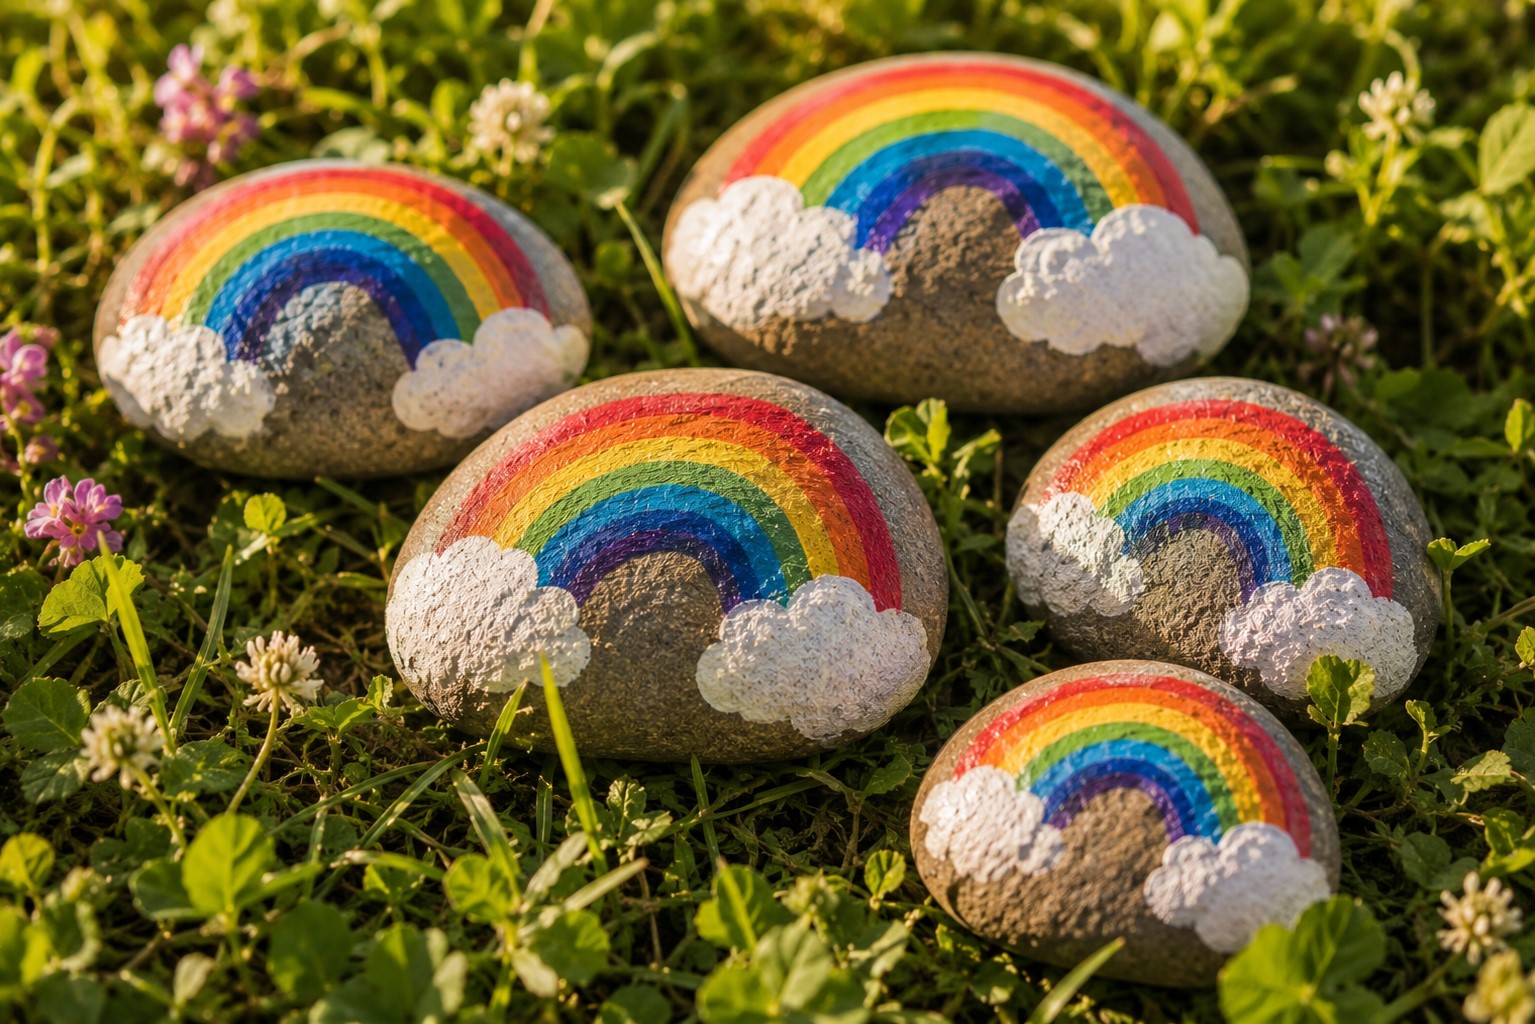
2. Rainbow Rocks
Rainbow rocks are joyful, colorful, and genuinely impossible to look at without smiling. Furthermore, they are beginner-friendly enough for very young children while still looking impressive when finished.
Paint a white base coat first. Once dry, paint curved stripes of red, orange, yellow, green, blue, and purple across the rock in rainbow arc formation. Use a fine brush to keep the stripes reasonably separate. Add small white clouds at both ends of the rainbow using a sponge or cotton ball dabbed in white paint for a soft, fluffy texture.
Additionally, rainbow rocks make wonderful gifts and are among the most popular designs in the rock hiding communities that have grown up around rock painting in recent years. More on that at the end of this post.
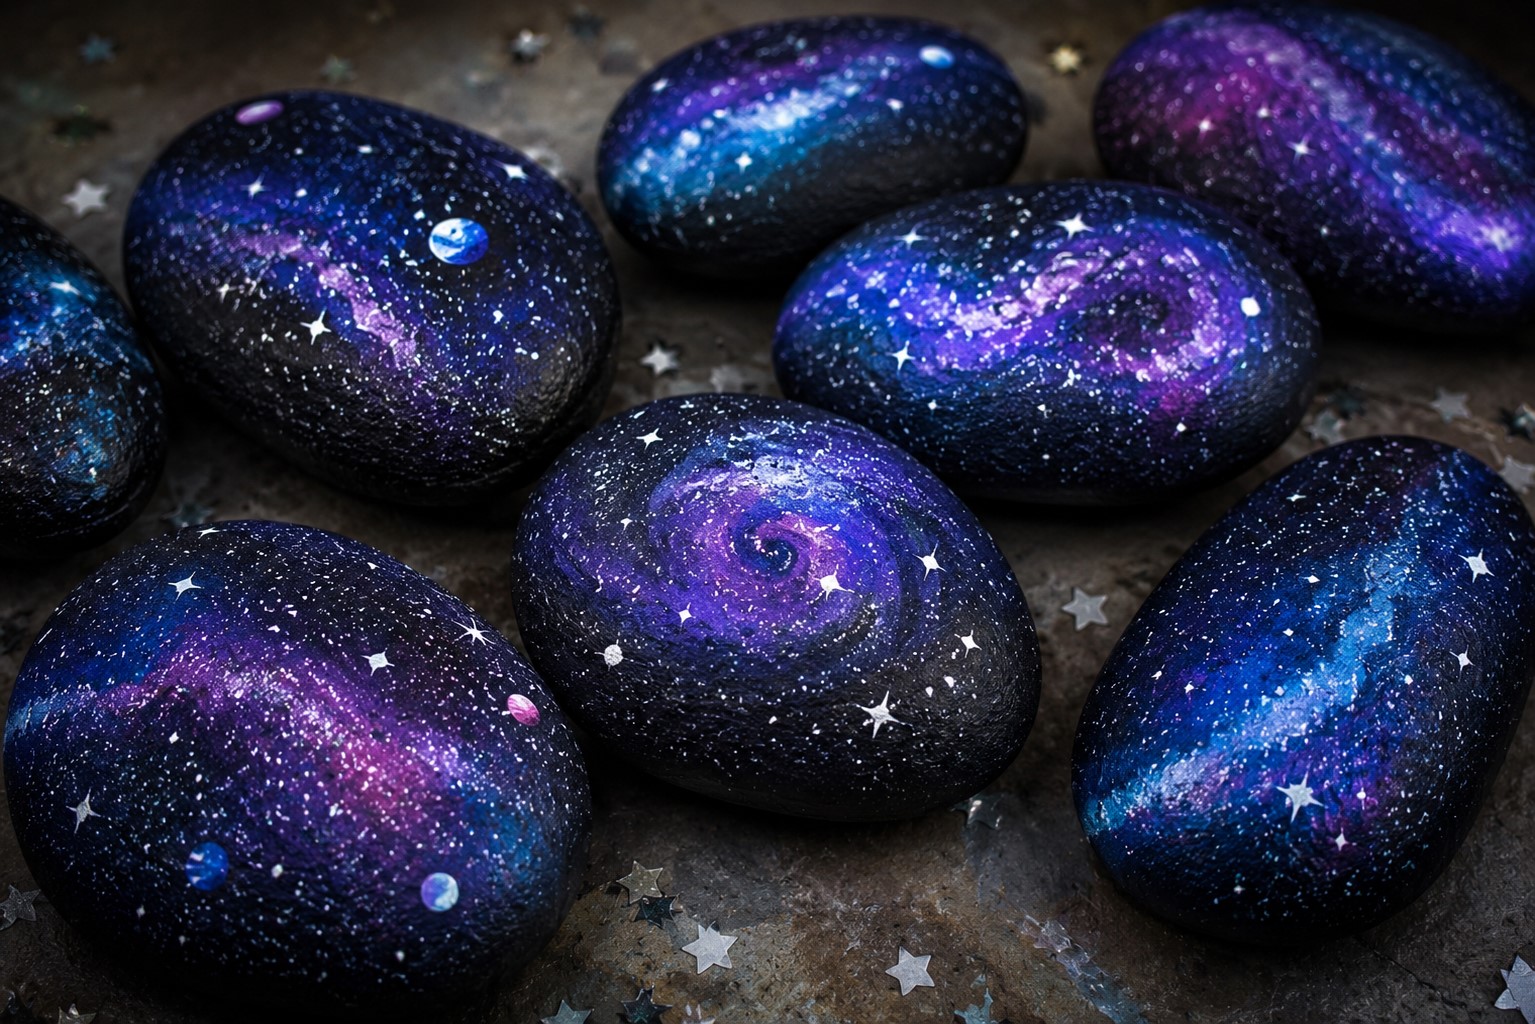
3. Galaxy Rocks
Galaxy rocks look genuinely stunning and are surprisingly achievable for kids aged seven and above. The technique is actually more about layering and blending than precise painting, which makes it very forgiving for imperfect technique.
Start with a black base coat. While the black is still slightly tacky, dab on spots of deep purple, navy blue, and dark teal using a sponge. Blend the colors gently where they meet. Once dry, add small white dots scattered across the surface using the very tip of a fine brush or the point of a toothpick dipped in white paint. These dots become the stars.
Furthermore, add a few slightly larger dot clusters to suggest star formations and nebula shapes. A soft dry brush of white across one section creates a beautiful Milky Way band effect. The finished galaxy rock looks almost professional and kids are consistently amazed that they made it themselves.
4. Emoji Faces
Emoji rocks are an instant hit with kids aged five through twelve without exception. Every child has a favourite emoji and painting it on a rock feels both personal and immediately recognizable.
Paint the whole rock yellow for the classic emoji base. Once dry, add whatever expression your child chooses. A simple smile. Tears of joy. Heart eyes. The tongue-out face. Paint pens work particularly well for the fine facial feature details because they give clean, consistent lines.
Moreover, making a whole collection of different emoji rocks together produces a genuinely fun set that kids arrange, sort, and play with long after the painting session ends. Consequently, one emoji rock almost always inspires a whole series made across multiple sessions.
You will love this: How to Turn a Plain White Pillowcase Into Custom Kid-Made Art

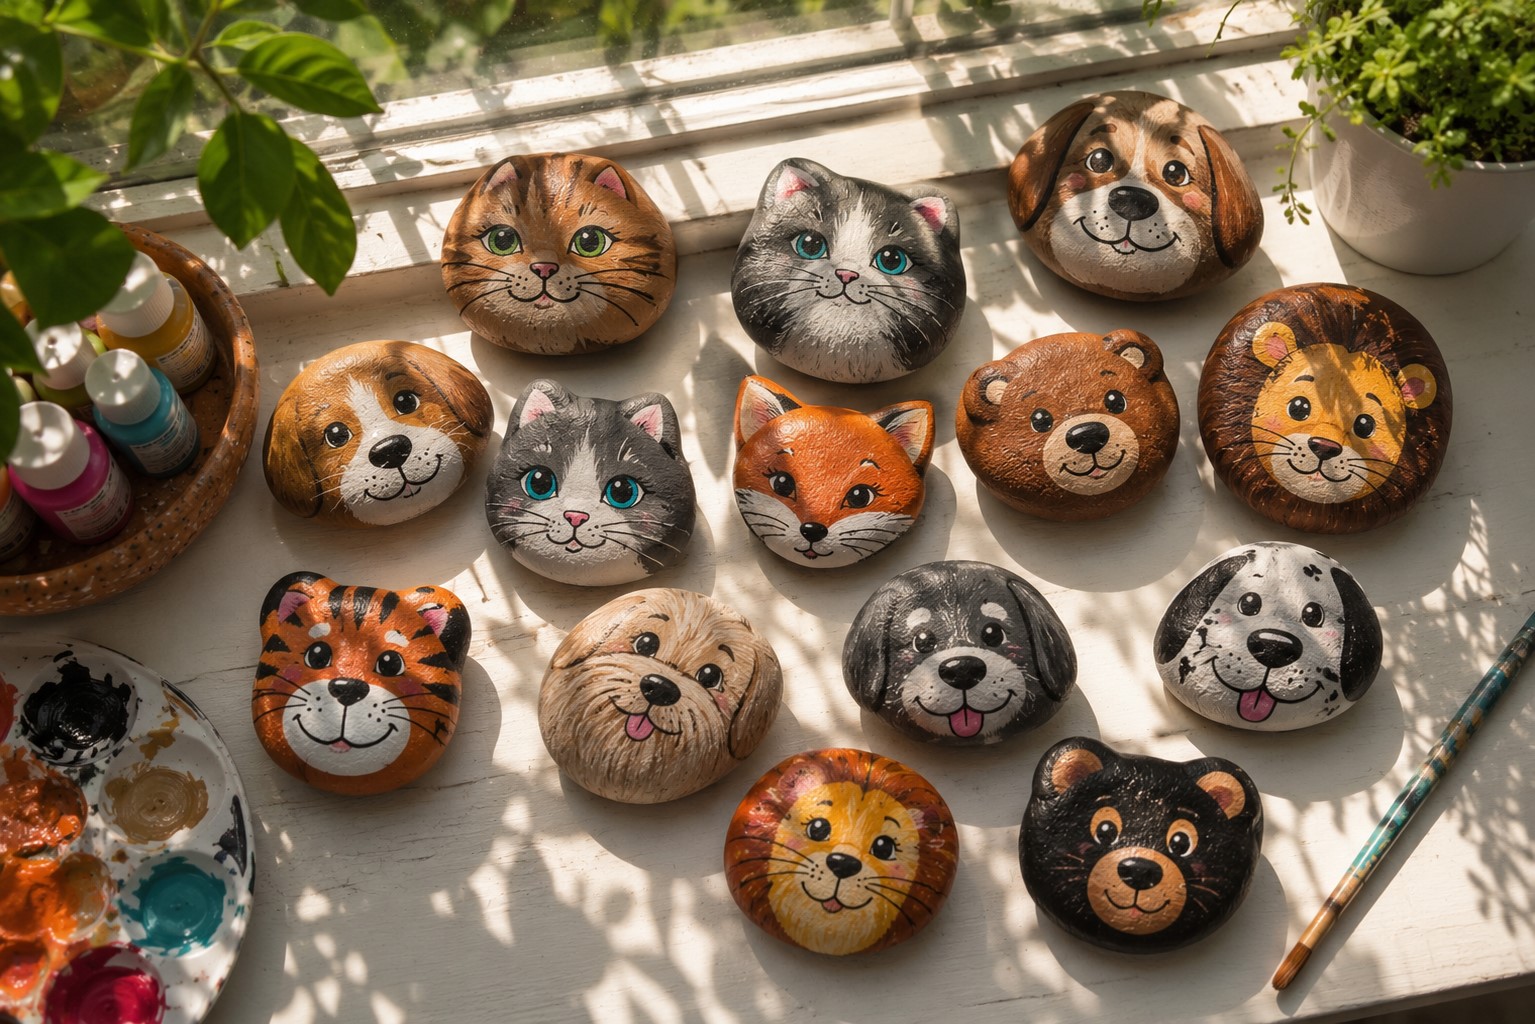
5. Animal Faces
Animal face rocks are versatile, fun, and work at every skill level. The basic technique is the same regardless of which animal you choose. Paint the base color of your animal. Add ears using paint or cut paper glued on. Add eyes, a nose, and any distinguishing markings.
A cat face needs grey or orange base paint, pointed paper ears, whisker lines, and a small pink triangle nose. A dog face needs brown base paint, floppy ear shapes, a larger oval nose, and warm eyes. A lion needs golden yellow paint, a mane painted in darker orange around the edge, and a proud expression.
Additionally, kids naturally gravitate toward painting their favourite animals which makes this idea endlessly personalizable. Furthermore, a collection of animal face rocks lined up on a windowsill looks absolutely adorable and becomes a genuine talking point for every visitor who sees them.
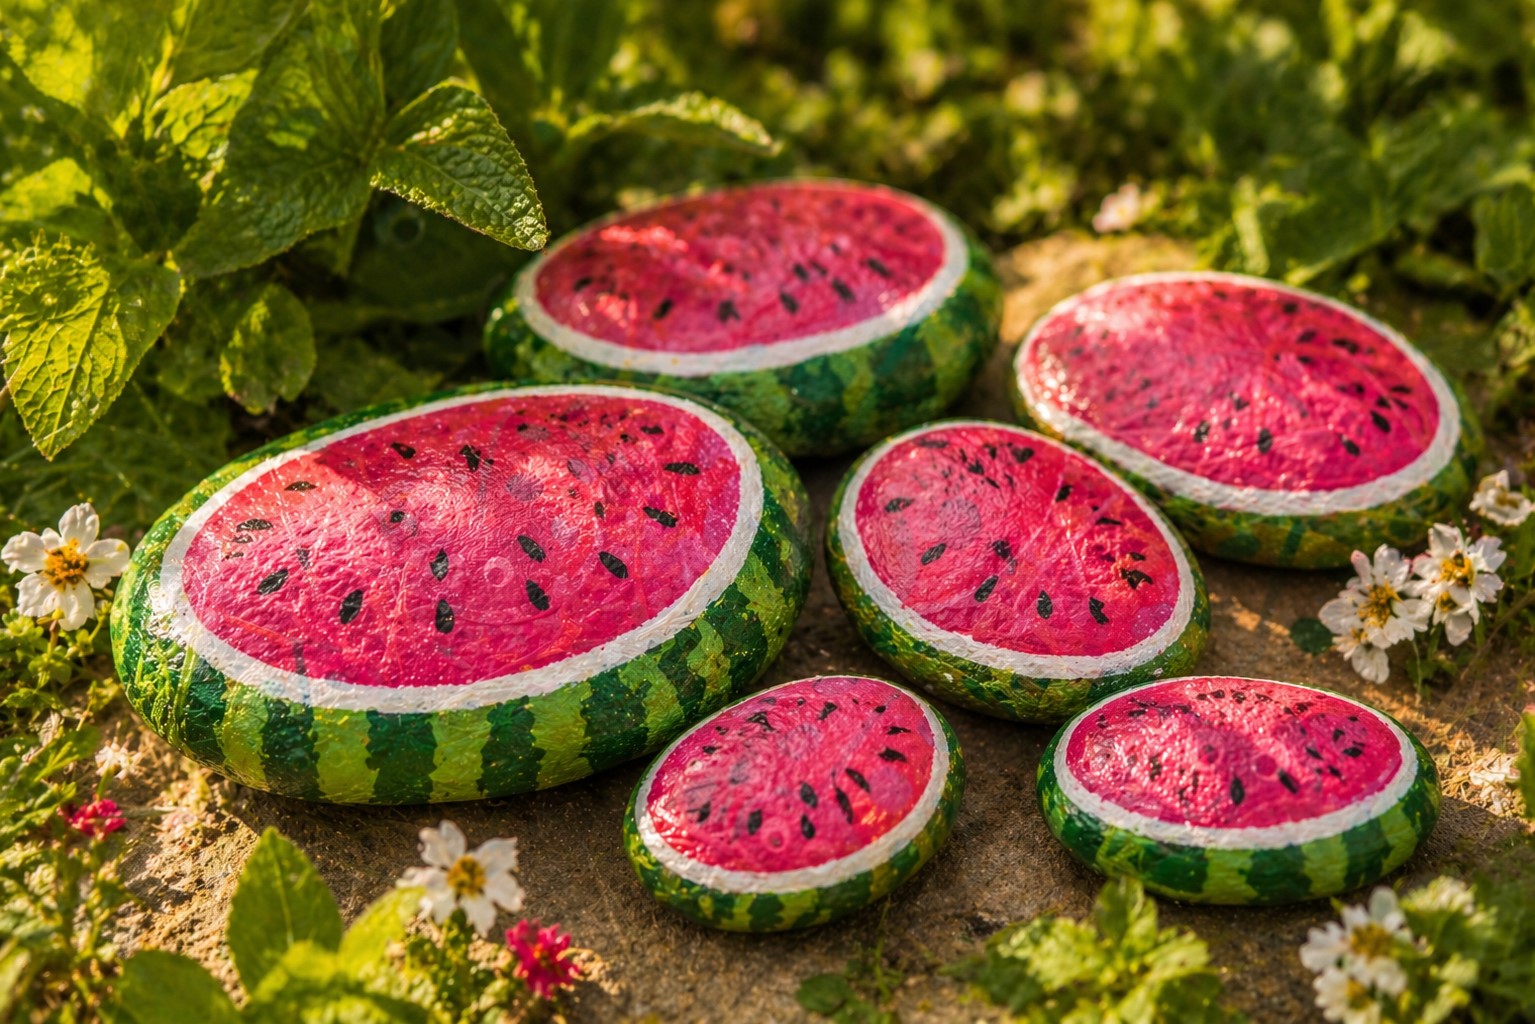
6. Watermelon Rocks
Watermelon rocks are a perfect summer-themed painting project that requires minimal technique and produces maximum visual impact. These are genuinely one of the most popular summer rock painting designs for good reason.
Paint the top two thirds of the rock bright green. Paint the bottom third white. Once dry, paint a wide stripe of bright pink or red just above the white section. Add small black oval seeds scattered across the pink section using a toothpick or fine brush. Finally, add thin black curved lines to the green section to suggest the watermelon rind pattern.
The result looks cheerful, summery, and immediately recognizable. Moreover, these make wonderful outdoor decorations for garden paths and flower beds throughout summer.
See what everyone loves: How to Make a DIY Dreamcatcher With Your Child Using Yarn and Sticks
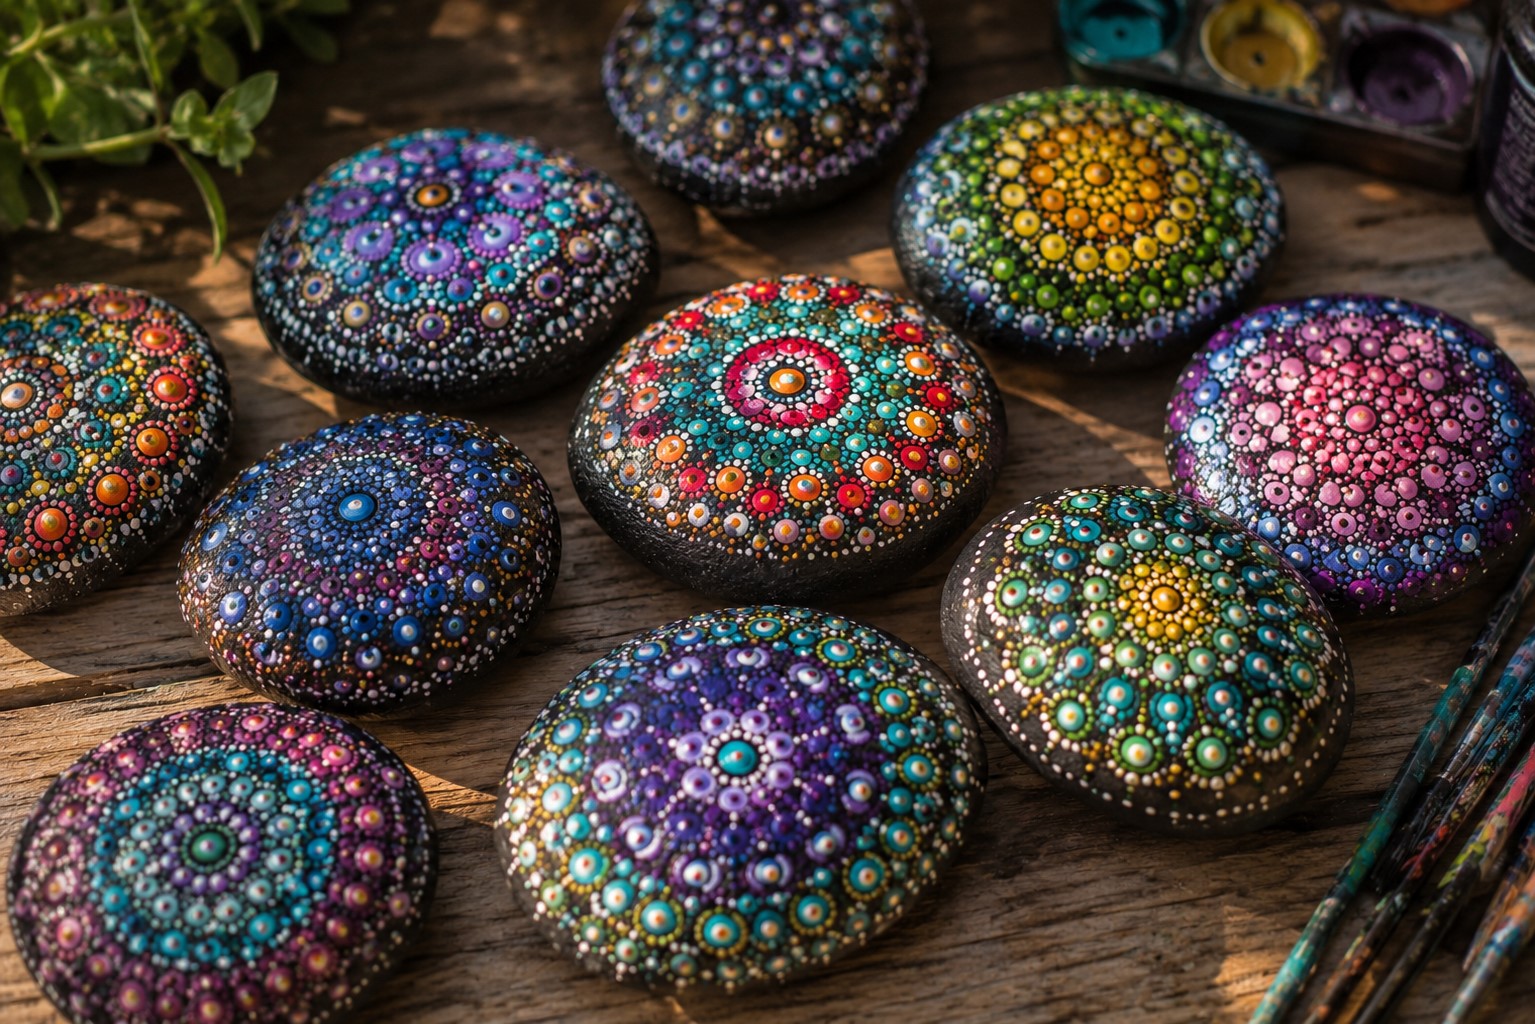
7. Mandala Rocks
Mandala rocks are the rock painting design that adults become just as obsessed with as kids. The repetitive, symmetrical dot patterns are meditative to create and produce genuinely breathtaking results.
The key tool for mandala rocks is a dotting tool. However, everyday household objects work equally well. The end of a pencil, a toothpick, a bobby pin, the back of a brush handle, and even a cotton swab all create different sized dots. Having a range of dot-making tools available gives you the variety needed for a complex mandala pattern.
Start by marking the center of your rock with a small dot. Work outward in concentric circles, placing dots at regular intervals around each circle. Alternate colors between circles for maximum visual impact. Keep your dot spacing consistent within each circle for a clean, symmetrical result.
Furthermore, mandala rocks are genuinely impressive finished objects. They look like something that belongs in a gift shop. Consequently, older kids and teenagers who might be skeptical about rock painting often get completely hooked the moment they attempt their first mandala.
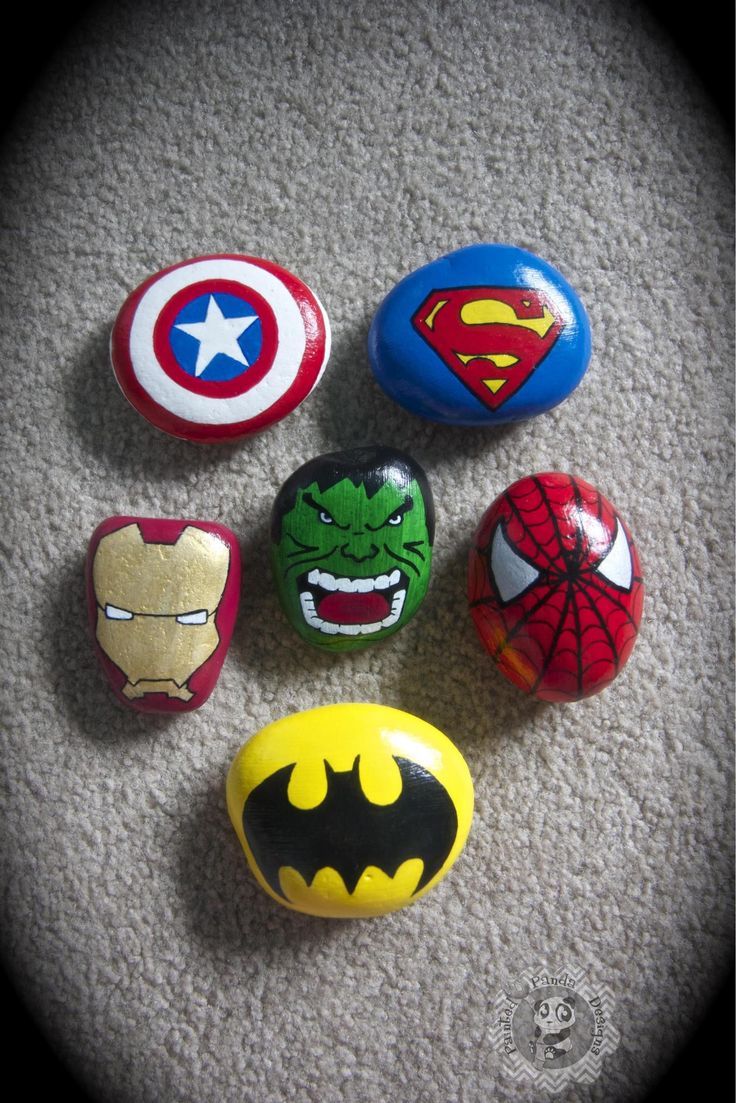
8. Superhero Rocks
Every child has a favourite superhero. And painting that hero’s symbol or colors onto a rock creates an immediate personal treasure that feels genuinely meaningful to the child who made it.
Simple symbol rocks are the most achievable approach. A yellow bat signal on black. A red and gold chest plate on a rounded rock. A red and blue divided rock with a spider symbol. A green rock with a subtle darker green textured pattern for a hulk effect.
Additionally, let kids invent their own original superhero instead of copying an existing one. Their own superhero name, their own color scheme, their own symbol. This creative ownership produces some genuinely inventive and imaginative designs that feel far more personal than any licensed character ever could.
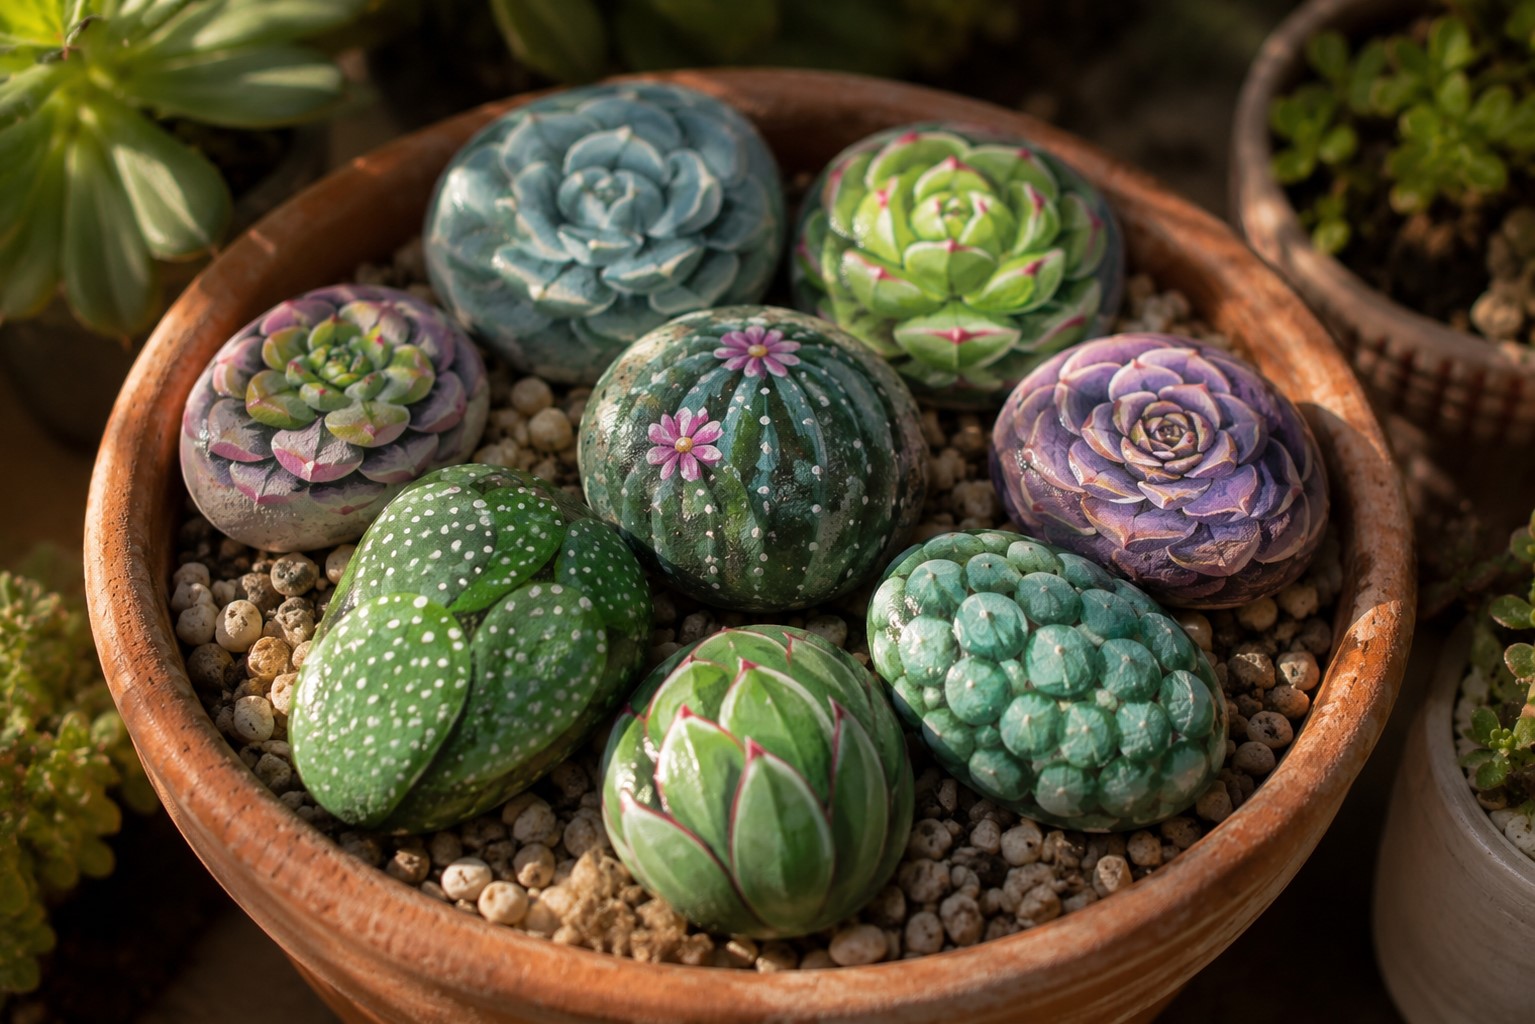
9. Succulent Rocks
Succulent rocks blur the line between craft and home decor in the most charming way possible. These painted rocks look remarkably like real succulents when done well and make beautiful additions to plant displays and garden spaces.
Paint a pale sage green base coat. Once dry, paint overlapping teardrop shapes in slightly darker green radiating outward from a central point, just like real succulent leaves. Add depth by painting the tips of each leaf in a slightly deeper green or dusty purple. Finally, add tiny white dots at the center to suggest the newest growth point of the plant.
Furthermore, grouping several succulent rocks of different sizes together in a terracotta pot creates a genuinely beautiful display that requires no watering and never dies. This is consequently one of the most popular rock painting projects for older kids who want to create something genuinely decorative for their bedroom.
See what is trending right now: How to Make a Paper Lantern With Your Kids for Any Celebration
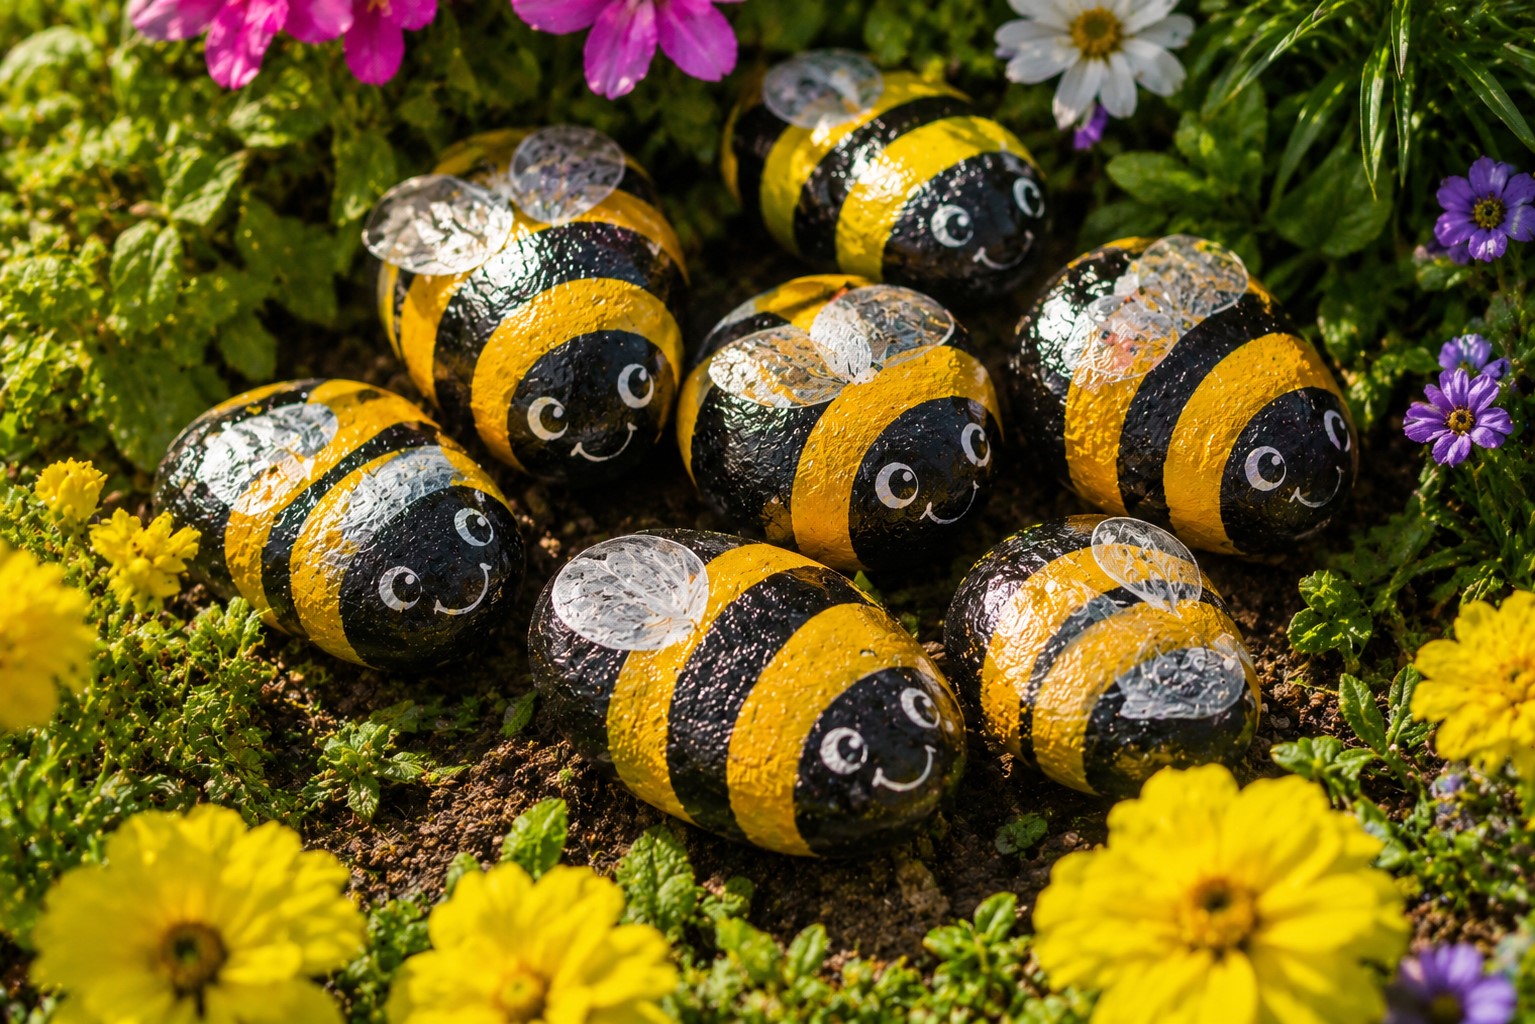
10. Bumble Bee Rocks
Bumble bee rocks are cheerful, summer-appropriate, and achievable for kids from about age five upward. Moreover, the black and yellow color combination is bold and graphic enough to look striking even with relatively basic technique.
Paint the rock yellow. Once dry, add thick black horizontal stripes across the body. Paint a black rounded head at one end. Add white oval wings on either side using white paint slightly blended at the edges for a translucent effect. Add a small stinger point at the opposite end from the head. Finally, add tiny white dot eyes and a curved smile on the head section.
Additionally, bumble bee rocks placed among real garden flowers look absolutely magical. Kids love positioning them throughout the garden and pretending they belong to the flowers naturally.
11. Painted Stone Characters From Books
Book character rocks combine literacy enthusiasm with creative art in a wonderful way. Therefore, this idea is particularly great for encouraging reading-focused children to engage with rock painting.
Ask your child to choose their absolute favourite book character. Then work together to figure out the key visual features that make that character immediately recognizable. A distinctive color. A specific item they always carry. A signature expression or hairstyle.
Keep the design simple and graphic rather than attempting photorealistic detail. Bold colors, clear shapes, and one or two identifying features are all you need. The rock does not need to look exactly like the character. It just needs to capture enough essence that the child knows immediately who it represents.
Furthermore, making a whole set of rocks representing characters from the same book series creates a genuinely charming collection that sits beautifully on a bookshelf alongside the actual books.

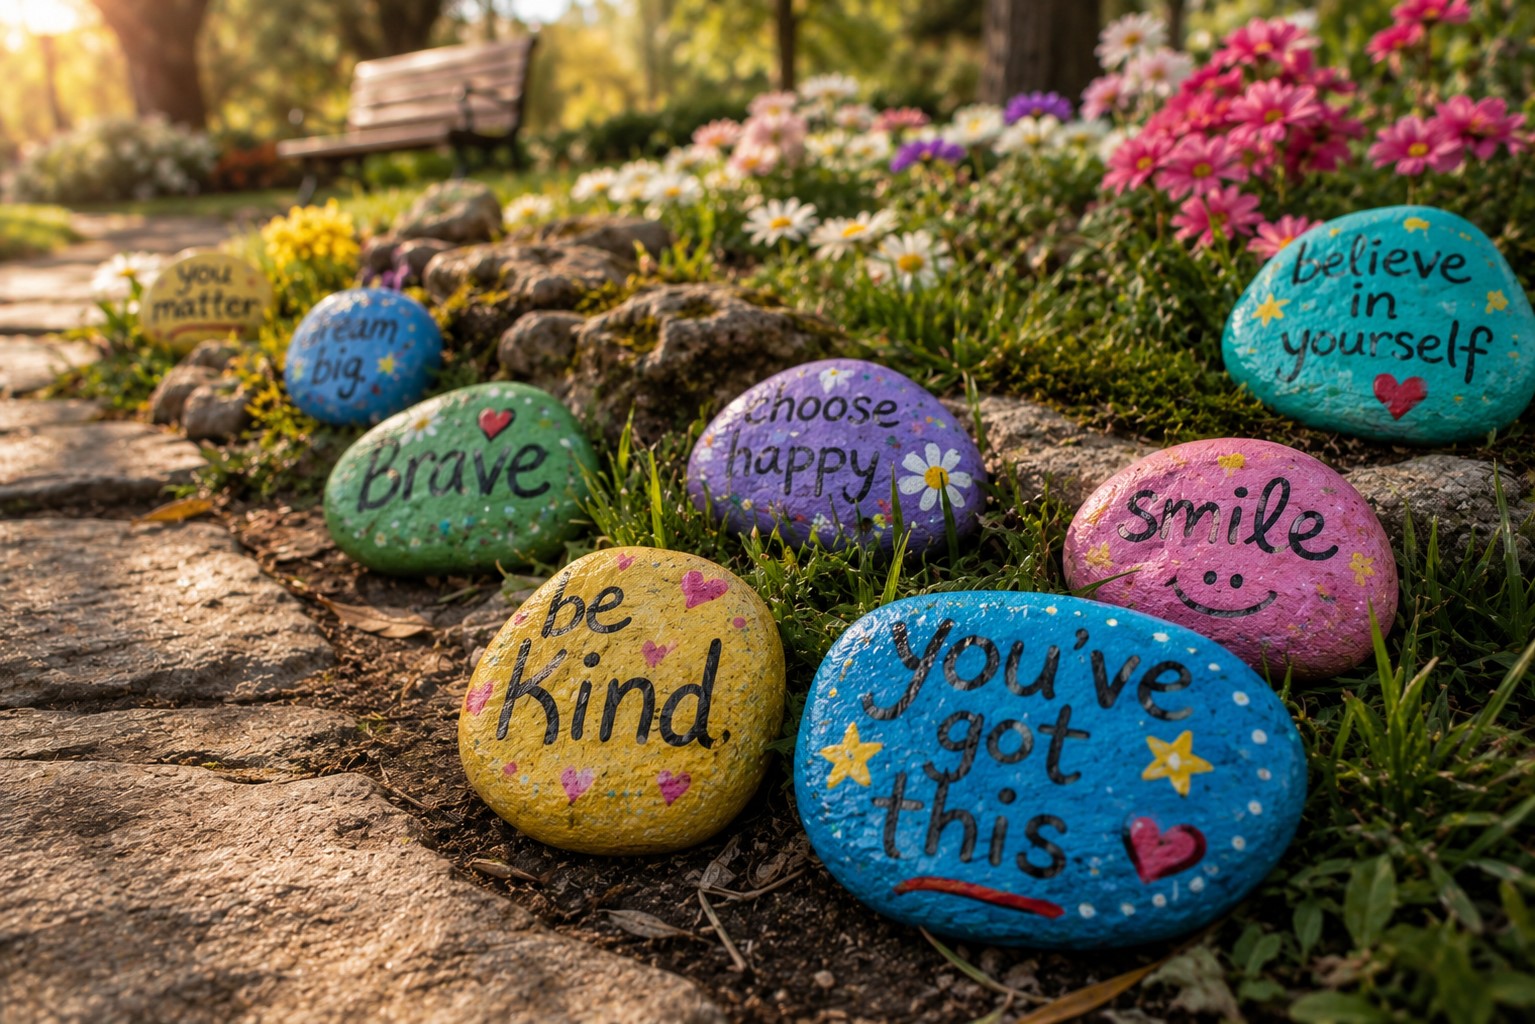
12. Positive Message Rocks
Positive message rocks are simple, meaningful, and have a beautiful tradition behind them. The rock kindness movement that has grown globally involves painting positive messages on rocks and leaving them in public places for strangers to find. The idea is simple and genuinely wonderful.
Use paint pens or fine brushes to write uplifting words and phrases on painted rocks. Words like brave, kind, loved, you’ve got this, smile, and keep going resonate with children and adults alike. Surround the words with simple decorative elements like hearts, flowers, stars, and dots.
Additionally, the act of intentionally creating something kind for a stranger is a genuinely powerful experience for children. It teaches generosity, empathy, and the ripple effect of small acts of kindness in a very tangible and memorable way. Therefore, positive message rocks are one of the most emotionally valuable rock painting projects on this entire list.
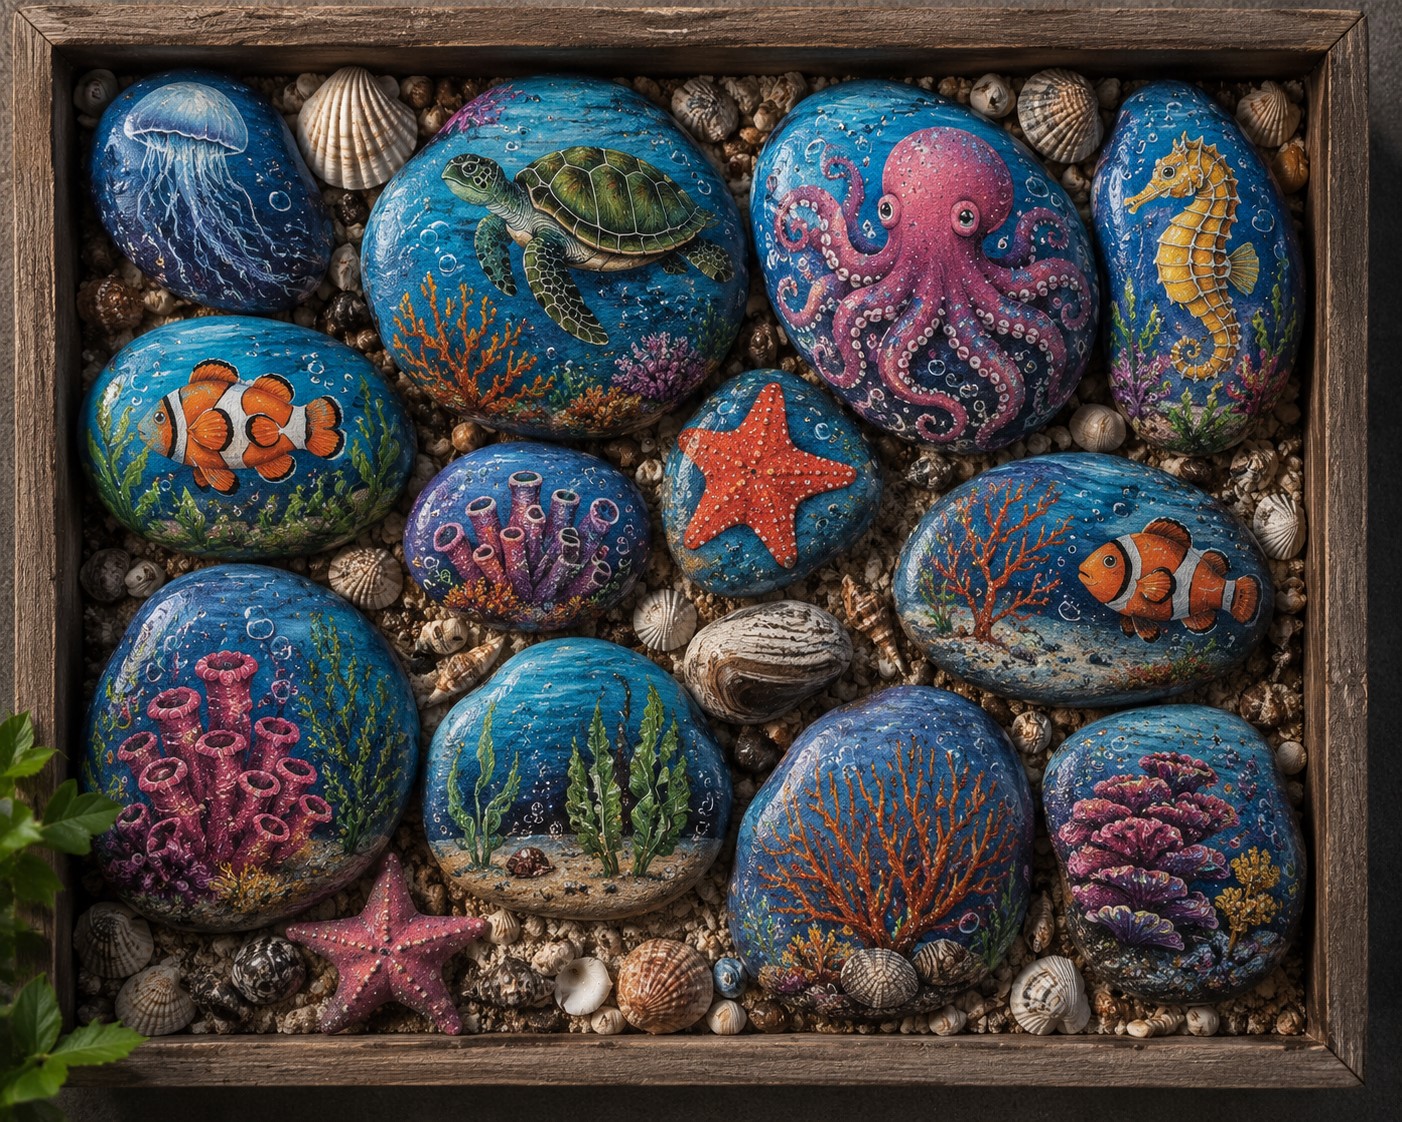
13. Under the Sea Rocks
Under the sea designs give kids a whole themed world to paint across a collection of rocks. Each rock becomes a different ocean creature or element that eventually forms a complete underwater scene when displayed together.
Octopuses with curling tentacles. Clownfish with bold orange and white stripes. Starfish with textured dotted surfaces. Seahorses with elegant curved bodies. Sea turtles with detailed shell patterns. Simple waves and bubbles. Coral shapes in bright pink and orange.
Furthermore, painting the background of each rock in varying shades of blue before adding the sea creatures gives the whole collection a cohesive feel. When arranged together on a shelf or in a shallow tray of sand, the collection looks like a genuine underwater diorama that kids will rearrange and play with repeatedly.
People are loving this: How to Create a No-Sew Fleece Blanket With Your Kids in One Hour
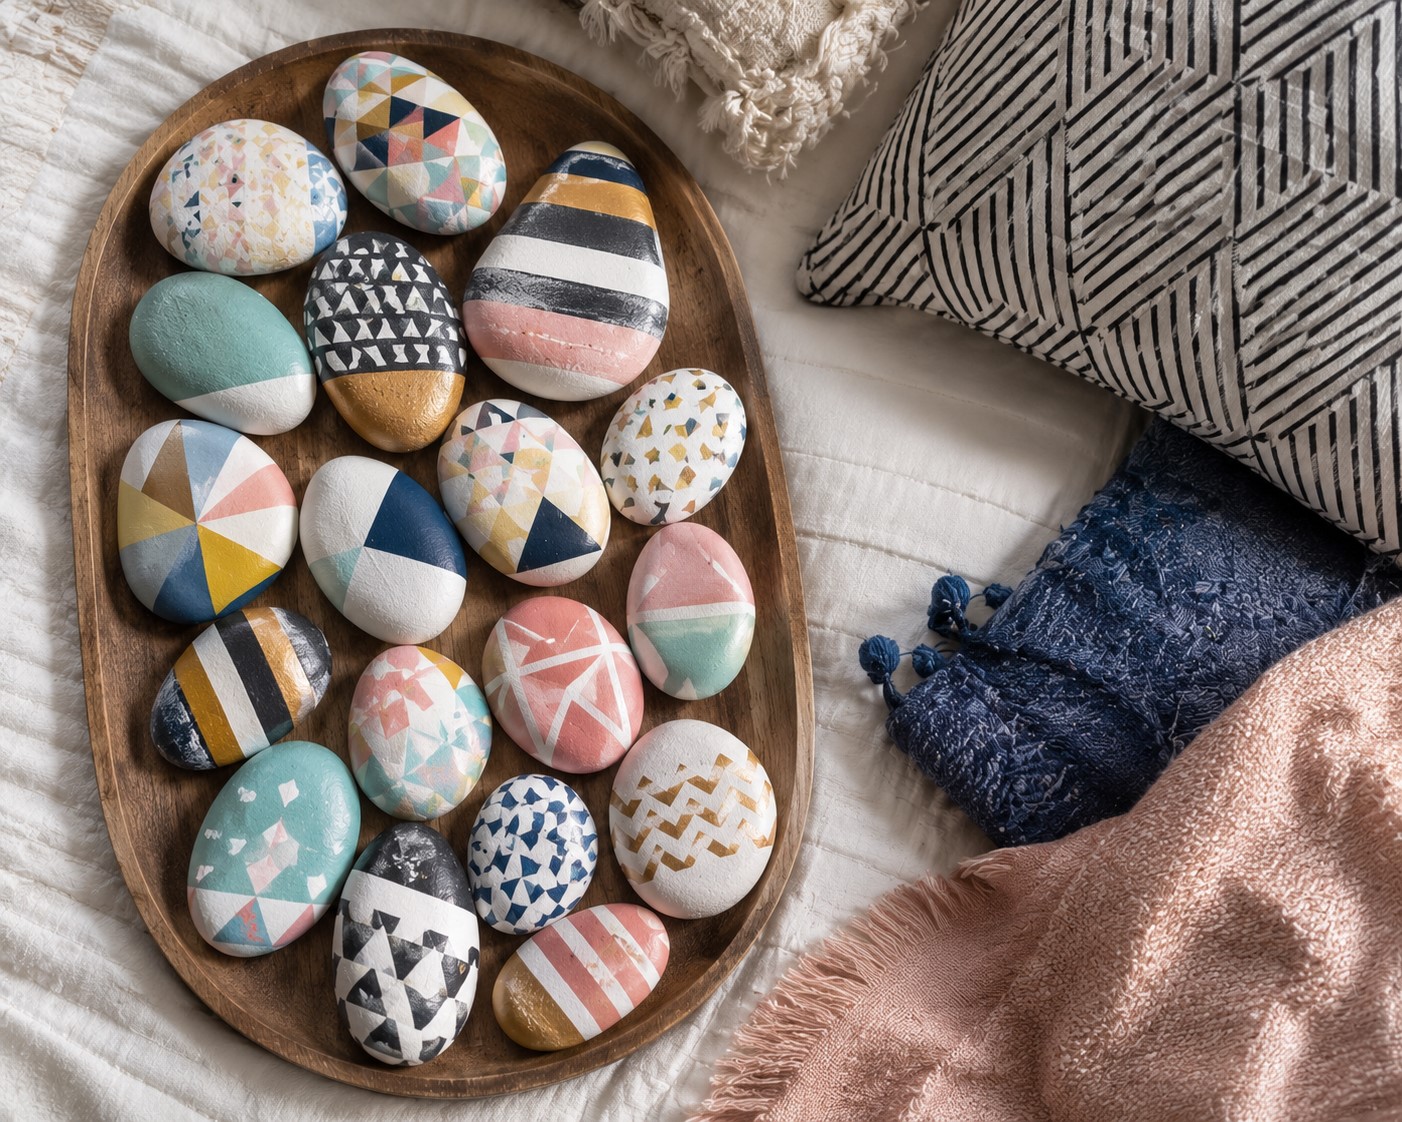
14. Geometric Pattern Rocks
Geometric pattern rocks suit older kids and teenagers who enjoy precision and pattern. The results look modern, sophisticated, and genuinely artistic in a way that works beautifully as bedroom decor.
Use masking tape to create clean geometric divisions across the rock surface. Paint each section in a different color from a cohesive palette. Remove the tape once the paint is fully dry to reveal crisp, clean lines between color sections. Then add additional hand-painted geometric details within each section if desired.
Additionally, paint pens used freehand produce beautiful geometric patterns without tape. Triangles, diamonds, chevrons, and hexagons drawn repeatedly across a rock surface in two or three complementary colors look striking and intentional. Consequently, geometric rocks are consistently among the designs that teenagers are most proud of and most likely to display permanently in their rooms.
Your children will thank you for this: The Easiest Kids Friendship Bracelet Tutorial for Complete Beginners
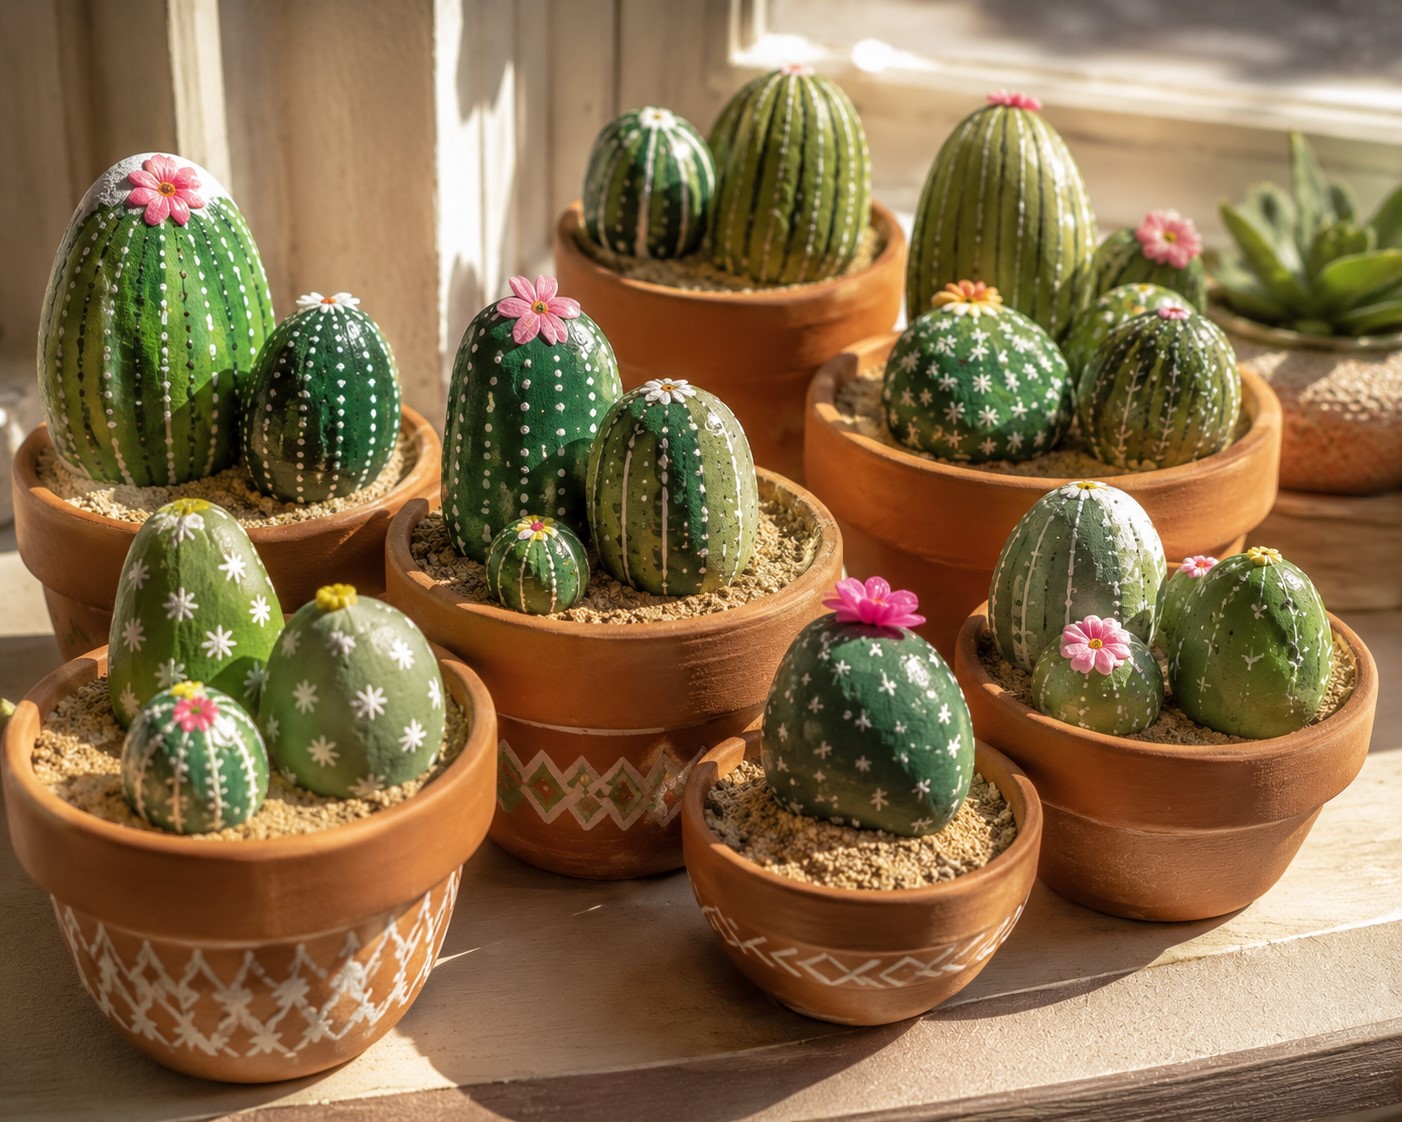
15. Cactus Rocks
Cactus rocks are currently everywhere in home decor and kids absolutely love making them. They are quick, graphic, and immediately recognizable without requiring advanced painting skills.
Paint the rock a warm sandy beige or terracotta color for the desert background. Then paint a simple bold green cactus shape on top. Add tiny white or yellow dots in a regular pattern across the cactus body to represent spines. Paint a small bright pink or red flower at the top of the cactus for a cheerful finishing touch.
Furthermore, displaying cactus rocks in small terracotta pots with a layer of sand creates a miniature desert scene that looks genuinely cute on a windowsill or desk. Kids who love desert and southwestern aesthetics absolutely obsess over this particular design.
You might want to try this out: How to Make Pressed Flower Art That Will Last for Years
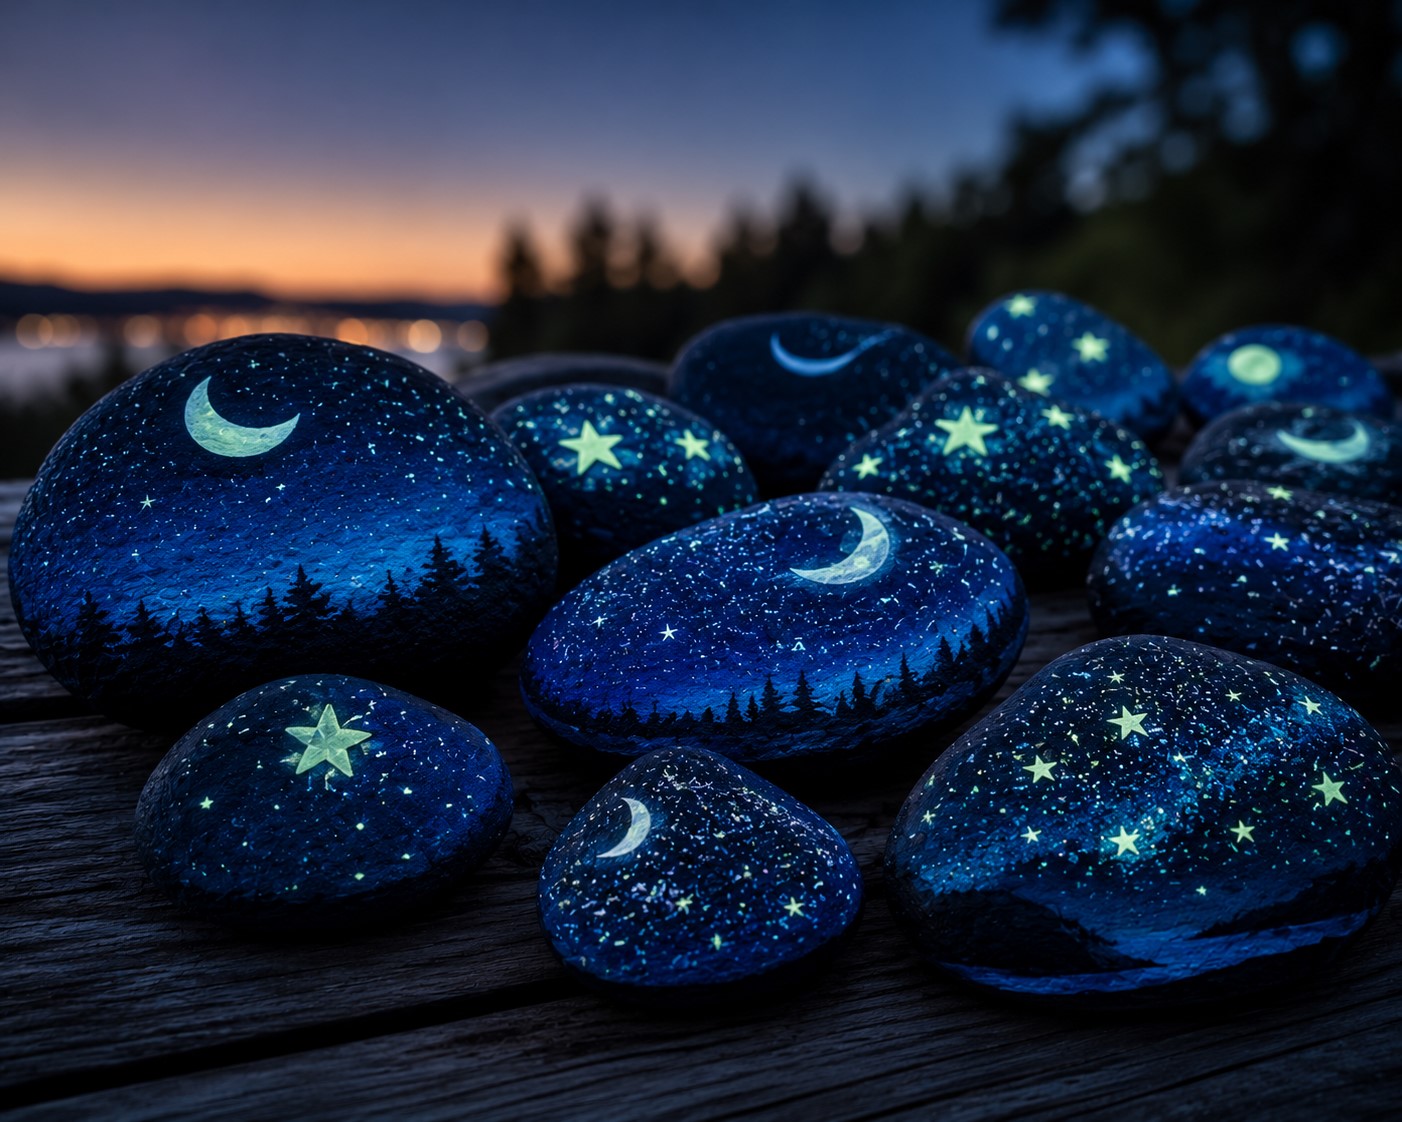
16. Night Sky Rocks
Night sky rocks are similar in spirit to galaxy rocks but simpler and more accessible for younger painters. They capture the magic of looking up at the stars on a clear summer night and translating that feeling onto a small stone.
Paint the whole rock deep navy blue or black. Once completely dry, add a scattering of white dots across the surface for stars using a toothpick or the very tip of a fine brush. Add a simple white crescent moon to one side. Optionally add a shooting star with a long white trail. The minimalist simplicity of this design is precisely what makes it so beautiful.
Moreover, night sky rocks glow beautifully when made with glow-in-the-dark paint mixed into the star dots. In daylight they look perfectly normal. In the dark, the stars glow softly and kids find this genuinely magical at bedtime.
Make sure you come back to this: How to Make Homemade Bubble Solution That Actually Creates Giant Bubbles
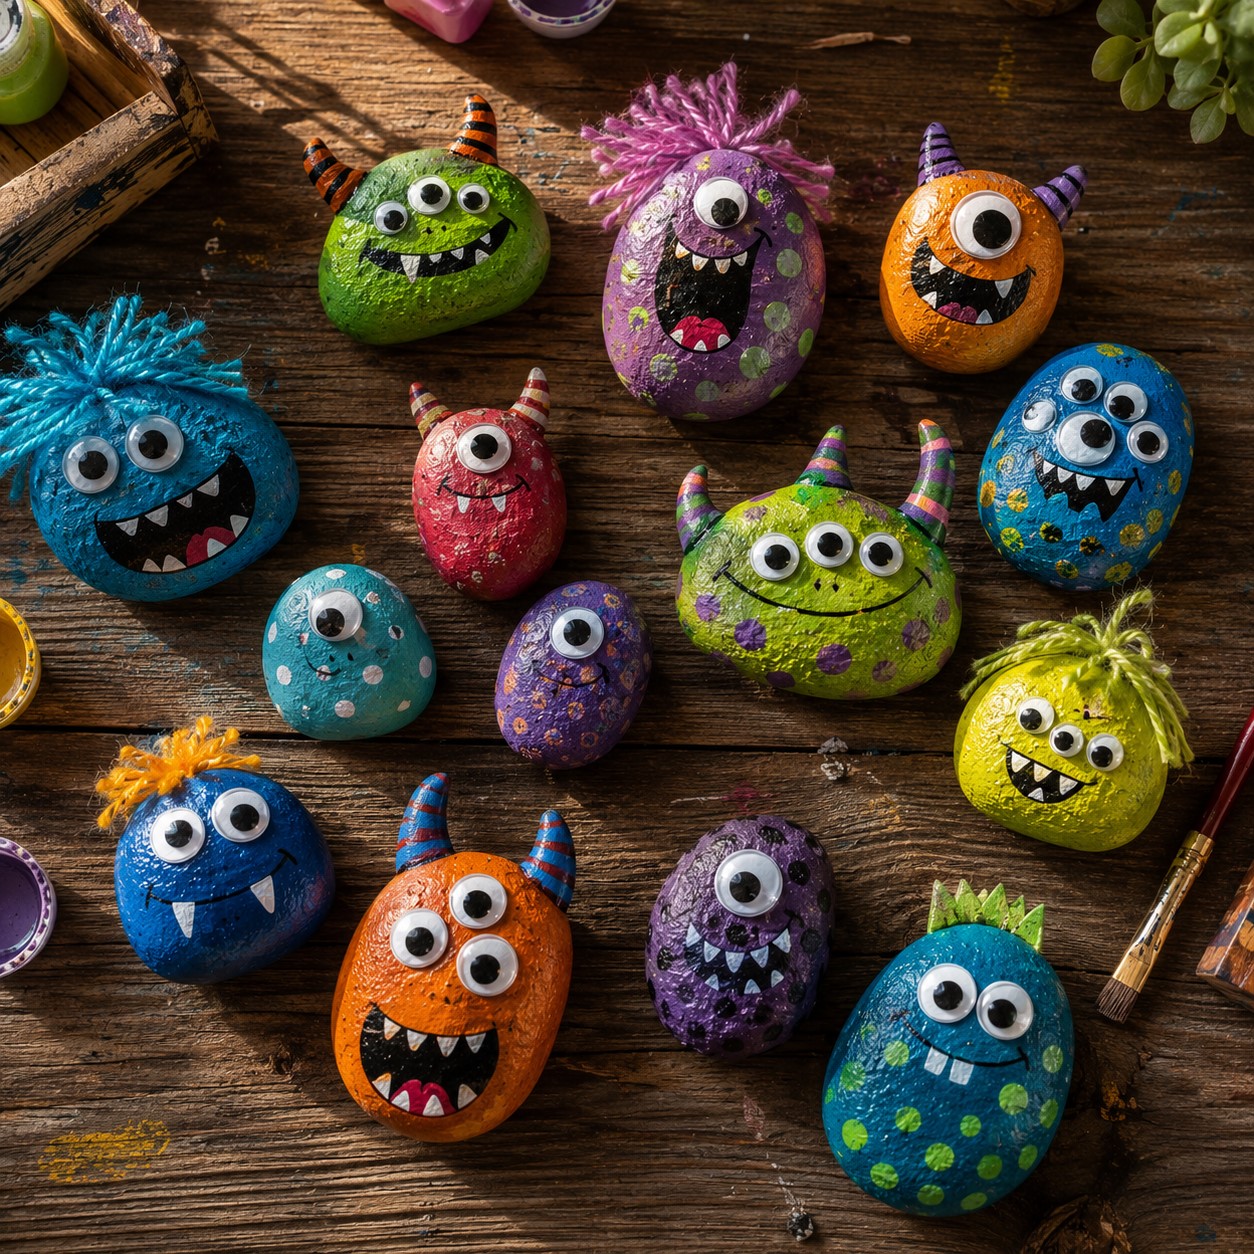
17. Monster Rocks
Monster rocks are wonderfully silly, enormously fun to make, and give kids complete creative permission to be as wild and imaginative as they want to be.
The beauty of monster rocks is that there are genuinely no rules. Any combination of colors, eyes, teeth, horns, spots, and expressions is valid and correct. A purple monster with six eyes and a zigzag mouth is just as right as a green monster with one eye and a friendly grin.
Googly eyes glued onto painted rocks add an extra dimension of silliness that kids love. Additionally, adding paper accessories like tiny horns cut from cardstock or yarn hair glued to the top of the rock creates genuinely three-dimensional monster characters that feel like toys as much as art.
Therefore, monster rocks are consistently the design that produces the most laughter during a group rock painting session. That joyful, unselfconscious creativity is genuinely worth nurturing in every child.
18. Food Rocks
Food rocks are quirky, funny, and instantly recognizable. They make people smile without fail and kids love the humor of a stone that looks convincingly like a piece of food.
A round rock painted red with a green leaf on top becomes a perfect apple. A longer oval rock painted yellow becomes a banana. A flat rock painted brown with darker brown chips becomes a chocolate chip cookie. A rock painted to look like a fried egg sunny-side up is consistently one of the funniest and most impressive designs in any collection.
Furthermore, a basket of mixed food rocks displayed in the kitchen makes a genuinely charming decorative piece that becomes a conversation starter for every guest who notices it. Consequently, food rocks are among the most shareable and photographable designs on this entire list.
Try this out this weekend: How to Make a DIY Fairy Garden With Your Daughter on a Lazy Saturday

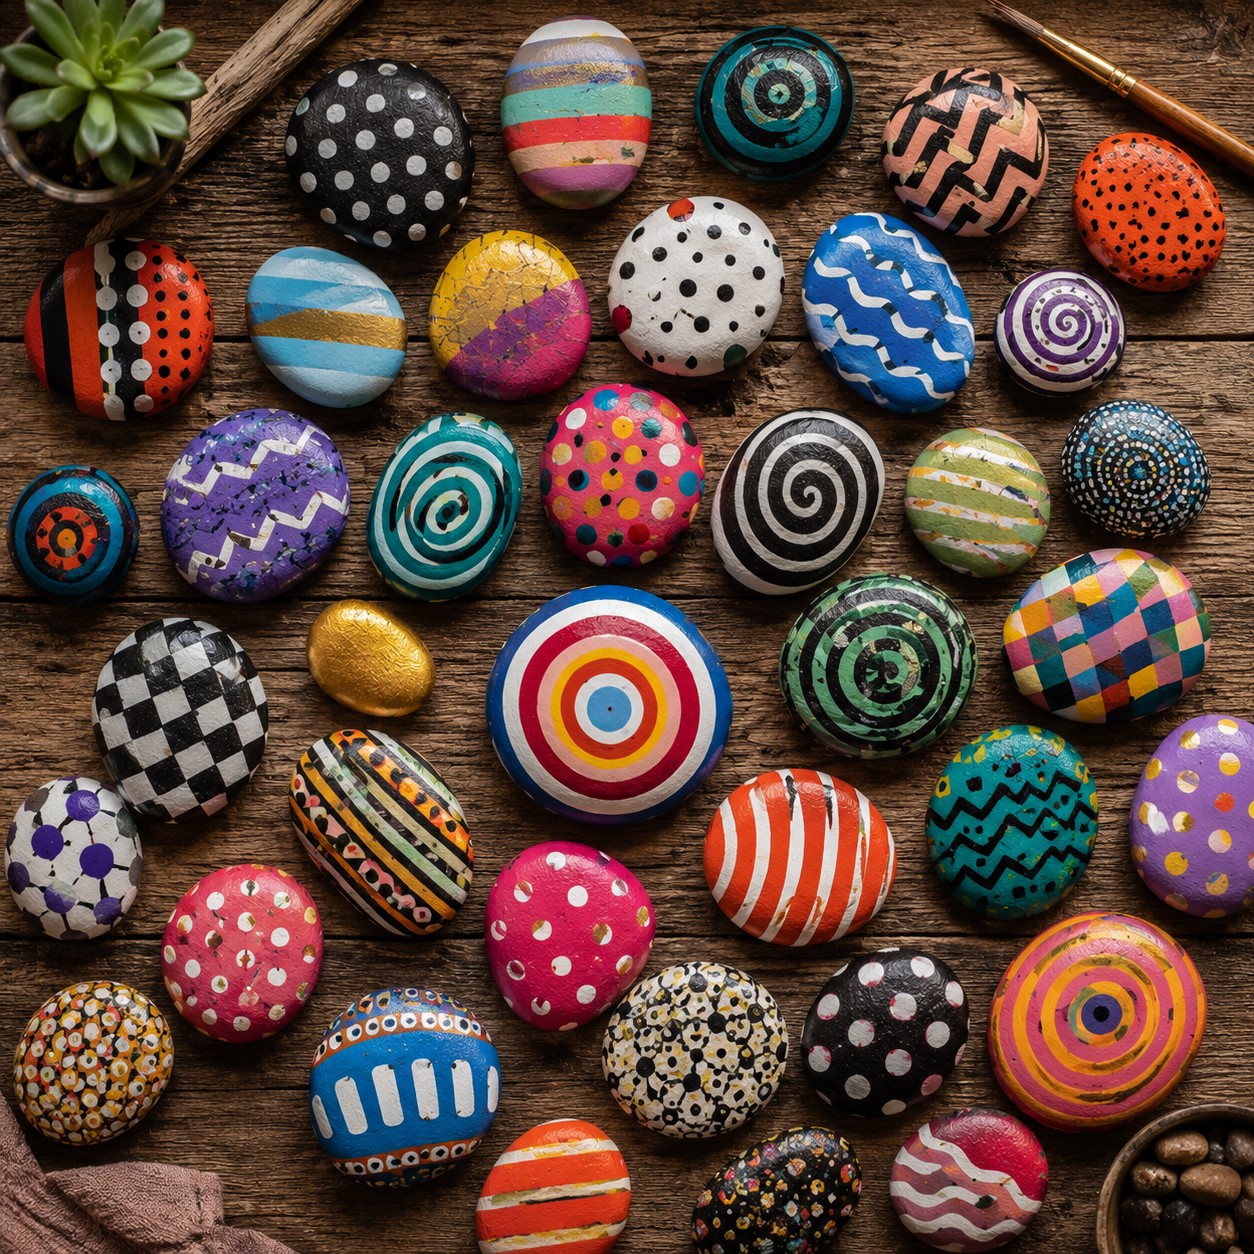
19. Patterned Abstract Rocks
Abstract pattern rocks give kids who feel intimidated by representational painting a completely accessible entry point. There is no right or wrong, no subject to get wrong and only color, pattern, and personal expression.
Stripes in complementary colors. Polka dots of varying sizes. Zigzag lines crossing at different angles. Concentric circles in graduating colors. Wavy lines that flow across the whole surface. Checkerboard patterns. Spiral patterns starting from the center outward.
Additionally, abstract rocks are wonderful for introducing basic color theory to children in a practical and engaging way. What happens when you put complementary colors like orange and blue next to each other? How does the same yellow look different against a black background versus a white one? These are genuine art concepts absorbed naturally through hands-on experimentation rather than formal instruction.
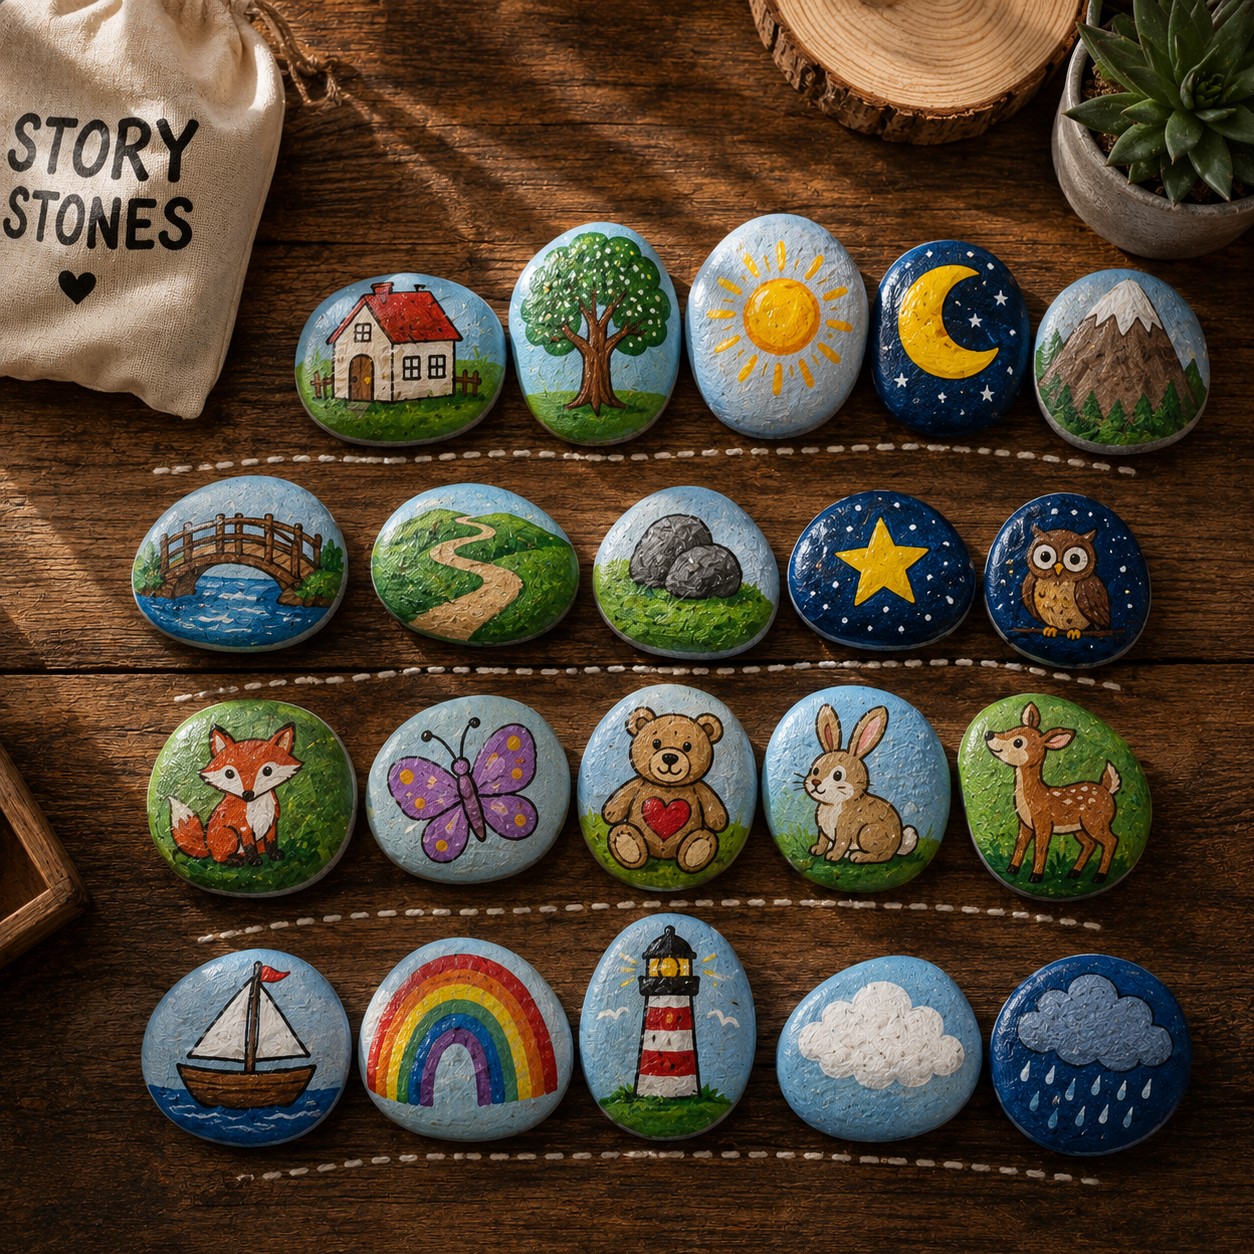
20. Story Rocks
Story rocks are the most open-ended and imaginative idea on this entire list. They consequently make the perfect closing project for a rock painting summer because they combine visual art with storytelling in a deeply personal way.
Paint a collection of rocks with simple images that could belong to a story. A house. A tree. A sun. A moon. A character. An animal. A path. A bridge. A mountain. A star. Keep each image simple and clear. Bold shapes and strong colors communicate better than complex detailed illustrations on small rock surfaces.
Once the collection is complete, use the rocks to tell stories together. Lay them out in different sequences and see what narrative emerges. Let children create their own stories by arranging and rearranging the rocks. Use them as prompts for creative writing. Use them as props for imaginative play.
Furthermore, story rocks make beautiful gifts for younger siblings, cousins, and children in your community. A set of hand-painted story rocks presented in a small cloth bag or wooden box is a genuinely thoughtful and personal gift that encourages creativity and imagination in the recipient. Therefore, story rocks bring the whole summer of rock painting full circle in the most meaningful possible way.
The Rock Kindness Movement
Before we wrap up, I want to briefly mention something that has grown beautifully around rock painting in recent years. The rock kindness movement, sometimes called the kindness rocks project, involves painting rocks with positive messages and images and then hiding them in public places for strangers to discover.
Parks, hiking trails, library gardens, community notice boards, and town center benches are all popular hiding spots. The person who finds a rock can keep it, display it, or rehide it somewhere new for the next person to discover. Many communities have dedicated Facebook groups where finders post photos of their discovered rocks and share the joy of the find.
Additionally, many rocks are painted with a social media hashtag or a simple message on the back saying something like “Keep me or pass me on.” This creates a beautiful chain of unexpected kindness that can travel surprisingly far from its starting point.
For kids, participating in the rock kindness movement transforms rock painting from a personal craft activity into an act of genuine community connection. Hiding a rock you painted yourself and then imagining the stranger who will find it and smile is a powerful and heartwarming experience. Therefore, consider making rock kindness hiding a regular part of your summer rock painting tradition this year.
Displaying and Storing Your Painted Rock Collection
Once your collection starts growing, which it will very quickly, you need some display ideas that do the rocks justice.
A shallow wooden tray or wicker basket filled with painted rocks looks beautiful on a coffee table, windowsill, or bookshelf. A glass jar or large vase filled with smaller painted rocks makes a striking decorative object. Rocks displayed among real houseplants create a beautiful natural vignette. Outdoor garden rocks placed among flowers and along pathways add color and personality to your garden space throughout summer and beyond.
For storage between sessions, a simple cardboard box lined with tissue paper keeps rocks from scratching each other and protects detailed surfaces. Label the box with the child’s name and the summer year so the collection is easily identified and treasured properly as it grows over multiple seasons.
One Final Thought
Rock painting is one of those rare activities that gives back more than you put into it. A child who spends a summer afternoon painting rocks gains artistic confidence, creative satisfaction, a finished object they are proud of, and quite possibly a lasting hobby that carries them well into adulthood.
So go outside this weekend. Find some smooth flat stones. Set up a painting station on the back porch or the garden table. Open the acrylic paints. And watch what happens when a child picks up a brush and looks at a blank stone full of possibility.
Because sometimes the most extraordinary things start with the most ordinary objects. And sometimes all a child needs to discover their creative voice is a rock, a brush, and permission to make it whatever they want it to be.
Leave a Reply