Can I tell you something that surprised me? The first time I saw a piece of pressed flower art up close, I genuinely thought it was a painting. The colors were so vivid. The details were so precise. I stood there staring at it like a confused person in a museum.
Then someone told me those were real flowers. Pressed, dried, and preserved. I was completely hooked from that moment.
If you’ve been hanging around this blog for a while, you know we love activities that are simple, beautiful, and genuinely fun to make. We recently talked about How to Make Homemade Bubble Solution That Actually Creates Giant Bubbles, which was a huge hit. Today we’re stepping into something a little more artsy. But don’t let that intimidate you.
Pressed flower art sounds fancy. It sounds like something that requires a special studio and a fine arts degree. It does not. I promise you that. I figured most of this out through trial and error, and I’m going to hand you everything I learned so your first attempt looks far better than mine did.
Let’s get into it.
Why Pressed Flower Art Is Having a Major Moment Right Now
Honestly, pressed flower art is not new. People have been pressing flowers for centuries. But right now, it is absolutely everywhere. Home décor pages, wedding stationery, DIY gift ideas pressed flowers are showing up in all of it.
And the reason is simple. There is nothing quite like the look of real preserved botanicals. No artificial flower, no printed design, nothing manufactured can replicate the way a real pressed flower looks on paper. Each piece is genuinely one of a kind.
Additionally, it’s one of those crafts that feels deeply satisfying. You’re taking something temporary a flower that would wither in days and turning it into something that can last for years, even decades. That feels meaningful in a way that a lot of crafts just don’t.
The best part? You do not need to be artistic at all. If you can arrange flowers in a vase, you can make pressed flower art. The flowers do most of the visual work for you.
Check this out: How to Make a DIY Fairy Garden With Your Daughter on a Lazy Saturday
What Flowers Work Best for Pressing?
Okay, before you run outside and grab every flower in sight, let’s talk about what actually works well. Because not all flowers press equally.
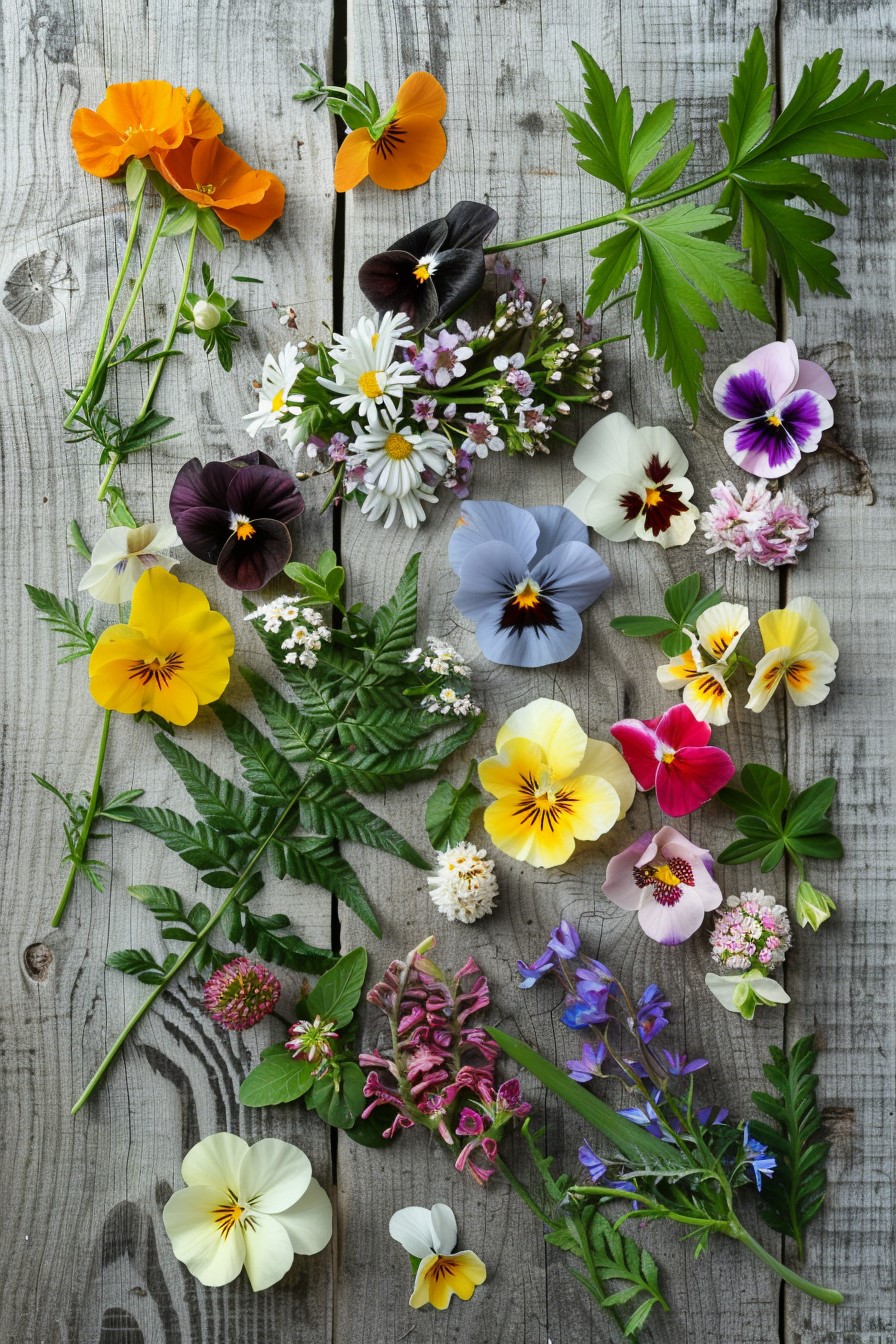
The flowers that give you the best results share a few traits. They are relatively flat or have thin petals. They have low moisture content. And they hold their color well after drying.
Great choices for beginners:
Pansies are honestly the perfect starter flower. They are already flat. They press beautifully. And they hold their purple, yellow, and white colors really well. If you can only grow or buy one flower for this project, make it pansies.
Violas are similar to pansies and work just as well. They’re smaller, which makes them great for detailed compositions.
Larkspur gives you gorgeous tall, delicate shapes. The purple and blue varieties are especially stunning after pressing.
Queen Anne’s Lace creates incredible lacy, feathery patterns. It’s stunning as a background element in compositions.
Ferns and leaves are underrated in pressed flower art. They add structure, texture, and depth. Always grab a few when you’re collecting.
Daisies and black-eyed Susans work well, though the raised center can be tricky. More on that later.
Flowers to approach with caution:
Thick, fleshy flowers like roses and tulips are more difficult. They have too much moisture and too much bulk. They take longer to press, and they often turn brown or lose their shape. That doesn’t mean you can’t use them it just means they need extra time and some specific techniques. Once you’re comfortable, absolutely experiment with them.
Bookmark this: The Easiest Kids Friendship Bracelet Tutorial for Complete Beginners
When and How to Pick Your Flowers
Here’s something that makes a real difference and most beginner guides skip over it. The timing of when you pick your flowers matters enormously.
Pick your flowers mid-morning. By that point, any morning dew has evaporated. But the sun hasn’t been beating down on the petals all day either. Mid-morning flowers are at their freshest and contain the least excess moisture.
Pick flowers that are just barely fully open. Avoid flowers that are past their peak. Overblown flowers, ones that have been open for a few days will lose their petals during pressing and the color fades faster.
Also, pick on a dry day. Pressing flowers that were caught in rain the day before is a recipe for mold. Mold is the biggest enemy of pressed flowers. We will talk more about preventing it shortly.
After picking, bring your flowers inside right away. Don’t leave them sitting in the sun. The sooner you get them into your pressing setup, the better your results will be.
The Tools You Need (And What You Can Skip)
Let me be upfront about something. You do not need a lot of specialized equipment for this. There are some fancy flower presses on the market. They’re lovely. But they are absolutely not necessary, especially when you’re just starting out.
Here’s what you actually need.
Heavy books. Old encyclopedias, phone books, or any large heavy book works perfectly. You’re going to be stacking them, so have at least two or three on hand.
Absorbent paper. This is important. You need paper that will pull moisture away from the flowers as they dry. The best options are blotting paper, watercolor paper, or plain white printer paper. Avoid anything glossy, glossy paper traps moisture rather than absorbing it.
Cardboard sheets. These go between layers in your pressing stack. They add pressure and improve airflow.
Tweezers. Your fingers are too clumsy for arranging small petals. A pair of basic tweezers will save you enormous frustration.
A flat surface and patience. These two things are non-negotiable.
Optional but helpful:
A microwave flower press is genuinely useful if you want faster results. It speeds up the drying time from weeks to minutes. They’re inexpensive and available online. However, results can vary, and delicate flowers sometimes don’t survive the process well. Start with the traditional method first.
Pin this: How to Do Easy Block Printing With Kids Using Sponges and Foam
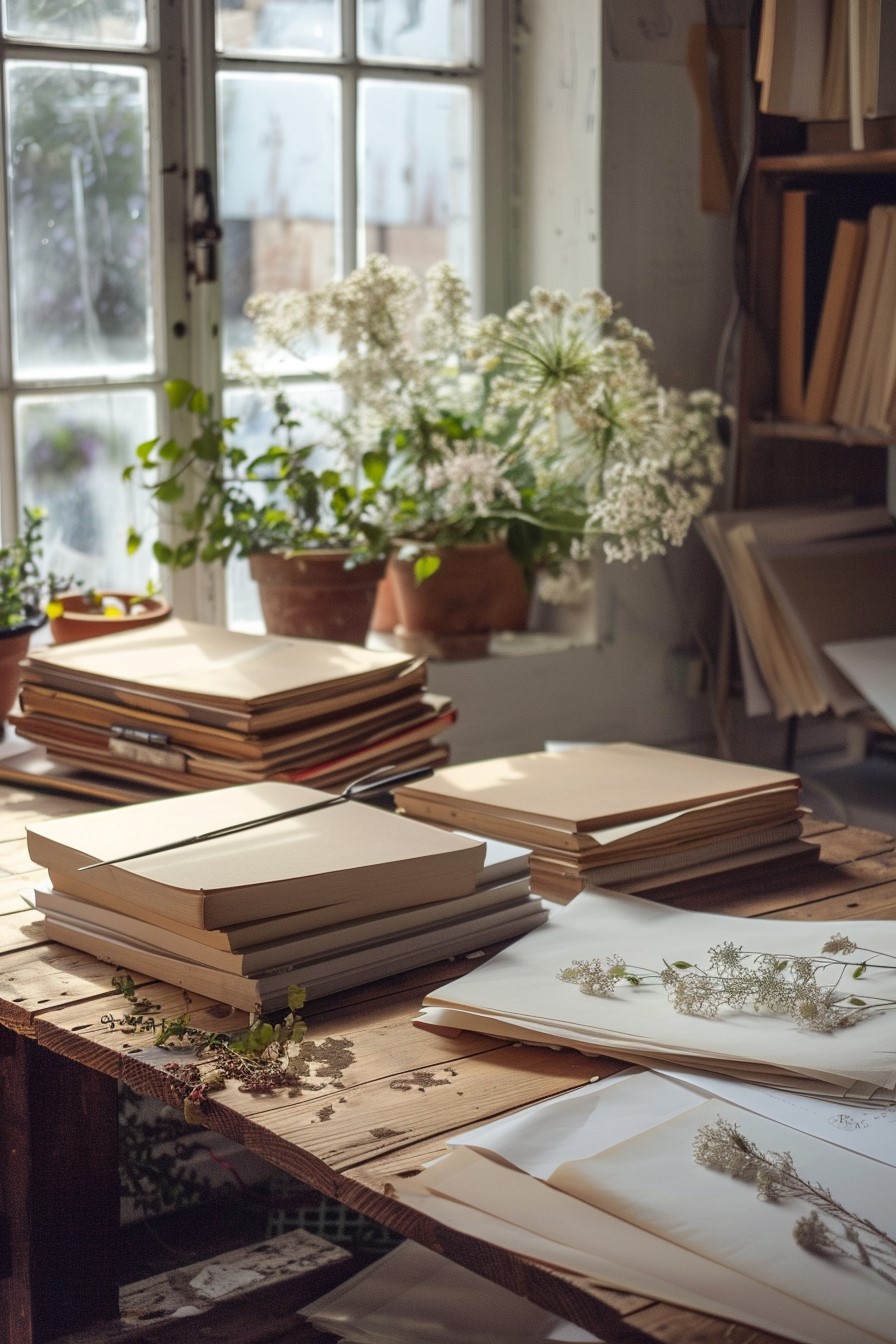
The Traditional Pressing Method: Step by Step
Alright. Let’s get into the actual process. This method takes time. But the results are consistently beautiful and reliable.
Step 1: Prepare your flowers
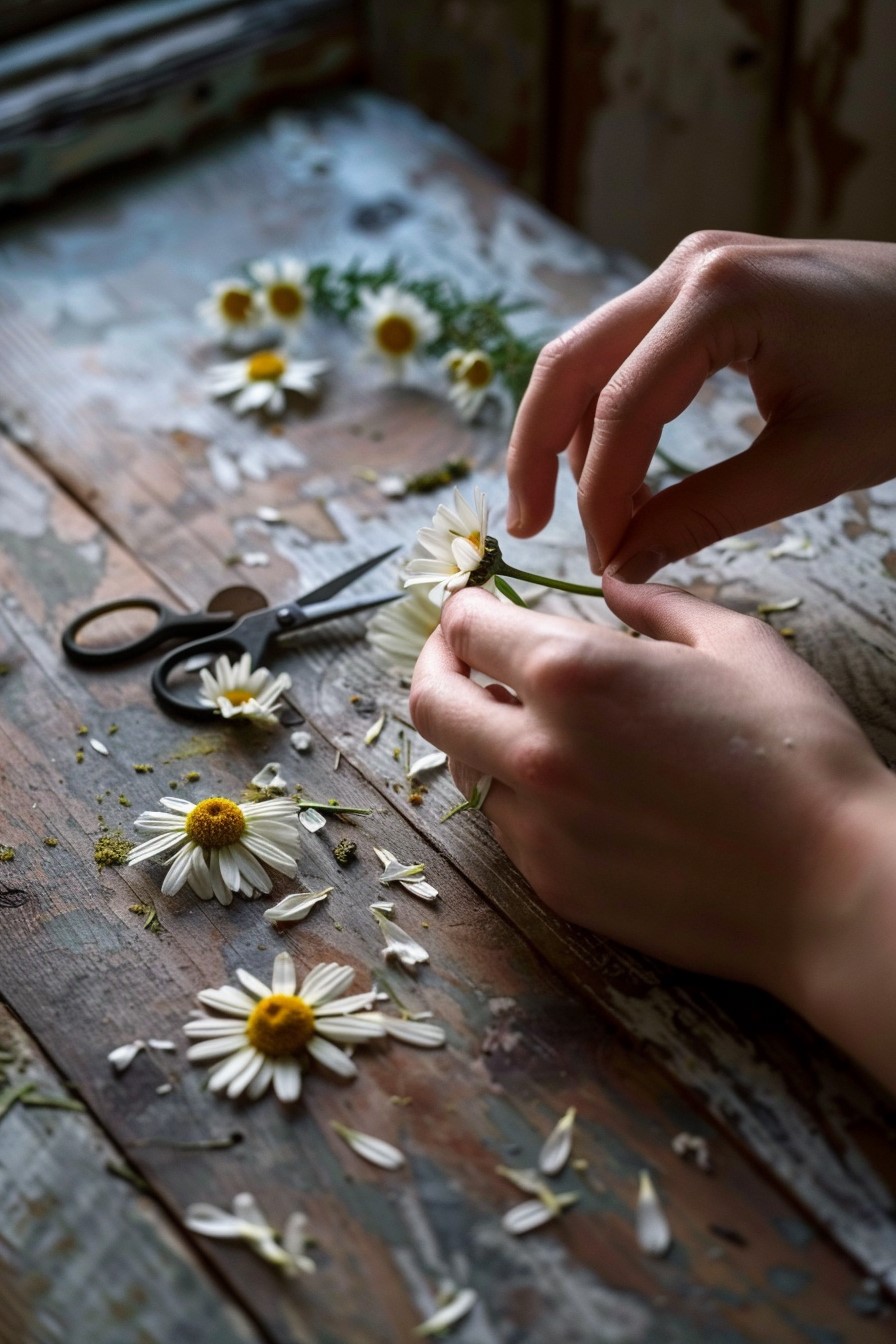
Lay your flowers out on a clean, dry surface. Look at each one carefully. Remove any damaged petals. If a flower has a thick center like a daisy you can carefully slice it in half from behind to reduce the bulk. This helps it press flatter.
For flowers like roses where the whole bloom is thick, you have two options. You can press individual petals separately and reassemble the design later. Or you can press a side profile of the rose cutting it in half vertically which gives a beautiful result.
Step 2: Set up your pressing layers
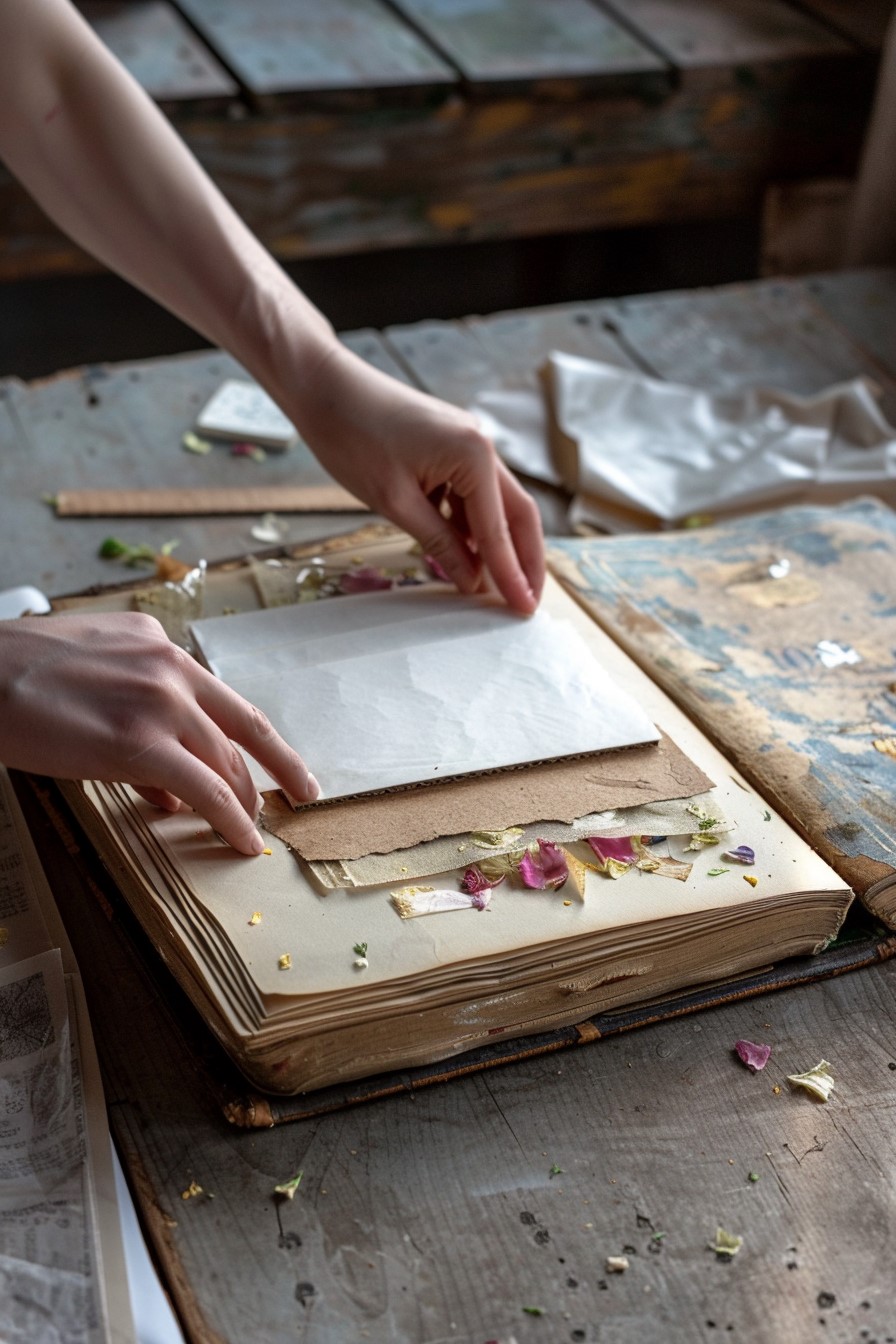
Open your heavy book to somewhere in the middle. Place a sheet of cardboard down. Then layer two sheets of absorbent paper on top of the cardboard.
Step 3: Arrange your flowers
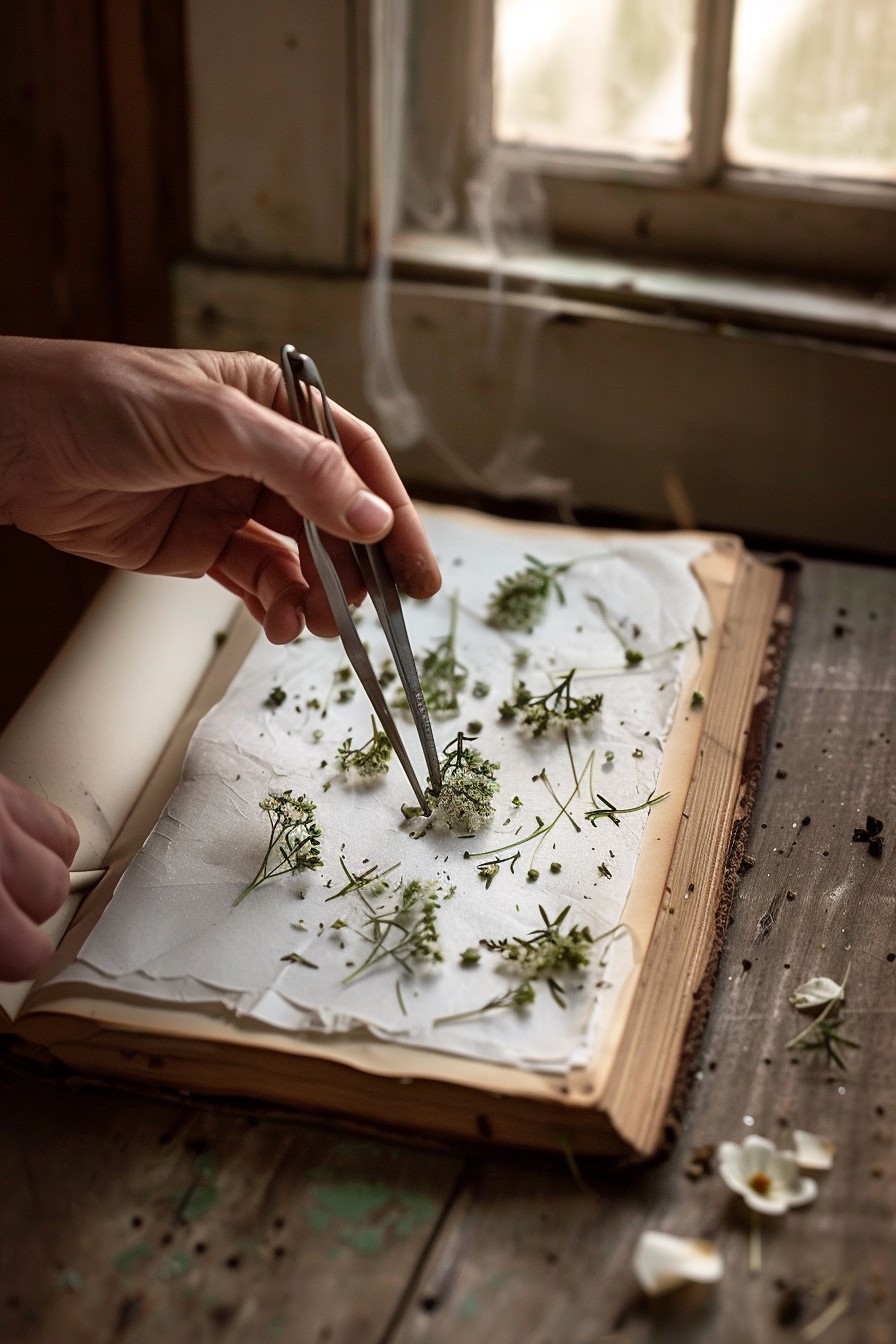
Place your flowers face down on the absorbent paper. Use your tweezers to position petals and stems exactly how you want them. This is important, they will dry exactly as you place them. Spread them out so they are not overlapping or touching each other.
you will love this: How to Start Crafting with Kids as a Beginner
Step 4: Cover and stack
Place two more sheets of absorbent paper on top of the flowers. Add another cardboard sheet. Then close the book.
Step 5: Add weight
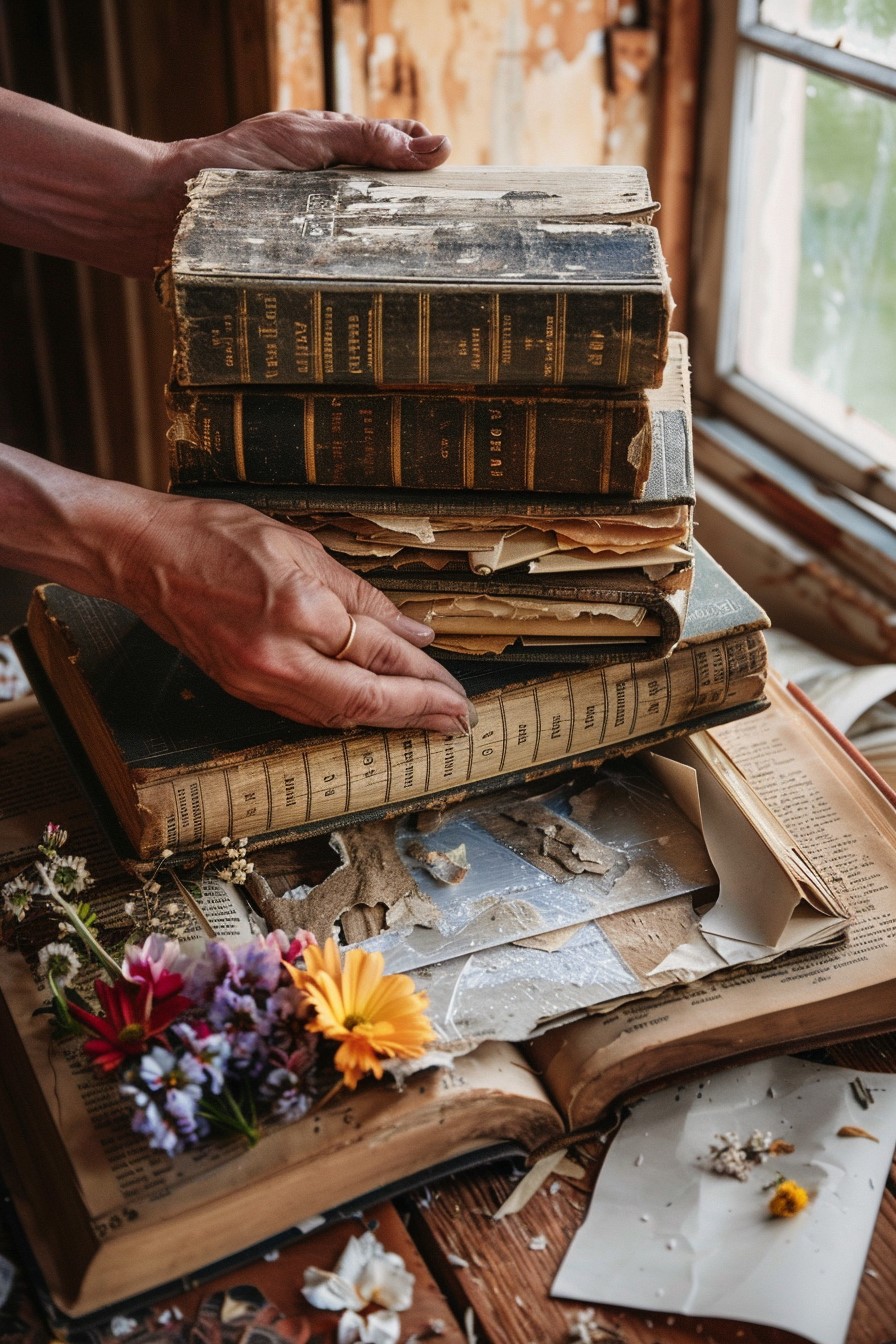
Stack more heavy books on top. The more evenly distributed weight you can add, the flatter your flowers will press. Stack at least three or four large books.
Step 6: Change the paper after 48 hours
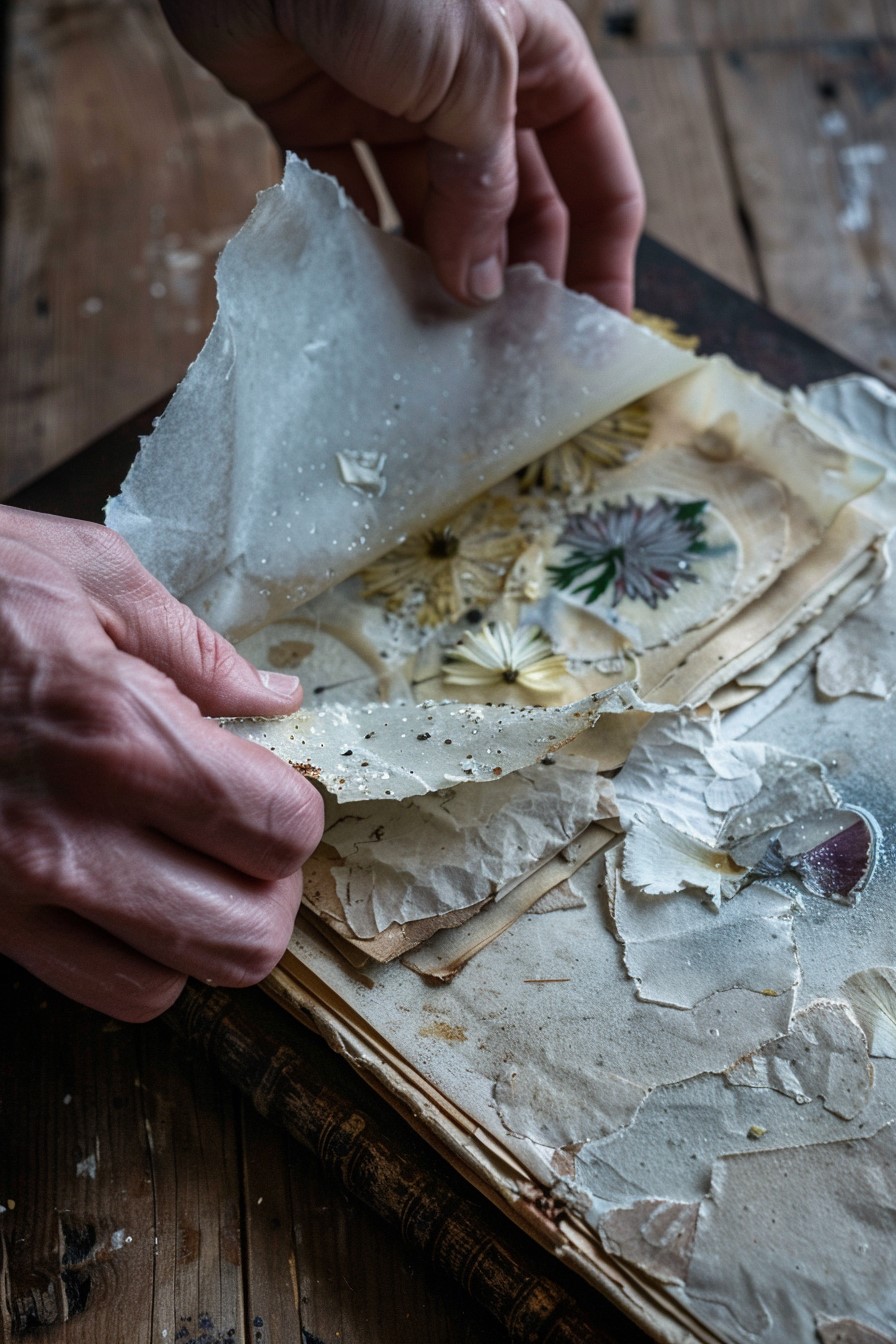
This is the step most beginners skip, and it causes mold. After the first two days, carefully open your press and replace the absorbent paper. The paper will have soaked up a lot of moisture from the flowers. If you leave that damp paper in place, mold can develop and ruin your flowers entirely. Fresh paper keeps things clean and dry.
Step 7: Wait

Most flowers need two to four weeks to fully press and dry. Thicker flowers can take up to six weeks. I know that feels like forever. But rushing this process is what leads to flowers that shrivel, crack, or lose their color.
See what everyone is loving right now: A Parent’s Guide to Starting a Mini Craft Corner for Your Kids at Home
Preventing the Two Biggest Problems: Mold and Color Loss
Let me address these directly because they are the two things that frustrate beginners the most.
Mold happens when moisture gets trapped. Prevent it by changing your absorbent paper regularly every two to three days for the first week. Also, store your flower press in a dry, well-ventilated spot. Avoid damp basements or humid rooms.
Color loss is partly unavoidable. Some flowers naturally fade as they dry. However, you can slow it down significantly. Keep your flower press out of direct sunlight. UV light bleaches the pigment in petals faster than anything else. A cool, dark cupboard is your best friend during the pressing period.
Additionally, pressing flowers as fresh as possible helps retain more color. The longer a flower sits before pressing, the more pigment it has already started to lose.
Some crafters also use a very light spray of hairspray on fully dried flowers to help lock in the color. I’ve tried it. It does help a little, especially with flowers that tend to go translucent after drying.
Trust me you need to see this: How to Make the Cutest DIY Butterfly Mobile With Your Kids This Weekend
How to Make Your Pressed Flower Art Composition

So your flowers are pressed, dry, and beautiful. Now comes the fun part which is actually creating the artwork.
This is where people sometimes freeze up. They’re staring at their lovely pressed flowers and they don’t know where to start. Here’s my advice: stop thinking about it as art. Think about it as arranging.
Choose your background first. Watercolor paper is my top recommendation. It has a lovely texture and weight. It holds adhesive well. And it has a slightly warm, natural tone that makes botanical elements look gorgeous. White cardstock also works well. Some people love pressing flowers onto pages of old books for a vintage look, that’s stunning too.
Start with your largest elements. Lay out your composition without gluing anything first. Place your largest flowers and leaves first. Then fill in with smaller elements. Step back and look at it. Move things around. There’s no rush.
Think about balance, not symmetry. Perfect symmetry can look stiff in botanical art. Instead, aim for visual balance. A large flower on the left can be balanced by a cluster of small flowers on the right. A trailing stem can add movement and stop the composition from feeling static.
Use odd numbers. This is a design trick that works every time. Groups of three or five elements almost always look more natural than groups of two or four. Something about odd numbers feels organic to the eye.
Leave some breathing room. Don’t crowd every inch of your background. Negative space, the empty parts of your composition is just as important as the flowers themselves. It gives the eye somewhere to rest.
See this guide: How to Turn Old Crayons Into New Ones Using a Muffin Tin
Gluing Your Flowers Down
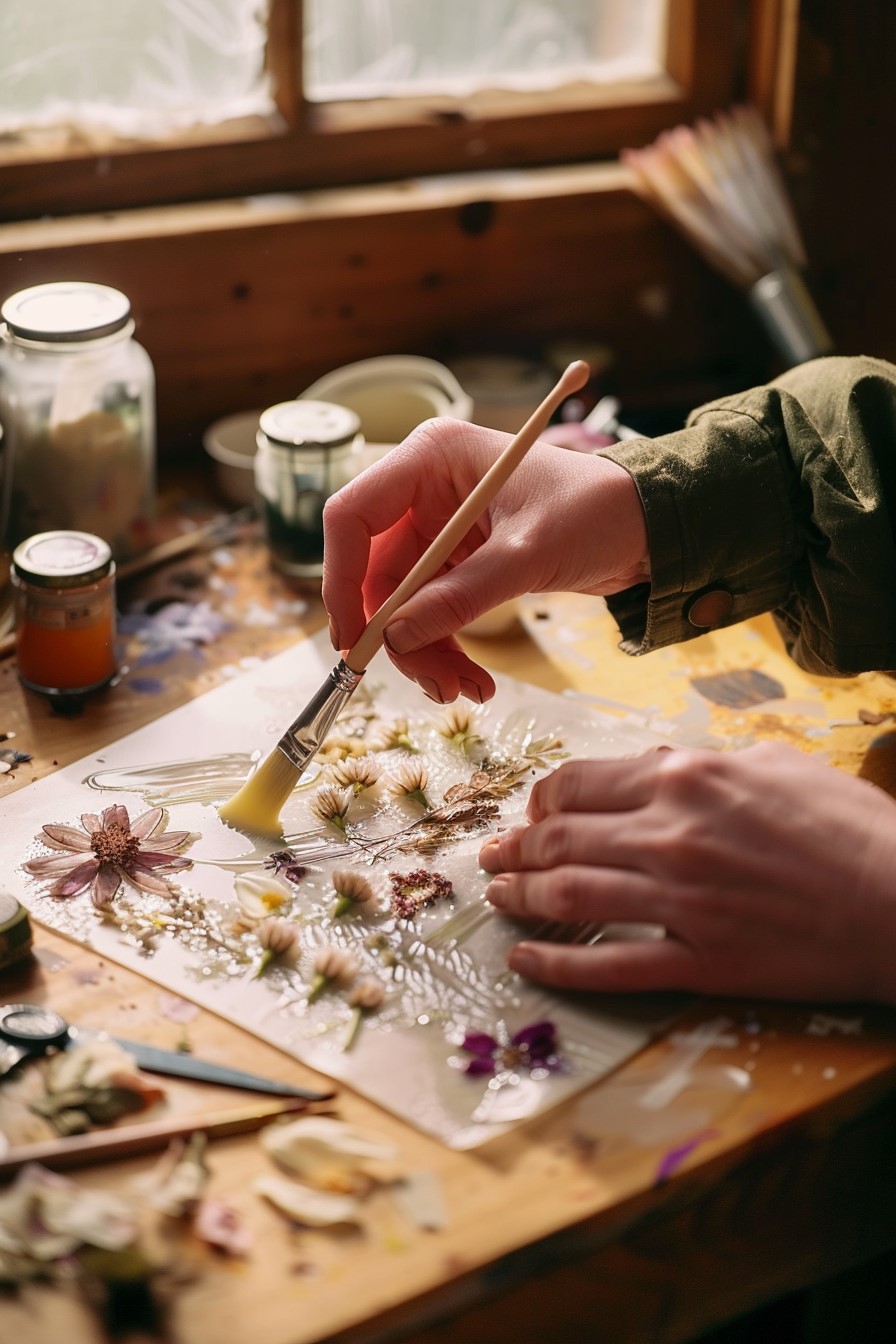
Once you’re happy with your arrangement, it’s time to commit. This step requires a gentle hand.
The best adhesive for pressed flowers is PVA glue, the same kind used in decoupage. It dries clear, it’s flexible, and it holds well without being too aggressive. Mod Podge also works wonderfully.
Use a small, fine-tipped brush or a toothpick to apply tiny amounts of glue to the back of each flower and leaf. Less is more here. Too much glue can seep through delicate petals and leave visible marks.
Press each element gently into place. Hold it down for a few seconds. Then move to the next one.
Work from the back of your composition to the front. Meaning, glue down your background elements using leaves, filler flowers before your main focal flowers. This creates a lovely layered depth.
After everything is in place, let it dry completely. Usually a couple of hours is enough.
Save this before you forget: How to Create a Mini Herb Garden Planter Craft With Kids
Sealing Your Artwork So It Lasts for Years
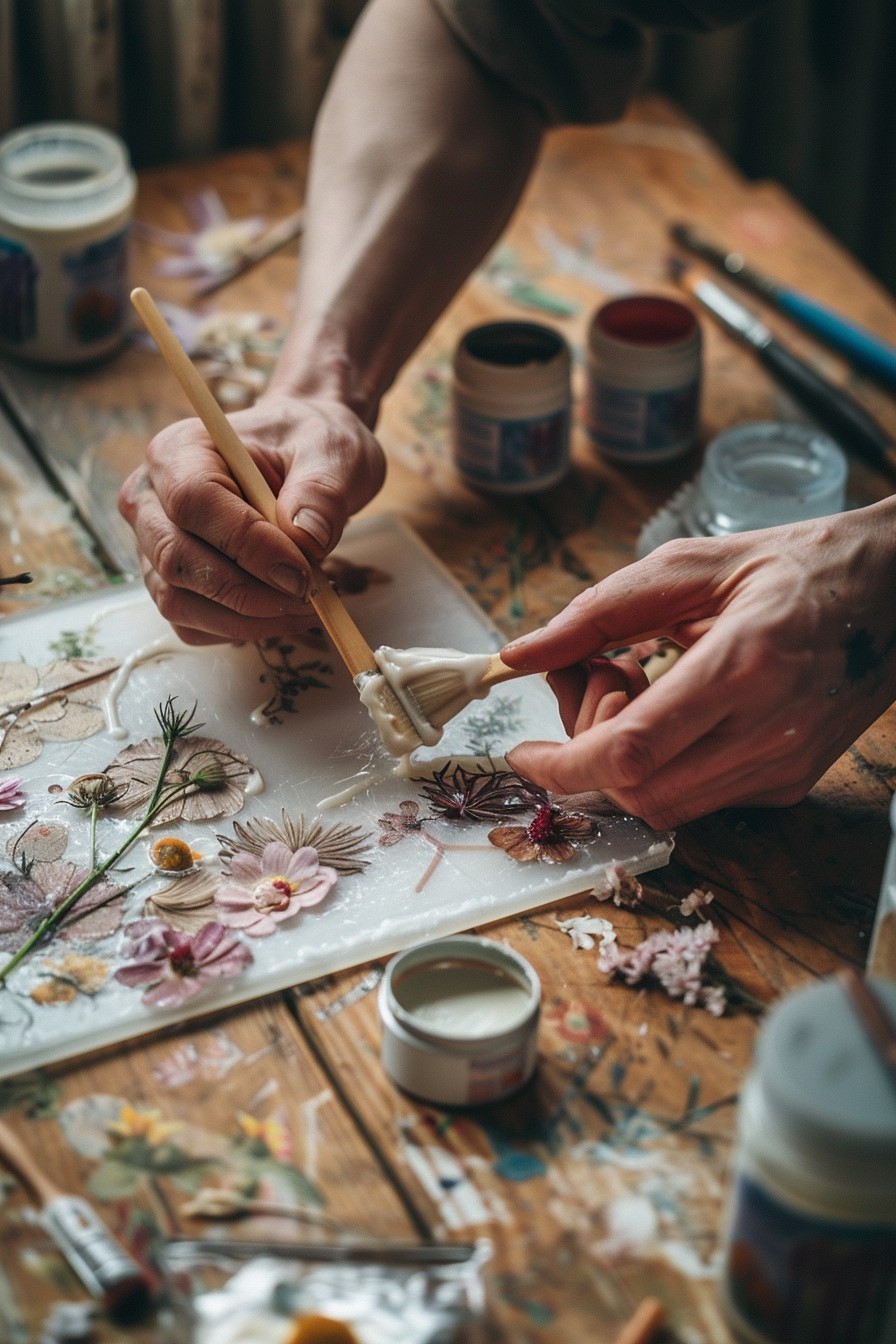
Here’s the part that turns a nice craft project into something that genuinely lasts for decades.
You need to seal your finished artwork. Without sealing, the flowers will continue to fade. Dust will cling to them. Moisture in the air can make them go limp or cause discoloration over time.
There are a few sealing options.
Mod Podge or PVA glue as a top coat. Apply a thin, even layer over your entire composition with a soft brush. Let it dry. Apply a second coat. This creates a protective layer that is slightly glossy. It also makes the colors look deeper and more vivid.
Resin. If you want your artwork preserved under a glass-clear finish, resin is incredible. Epoxy resin poured over pressed flower art creates a stunning, durable finish. It’s a slightly more advanced technique with a few extra steps. But the results are absolutely breathtaking. Coasters, bookmarks, jewelry pressed flowers in resin are in a league of their own.
UV spray sealant. Available at craft stores, this spray creates an invisible barrier against UV light. It’s the simplest option. Just spray lightly over your finished piece outdoors or in a ventilated space. Let it dry. Done.
For artwork you want to display long-term, I recommend combining a top coat of Mod Podge with UV spray sealant. That combination gives you protection against moisture and light fading simultaneously.
View full guide: 20 Fun Air Dry Clay Crafts for Kids
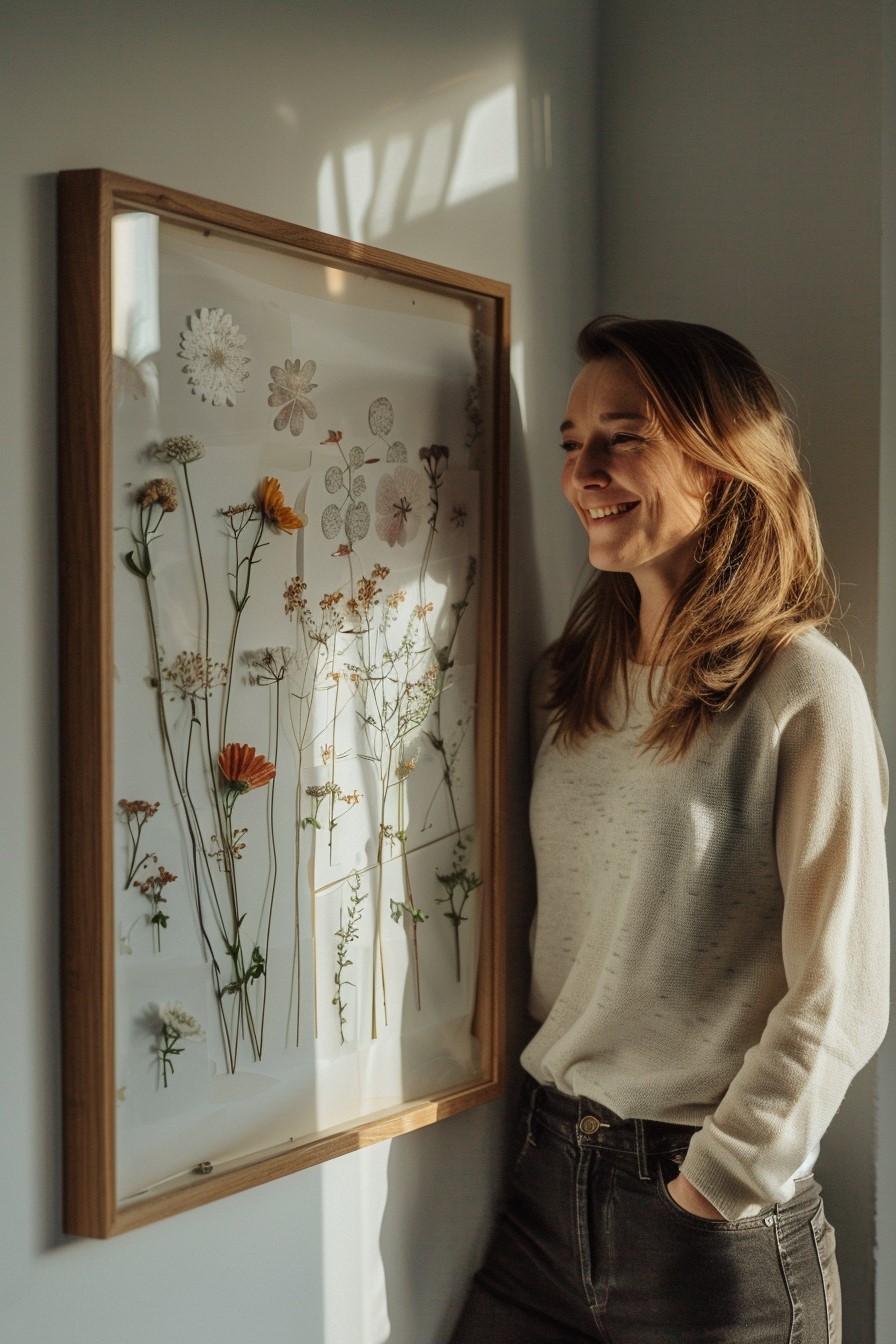
Framing and Displaying Your Art
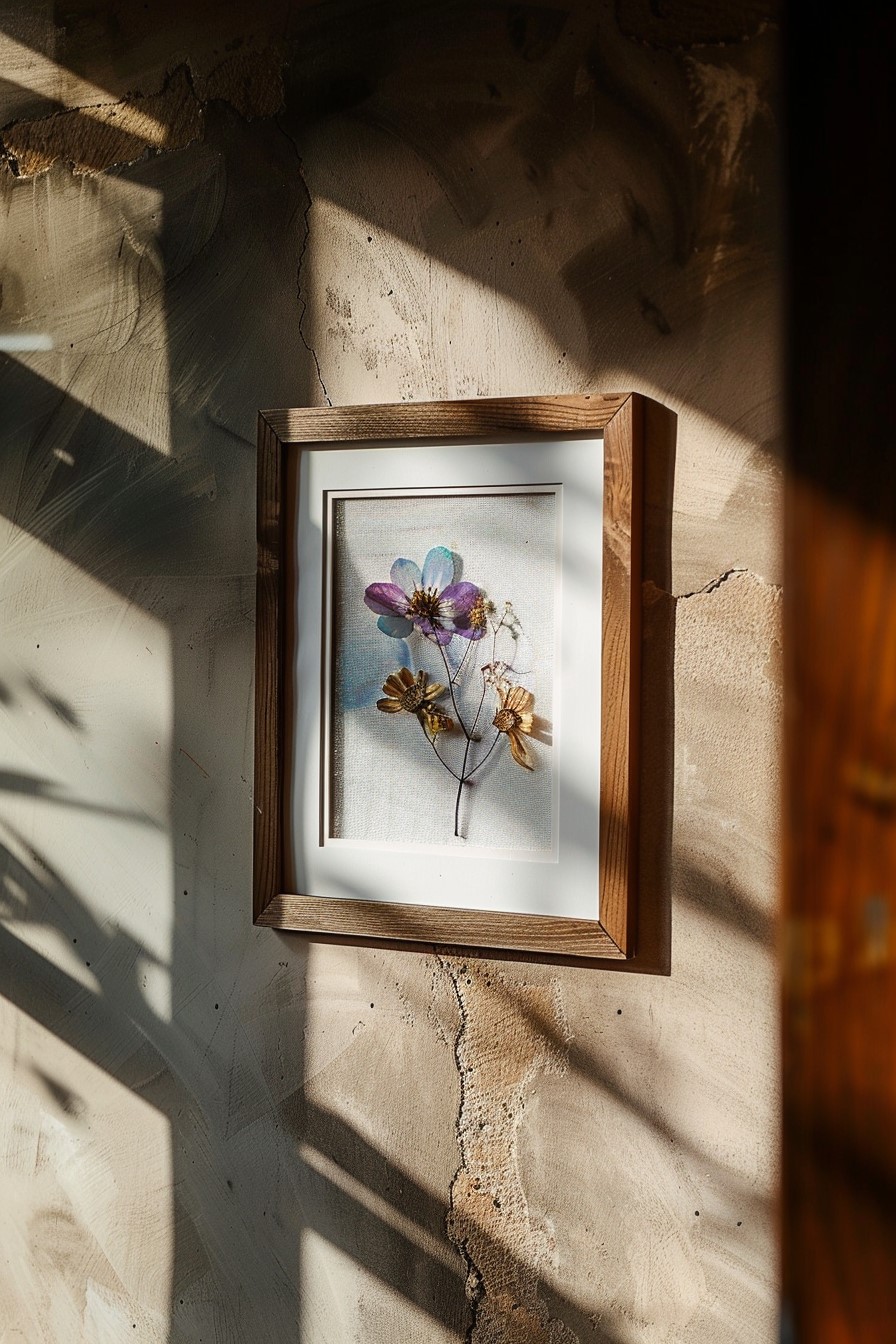
You’ve made something beautiful. Now show it off properly.
The most important framing tip is this: keep the glass or acrylic away from the pressed flowers if possible. When the glass sits directly on the flowers, moisture can build up between them. Over time, this causes browning and mold even on well-sealed pieces.
Use a frame with a mat board. The mat creates a physical gap between the glass and your artwork. This small space allows for air circulation and keeps everything looking fresh much longer.
Hang your framed pieces away from direct sunlight. A north-facing wall is ideal. If you love a sunny spot, use UV-protective glass, it’s worth the extra cost for something you worked hard on.
Also, keep your artwork away from humidity. Kitchens and bathrooms are not ideal display spots for pressed flower art. A living room, bedroom, or hallway is perfect.
Creative Ideas Beyond the Basic Frame
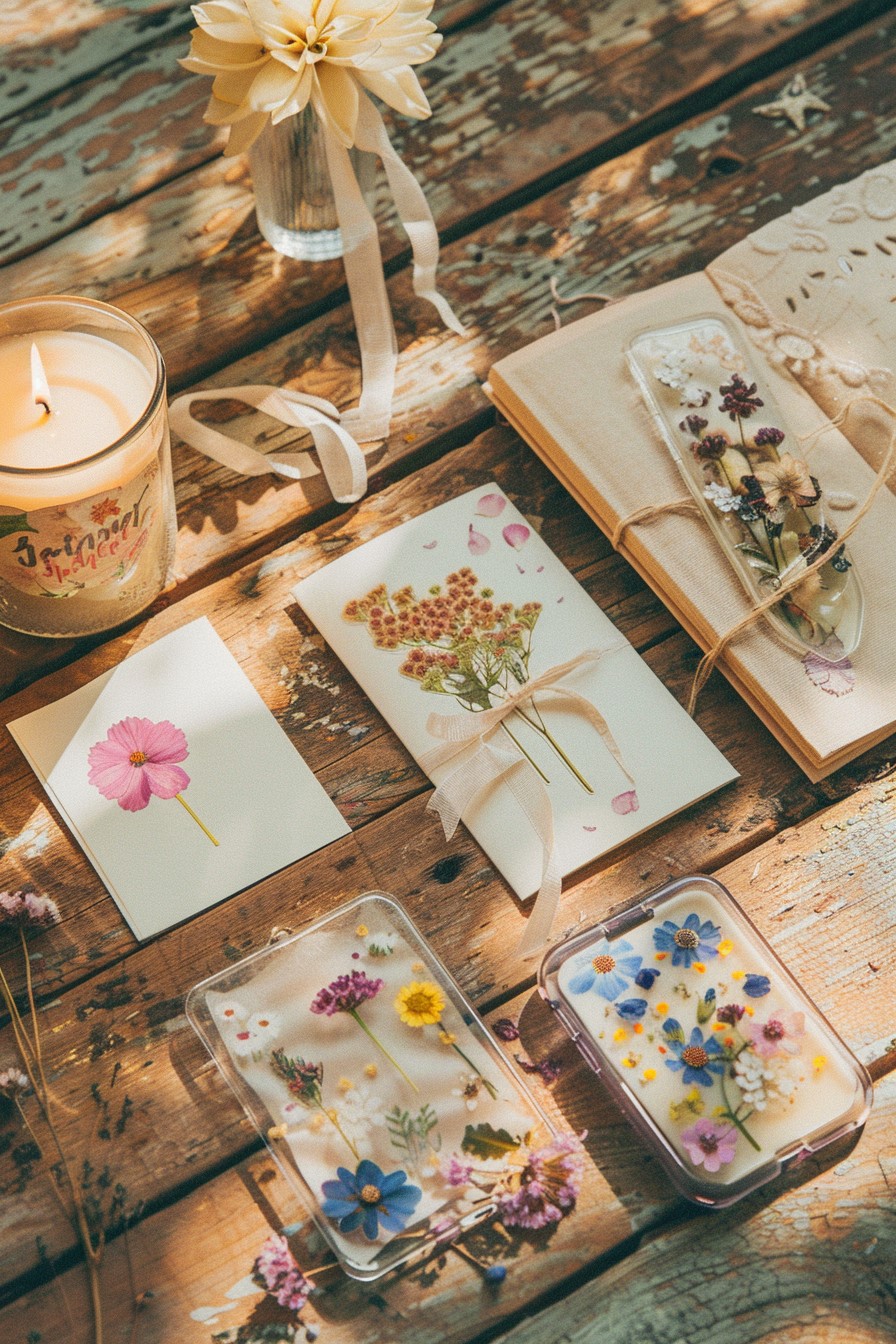
Once you get the hang of basic pressed flower art, the possibilities genuinely open up. Here are some ideas that might spark something for you.
Greeting cards. Press a single small flower and glue it to the front of a blank card. Add a handwritten message inside. These are the kind of cards people keep for years. They feel incredibly personal and special.
Bookmarks. Laminate a strip of cardstock with pressed flowers arranged on it. Punch a hole at the top and thread through a ribbon. Honestly one of the most charming handmade gifts I’ve ever seen.
Candles. Press flowers onto the outside of a pillar candle using a heat gun or a brief pass with a hair dryer on low. The heat slightly melts the wax surface and the flower adheres to it. The effect is stunning. The candle glows through the petals when lit.
Phone cases. Arrange pressed flowers on a clear phone case. Seal with a thin layer of clear nail polish or resin. Unique, personal, and genuinely beautiful.
Journals and notebooks. Decoupage pressed flowers onto the cover of a plain journal. Seal with Mod Podge. You end up with a keepsake notebook that feels like an heirloom.
Explore this post: A Step-by-Step Guide to Making Air Dry Clay Bowls With Your Kids
A Few Final Tips Before You Start
Let me leave you with the things I wish someone had told me at the beginning.
Start with more flowers than you think you need. Some will not press well. Some will crumble when you try to move them. Having extra means you’re never stuck.
Keep a variety of sizes. Small filler flowers are just as important as your showstopper blooms. A composition built only from large flowers looks unbalanced.
Label your layers when pressing multiple types. A small sticky note on the outside of the book page telling you what’s inside saves a lot of confusion three weeks later.
Take photos of your fresh flowers before pressing. Color shifts during drying can be significant. Having a reference photo helps you remember what you were working toward.
Finally, don’t stress about perfection. The beauty of pressed flower art is that it’s organic. A slightly imperfect petal, an unexpected shape, a color that dried differently than expected, these are features, not flaws. They’re what make each piece completely yours.
Leave a Reply