Let me tell you something that happened to me a few years back. We spent an entire Saturday afternoon making a kite from scratch. The kids were excited. The materials were ready. Everything looked promising. We ran out to the park with enormous enthusiasm and that kite went absolutely nowhere. It flopped, it spun sideways, and it nosedived into the ground repeatedly like it had a personal issue against flying.
That experience sent me straight into research mode as usual. I was determined to figure out what actually makes a homemade kite fly properly instead of just looking pretty on the ground. And after a lot of testing, tweaking, and more than a few embarrassing park moments, I finally cracked it.
Today I am sharing everything I learned so that your kite not only looks wonderful but genuinely flies the way a kite should. High, steady, and with a child running below it screaming with absolute joy.
If you have been following along on the blog, you already know we love making things that are both beautiful and functional. Our last project on How to Turn a Plain White Pillowcase Into Custom Kid-Made Art was all about turning ordinary objects into something personal and special. This project takes that same spirit completely outdoors. This one is all about wind, wide open spaces, and the pure thrill of watching something you built with your own hands lift off the ground.
No expensive kite shop required. No complicated engineering degree needed. Just some simple materials, a little patience, and the right technique. So let us get into it together.
Why Making a Kite Is One of the Best Outdoor Crafts

Before we talk about materials and building steps, let me first make the case for why this specific craft deserves a permanent spot in your activity rotation.
First of all, a homemade kite combines two things kids absolutely love. Making something with their hands and then immediately going outside to use it. The transition from craft table to open field happens on the very same day. That instant gratification is genuinely powerful for keeping kids engaged and excited throughout the building process.
Secondly, kite flying is one of those rare activities that pulls everyone away from screens without any argument whatsoever. When a kite is climbing into a blue sky on a good wind, nobody is thinking about their tablet. Nobody is asking for the television remote. Everyone is just looking up, running, laughing, and being completely present in the moment.
Furthermore, building a kite teaches kids real and meaningful concepts without feeling like a lesson. Aerodynamics, balance, symmetry, and cause and effect all come into play naturally during both the building and flying stages. Kids learn that a tail that is too short makes the kite spin uncontrollably. They learn that bridle placement affects the angle of flight. They learn these things not from a textbook but from watching their own creation respond to the wind in real time.
Additionally, this is a craft that works across a wide age range. Young children can help decorate and assemble. Older kids can take on the measuring and structural building with more independence. Even teenagers who normally roll their eyes at family craft activities tend to get genuinely invested when there is aerodynamics and competition involved.
Save this guide: How to Make a DIY Dreamcatcher With Your Child Using Yarn and Sticks
Understanding What Makes a Kite Actually Fly

Now I want to spend just a moment on the science because honestly understanding it makes building so much easier. Do not worry. This is not a physics lecture. I promise to keep it simple.
A kite flies because of the relationship between four forces working together. Lift pushes the kite upward. Drag pulls it backward. Gravity pulls it downward. And tension in the string holds everything in balance. When these four forces are properly balanced, the kite climbs and holds a steady position in the sky.
The shape of the kite determines how well it catches and directs the wind. A flat diamond kite is the simplest shape and works well in moderate steady winds. A delta kite has a triangular shape that is more stable in variable wind conditions. A sled kite has no rigid frame on its front edge and is surprisingly good in lighter winds.
The bridle is the string or strings attached to the face of the kite that connect to your flying line. The angle of the bridle determines the angle at which the kite faces into the wind. Getting this angle right is genuinely one of the most important factors in whether your kite flies well or struggles.
The tail provides drag and stability. A kite without a tail or with a tail that is too short will spin, loop, and crash repeatedly. A tail that is too heavy, on the other hand, will prevent the kite from climbing at all. Finding the right tail length is a big part of the tuning process.
Understanding even these basics before you start building means you will make better decisions throughout the construction process and troubleshoot more effectively out in the field.
The Materials You Need

Here is the wonderful news about building a homemade kite. The materials are simple, inexpensive, and available almost everywhere. You likely have several of them at home already.
Thin wooden dowels
These form the structural frame of your kite. For a standard diamond kite, you need two dowels. One measures approximately 90 centimeters long for the spine running top to bottom. The other measures approximately 80 centimeters long for the spreader running side to side. Thin dowels around 6 millimeters in diameter work perfectly. They are light enough to fly well and strong enough to hold the frame shape under wind pressure.
Ripstop nylon or plastic sheeting
This is your kite sail. Ripstop nylon is the best option because it is lightweight, strong, and handles wind beautifully. Alternatively, a large plastic bag, a garbage bag, or even a plastic tablecloth works very well for a beginner kite. Tissue paper creates a beautiful looking kite but tears easily in stronger winds. Thin plastic is genuinely more forgiving.
Strong string or kite line
You need two types. Thin, strong string for building the frame and bridle. And a longer length of kite flying line for actually flying. Kite line is available inexpensively at toy stores and online. Alternatively, thick cotton twine works reasonably well for a first attempt.
Scissors and a craft knife
For cutting your sail material and trimming string.
Strong tape
Packing tape or duct tape reinforces connection points and prevents tearing at stress areas.
Glue or a hole punch
For attaching the sail to the frame securely.
Ribbon or strips of plastic bag
For making the tail.
Markers, paint, or stickers
For decorating. This is the part kids are most excited about so make sure you have plenty of color options available.
A pencil and ruler
For marking measurements accurately before cutting.
Building Your Diamond Kite: Step by Step
The diamond kite is the classic choice for a reason. It is simple to build, reliable in flight, and iconic in appearance. Consequently, this is the design we are going to build together today.
You’ll love this too: How to Create a No-Sew Fleece Blanket With Your Kids in One Hour
Step One: Prepare Your Frame
Lay your two dowels out on a flat surface. Your longer dowel is the spine. Your shorter dowel is the spreader. Mark the center point of the spreader with a pencil. Then measure approximately one quarter of the way down from the top of the spine and make a mark there. This is where the two dowels will intersect.
Place the spreader across the spine at these marked points so they form a cross shape. The spreader should sit at a right angle to the spine perfectly. Lash the two dowels together firmly at this intersection point using strong thin string. Wrap the string around the joint multiple times in both directions, crossing over itself to create a tight and stable connection. Finish with several firm knots. Add a small piece of tape over the lashing for extra security.
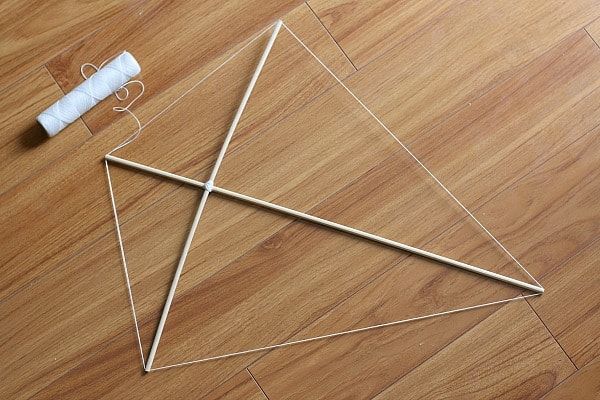
Step Two: Create the Frame Outline
Starting at the top tip of your spine, run string along the outside of the frame connecting all four tips of the kite in sequence. At each tip, make a small notch in the wood with scissors or a craft knife and loop the string around it so it cannot slip. The string should run top tip to right tip to bottom tip to left tip and back to the top in a continuous loop.
Pull the string taut enough to create a gentle bow in the spreader without snapping it. A slight bow in the spreader actually improves flight stability significantly. Tie off the string firmly at the top and trim any excess.
Your completed frame should look like a classic diamond shape with string defining all four outer edges clearly.
If your kids enjoyed this, see: How to Make Pressed Flower Art That Will Last for Years
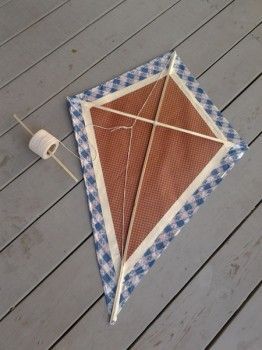
Cutting and Attaching the Sail
Now it is time to make the part that catches the wind. This step requires a little precision but it is entirely manageable with basic craft skills.
Lay your frame flat on top of your sail material. Use a pencil or marker to trace around the outside of the frame, adding approximately two centimeters extra all the way around as a border. This border is what you will fold over and attach to the frame string.
Cut along your marked line carefully. You should now have a sail shape that is slightly larger than your frame on all sides.
Lay the sail flat on your work surface. Place the frame on top of it. Now fold the border of the sail over the frame string on each edge and secure it firmly with tape. Work your way around all four sides, pulling the sail taut as you go but not so tight that it warps the frame shape.
Reinforce all four corner points with extra tape on both the front and back of the sail. These corners experience the most stress during flight so they need the strongest attachment. Additionally, run a strip of tape along the spine on the back of the sail for extra reinforcement down the center.
Don’t miss this: How to Make a Paper Lantern With Your Kids for Any Celebration
Decorating Your Kite Sail
Before you attach anything else, now is the perfect moment to decorate. Once the kite is fully assembled with bridle and tail, decorating becomes much more awkward. So do it now while the sail is flat and accessible.
This is genuinely the part where kids take full creative ownership and it is wonderful to watch. Let them go completely free with markers, paint pens, or stickers. Bright bold designs show up beautifully against a blue sky from a distance. Simple bold shapes, names, smiley faces, animals, geometric patterns, and rainbow stripes all look fantastic in the air.
If you are using plastic bag material for your sail, permanent markers work best. For ripstop nylon, fabric markers adhere most reliably. For paper or tissue paper sails, regular markers or watercolor paint both work beautifully.
For more ideas like this: How to Make Homemade Bubble Solution That Actually Creates Giant Bubbles
Attaching the Bridle
The bridle is arguably the most important part of your kite build. It is also the part most beginners get wrong. Therefore, take your time with this step and follow it carefully.
For a diamond kite, you need a two-leg bridle. Cut a length of string approximately one and a half times the total length of your spine. This gives you enough length for both bridle legs plus some extra for adjustments.
Tie one end of your bridle string securely to the top tip of the spine. Then tie the other end to the bottom tip of the spine. Both knots need to be very firm because the bridle bears the full force of the wind during flight.
Now find the point on your bridle string that sits naturally about one third of the way down from the top attachment point. At this point, tie a small loop knot. This loop is where your flying line attaches. It is called the tow point.
The position of this tow point is critical. Too high and your kite will fly at a very steep angle or loop backward. Too low and your kite will fly flat and low without climbing. The one third from top position is the standard starting point. You will adjust from there based on how your kite actually performs in the wind.
Making the Perfect Tail
Now let us talk about the tail. As I mentioned earlier, the tail provides drag and stability. Getting it right makes an enormous difference to how your kite behaves in the air.
For a standard diamond kite of this size, start with a tail approximately three to four meters long. Cut strips of ribbon, fabric, or plastic bag material about five centimeters wide. Tie them end to end until you reach your target length. Alternatively, cut a continuous long strip from a plastic bag and that works beautifully too.
Attach the tail firmly to the bottom tip of your kite spine. Tie it with a strong double knot and reinforce with tape.
Adjusting Tail Length in the Field
Here is something genuinely useful to know before you head outside. You will almost certainly need to adjust your tail length once you see how the kite actually behaves in real wind. Therefore, bring extra tail material and scissors with you to the flying field.
If your kite spins, loops, or dives repeatedly, your tail is too short. Add more length in half meter increments until the kite stabilizes and flies straight.
If your kite refuses to climb and just hangs low and heavy, your tail is too long and too heavy. Remove sections until the kite starts responding properly to the wind.
This tuning process is actually a fantastic learning activity for older kids. Let them observe the kite behavior, make a hypothesis about what adjustment is needed, make the change, and then test it again. Real scientific thinking happening in an open field with the wind in their hair.
Here’s another fun one: How to Make a DIY Fairy Garden With Your Daughter on a Lazy Saturday
How to Launch Your Kite Successfully
Building a great kite is only half the adventure. Launching it properly is what turns a good build into a soaring success. Consequently, here are the techniques that actually work.
First, choose the right location. You need an open space with no trees, power lines, or tall buildings nearby. Parks, open fields, beaches, and large open car parks on still days all work well. Trees are a kite’s natural enemy. Give yourself as much clear open space as possible in every direction.
Second, check the wind. Ideal kite flying wind is between 15 and 25 kilometers per hour. You can estimate this without any equipment. If you can feel a steady breeze on your face and see leaves moving continuously on trees, the wind is probably right. If you can barely feel any wind at all, your kite will struggle to climb. If the wind is so strong it is bending large tree branches, it is too strong for a homemade kite.
Third, always launch with your back to the wind. Hold the kite up above your head facing into the wind. Let out a few meters of line. Then release the kite and let the wind catch it while walking backward steadily. Do not run forward. Walk backward. That is the key technique most beginners get completely backwards.
You might want to bookmark this: How to Do Easy Block Printing With Kids Using Sponges and Foam
Keeping the Kite in the Air
Once the kite catches the wind and starts climbing, let out line gradually and steadily. Do not release large amounts of line all at once. Feed it out slowly as the kite climbs. If the kite starts to dip, pull the line in gently to increase tension and give it lift.
The steady, rhythmic give and take of the line is what keeps a kite flying beautifully. It takes a few minutes to find the rhythm but once you have it the kite practically flies itself. Let kids take over the line once the kite is stable and high. That moment of feeling the kite pulling against their hands through the line is genuinely one of the most thrilling physical sensations in childhood.
Troubleshooting Common Kite Problems
Even with the best build, things sometimes need adjusting out in the field. Here are the most common problems and exactly how to fix them.
The kite spins in circles constantly. This almost always means the tail is too short. Add more tail material in half meter increments until the spinning stops and the kite stabilizes.
The kite dives to one side repeatedly. This usually indicates an uneven frame. Check that your spreader is centered on the spine and that both sides of the sail are equally taut. A lopsided sail or an off-center spreader will pull the kite toward the heavier side every time.
The kite will not climb above a low height. This suggests the bridle angle needs adjusting. Slide your tow point slightly higher up the bridle string toward the top attachment point. This adjusts the angle at which the kite faces into the wind and usually gets it climbing again.
The kite collapses and falls in moderate wind. This can mean the sail is too loose and needs to be pulled tighter against the frame. It can also mean the wind is too light for your kite. Try a windier day or a more open location.
The string keeps tangling around the kite. This happens when you have too much line out for the height the kite is flying. Reel in some line until the kite is flying at an angle of roughly 45 degrees above the horizon. That is the sweet spot for most homemade kites.
This is worth a look: The Easiest Kids Friendship Bracelet Tutorial for Complete Beginners
Fun Kite Activities to Do Together

Once your kite is flying beautifully, there are so many ways to extend the fun beyond simply watching it hover in the sky.
Kite messages. Cut small squares of lightweight paper. Make a small slit in the center of each square. Thread them onto the kite line and watch the wind carry them up toward the kite like tiny climbing messengers. Kids absolutely love this and will spend a long time feeding message squares up the line.
Kite art from above. Attach a very lightweight streamer tail in multiple colors to the kite. In the right wind the colors stream and flutter in patterns that look almost like painting the sky. Kids are mesmerized watching the colors move.
Distance measuring. Use a measuring tape to mark how far from your launch point the kite shadow falls on the ground. Then use basic geometry to estimate how high the kite actually is. This turns into an impromptu math activity that kids engage with enthusiastically because the numbers are about something they genuinely care about in that moment.
Kite racing. If you make multiple kites together, head to the field and see whose kite climbs highest first. Friendly competition makes everyone more invested in getting their tuning right and produces a lot of running, laughing, and genuine outdoor fun.
Pin this: 20 Fun Air Dry Clay Crafts for Kids
Making It a Regular Outdoor Tradition
Here is something I genuinely want to encourage you to consider. Do not let kite making and flying be a one-time afternoon activity. Make it a recurring seasonal tradition instead.
Spring and autumn are the best kite flying seasons in most places because the wind is reliable and the temperature is comfortable for being outside for extended periods. Make a new kite each spring with a different design or different materials. Try a delta kite one season. Try a sled kite the next.
Over time your kids will develop real intuition for what works and what does not. They will make better design decisions. They will tune their bridles faster. They will read the wind more accurately. And through all of that, they will be developing genuine problem solving skills, patience, and confidence in their own ability to build things that work.
That is honestly what all of these craft projects are really about underneath the surface. Not just the kite or the pillowcase or the dreamcatcher. But the experience of a child discovering that their hands and their mind together can make something real happen in the world.
So build the kite. Head outside. Find the wind together.
And when that kite finally catches the breeze and climbs up into a blue sky, look at your child’s face in that exact moment. That expression right there is worth every bit of the effort.
Leave a Reply