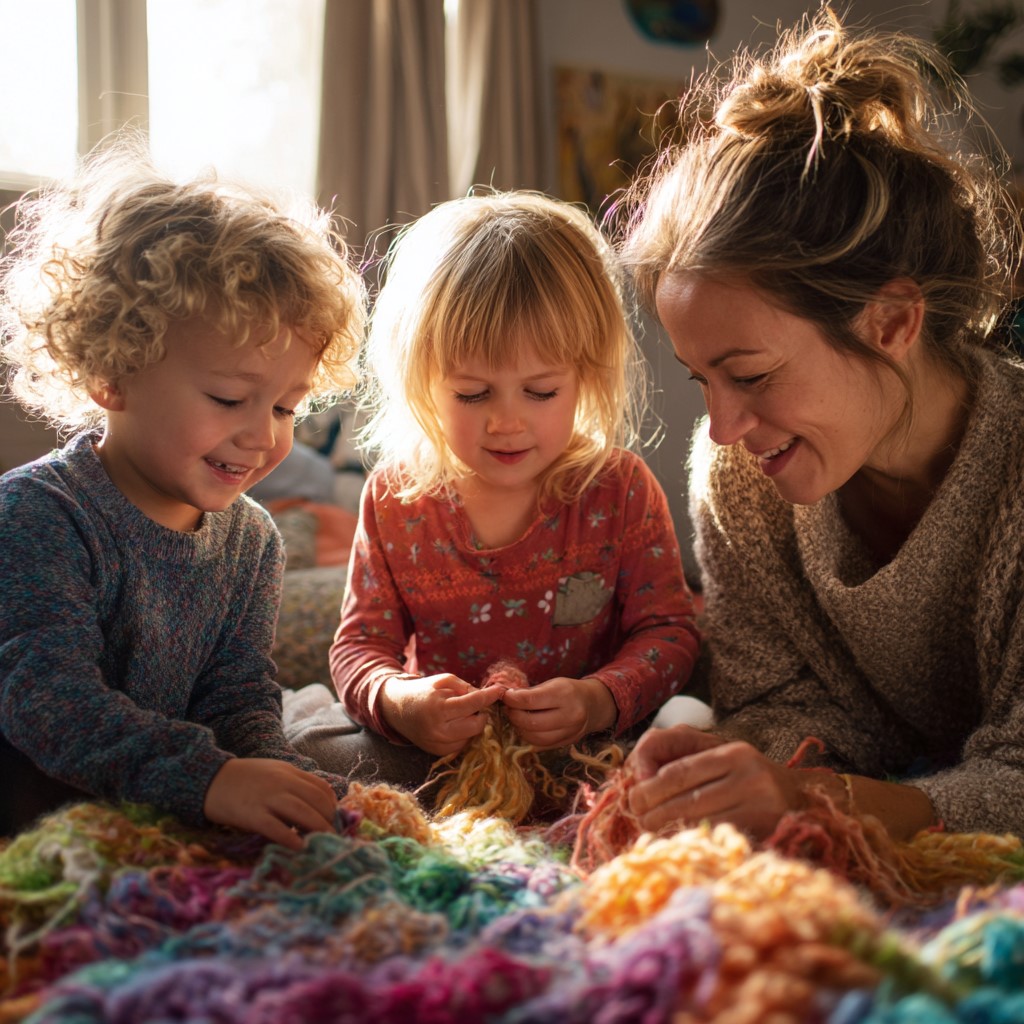
Let me paint you a picture. It’s a rainy Saturday afternoon. The kids are bored. You’ve already said no to three hours of cartoons. You need an activity that’s fun, productive, and doesn’t require you to hunt down seventeen different supplies from three different stores.
Well, that’s exactly where the no-sew fleece blanket comes in.
This is genuinely one of my favourite crafts to do with kids. And I say that as someone who has done a lot of crafts with kids over the years. There’s something about this particular project that hits differently. Maybe it’s because the end result is actually useful. Maybe it’s because kids can do most of the work themselves. Or maybe and I think this is the real reason, it’s because watching a child curl up under a blanket they made with their own hands is just incredibly wholesome.
If you’ve been following along on the blog, you’ll remember our last post on How to Make Pressed Flower Art That Will Last for Years. That was a slower, more patient kind of craft. This one, however, is the complete opposite. This is fast, fun, loud, and a little chaotic in the best possible way.
No sewing machine. No needle and thread. No special skills required whatsoever. Just fleece, scissors, and a solid hour of quality time with your kids. So without further delay, let’s get right into it.
Bookmark this: How to Make Homemade Bubble Solution That Actually Creates Giant Bubbles
Why This Blanket Project Is Perfect for Kids
Before we even talk about materials, let me first tell you why this specific craft works so well with children of different ages.
First of all, the technique is simple enough for kids as young as five to participate meaningfully. The main skill involved is tying knots. Most kids can learn that in about two minutes flat. Secondly, there are no sharp needles, no hot glue guns, and no complicated tools involved anywhere in the process. The safety profile of this project is genuinely excellent.
Furthermore, fleece is one of the most forgiving fabrics you will ever work with. Unlike other fabrics that fray, bleed color, or tear unpredictably, fleece is sturdy and incredibly easy to handle. If a child cuts a strip slightly crooked or ties a knot a little loosely, it still works beautifully. It still looks great. That kind of built-in forgiveness makes for a much more enjoyable experience for the kids and for you as well.
Pin this: How to Make a DIY Fairy Garden With Your Daughter on a Lazy Saturday
Why the One-Hour Timeline Is Actually Real
Now, I want to address this upfront because DIY timelines can sometimes be wildly optimistic. This one, though, is completely honest. A completed blanket with two to three people working together genuinely takes about one hour. Maybe a little more if your kids are very young. Maybe a little less if everyone is focused and enthusiastic.
The cutting takes roughly twenty to thirty minutes depending on the size of your blanket. The tying then takes another twenty to thirty minutes. The rest is simply setup, arranging, and admiring the finished product together. So yes one hour is completely realistic and totally achievable.
Save this guide: The Easiest Kids Friendship Bracelet Tutorial for Complete Beginners
What You Need to Get Started
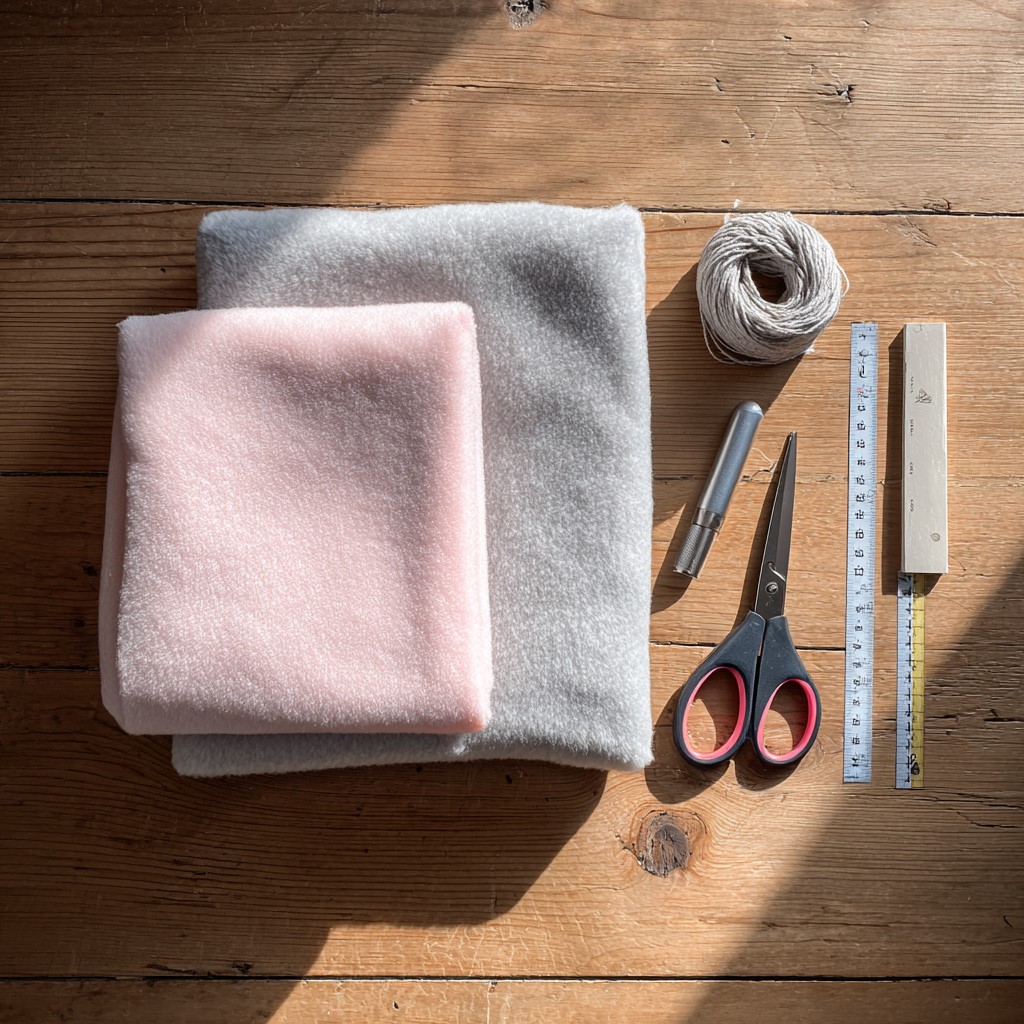
Now let’s talk supplies. The beauty of this project is honestly how short this list is.
Fleece fabric. You need two pieces of fleece in coordinating or contrasting colors or patterns. Each piece should be the same size. For a lap blanket, go with one yard of each. For a full throw blanket, use one and a half yards of each. For a toddler or baby blanket, half a yard of each is plenty.
Sharp fabric scissors. This is the one place you simply cannot compromise. Dull scissors will make the cutting process frustrating and exhausting for everyone involved. Use the sharpest scissors you have. If you’re crafting with younger kids, you handle the cutting and let them focus on the tying.
A ruler or measuring tape. You need this specifically for marking your fringe strips so they come out even and consistent.
A fabric marker or chalk. For marking your cut lines clearly. This washes out easily afterward or stays hidden inside the seam allowance.
A flat surface. A large table, a clean floor, or even a bed works perfectly fine. You just need enough space to spread out the full fabric without it bunching up.
That’s genuinely everything. No other supplies needed at all.
Check this guide: How to Do Easy Block Printing With Kids Using Sponges and Foam
Choosing Your Fleece Fabric
Spend a little time on this particular step because your fabric choice affects both the look and the feel of the finished blanket significantly. Anti-pill fleece is absolutely the best option here. It’s soft, it doesn’t shed little balls of fluff after washing, and it holds up beautifully over time with regular use.
When it comes to picking colors and patterns, let the kids choose. Seriously. I know it’s tempting to guide them toward something you personally think looks nice. But the real magic of this project comes from ownership. A child who picked their own fabric even if it’s the loudest, most chaotic pattern in the entire store will treasure that blanket in a way they simply won’t if you made the choice for them.
Some combinations that tend to work especially well together include a solid color paired with a patterned fleece, two complementary solid colors, or a themed print paired with a coordinating solid. For example, a dinosaur print paired with bright green. A galaxy print paired with deep navy. A floral print paired with soft pink or sage green. The possibilities are honestly endless.
Anti-pill fleece is widely available at fabric stores and online. Always buy a little more than you think you need. Having extra is always better than running short halfway through the project.
People love this: A Parent’s Guide to Starting a Mini Craft Corner for Your Kids at Home
Preparing Your Fabric
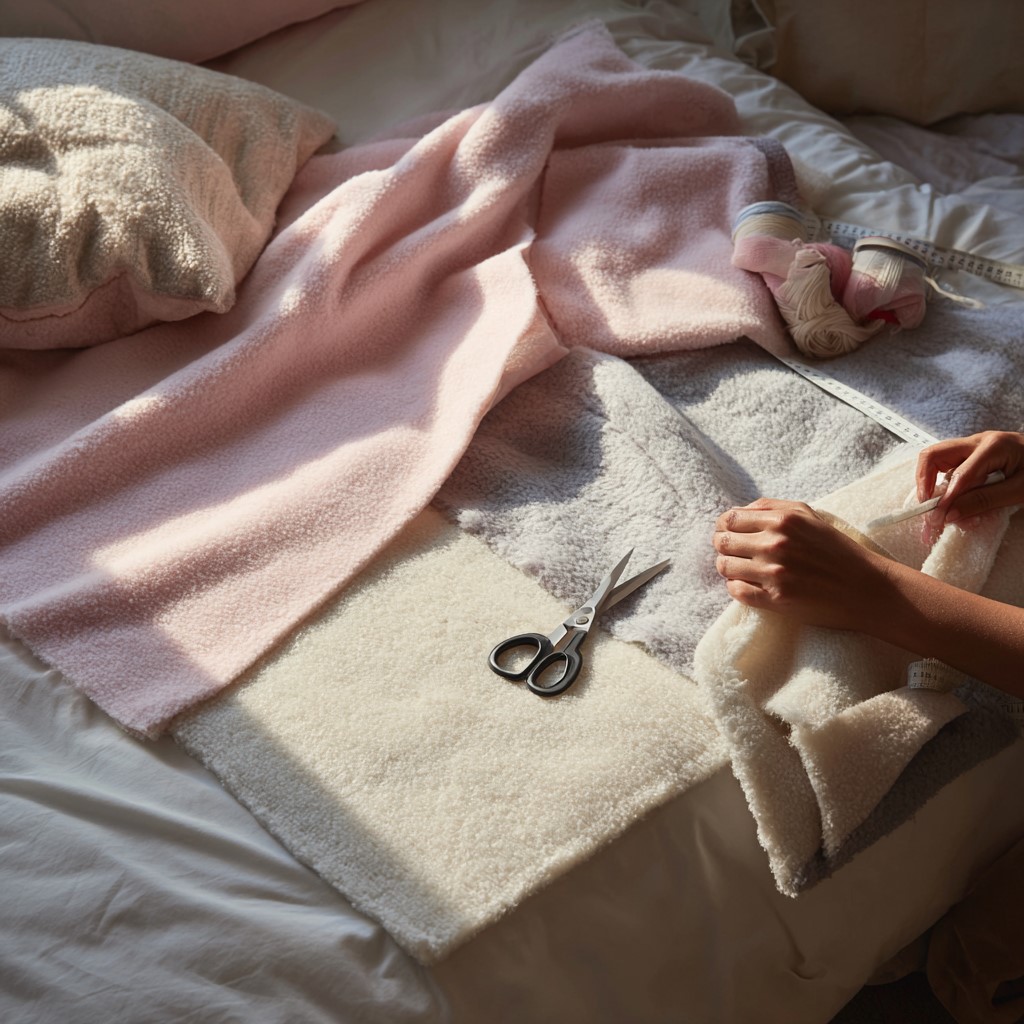
Alright, so you have your fleece. Now let’s set everything up properly before the cutting begins.
Step 1: Wash and dry your fleece first. Fleece can shrink slightly the very first time it’s washed. Washing it before you cut means your blanket won’t shrink unevenly after it’s finished and in use. Wash both pieces together in cold water. Tumble dry on low. This step also pre-softens the fabric, which makes the final blanket even cozier to use.
Step 2: Lay both pieces together. Next, place your two pieces of fleece on top of each other with the wrong sides facing outward. In other words, the pretty sides should be facing each other in the middle. This lines everything up neatly so you can cut through both layers simultaneously.
Step 3: Trim the edges. Most fleece comes from the roll with slightly uneven edges. Therefore, use your ruler and fabric marker to trim all four sides so they are perfectly straight and even. This makes the fringe-cutting process much easier and gives you a cleaner, more polished finished edge.
Step 4: Cut the corner squares. In each of the four corners, cut out a square measuring approximately four inches by four inches. This step is genuinely important, so don’t skip it. If you leave the corners intact, your fringe pieces will overlap awkwardly and the corners of your blanket won’t lie flat. Cutting the corner squares ensures everything lines up neatly once you start tying.
You might want to see this: How to Turn Old Crayons Into New Ones Using a Muffin Tin
How to Cut the Fringe

This is the main technique of the whole project. Consequently, taking your time here will make everything that follows go much more smoothly.
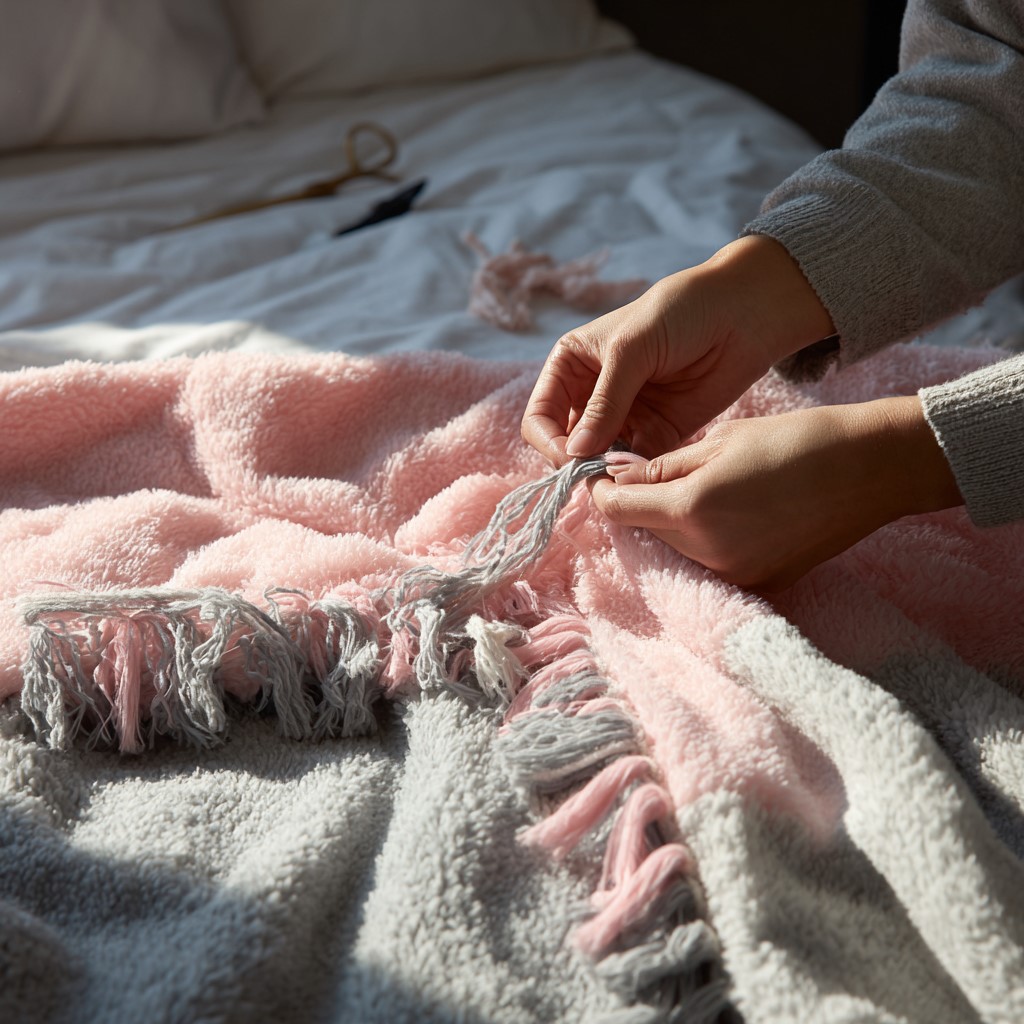
Starting from one corner of your blanket, cut strips along each edge. Each strip should be about one inch wide and four inches long. Cut through both layers of fleece at the same time so that your top and bottom strips match up perfectly with each other.
Work your way around all four sides of the blanket consistently. By the time you’re finished, you’ll have a fringe of two-layered strips running all the way around the entire blanket, with a clean uncut center section in the middle.
Check this out: 20 Fun Air Dry Clay Crafts for Kids
Tips for Cutting Clean, Even Strips
Use your ruler to mark the strips before you make a single cut. Draw lines every inch along each edge using your fabric marker. This gives you a clear, visible guide and keeps the strips consistent all the way around. Inconsistent strip width isn’t a complete disaster, the blanket will still work perfectly well. However, even strips give a much more polished and intentional look to the finished piece.
If you’re working with kids who want to help with the cutting, let them cut along the strips you have already marked out. The lines give them a clear path to follow confidently. Younger kids tend to do significantly better with longer-handled scissors that give them more control over the cut.
Also, take breaks during the cutting phase if you need to. Cutting all the way around a full-sized throw blanket is more work than it initially sounds. There is absolutely no rush. Put on some music. Make it genuinely part of the fun rather than just a task to get through.
For more ideas like this: A Step-by-Step Guide to Making Air Dry Clay Bowls With Your Kids
The Tying Method: Two Options
Here is where the real magic of the whole project happens. Once your fringe is fully cut, you have two different tying methods to choose from. Both work beautifully in their own way. The method you pick depends largely on the look you want and the age of the kids who are helping.
Option One: The Basic Overhand Knot
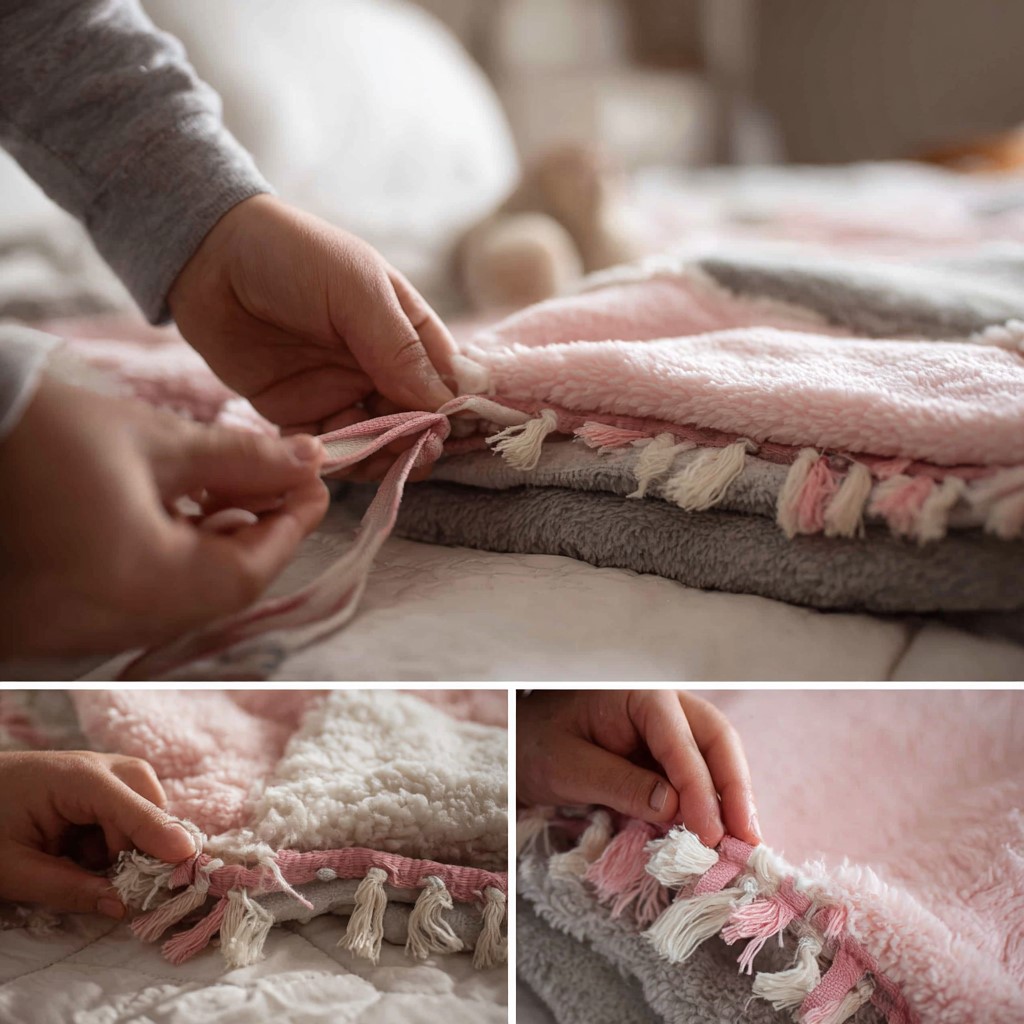
This is by far the simplest method and therefore the best one for younger kids.
Take one strip from the top layer and the matching strip directly below it from the bottom layer. Hold them together firmly. Then tie them in a simple overhand knot, the exact same knot you use to start tying your shoes. Pull it snug but not so tight that it puckers or bunches the fabric around it.
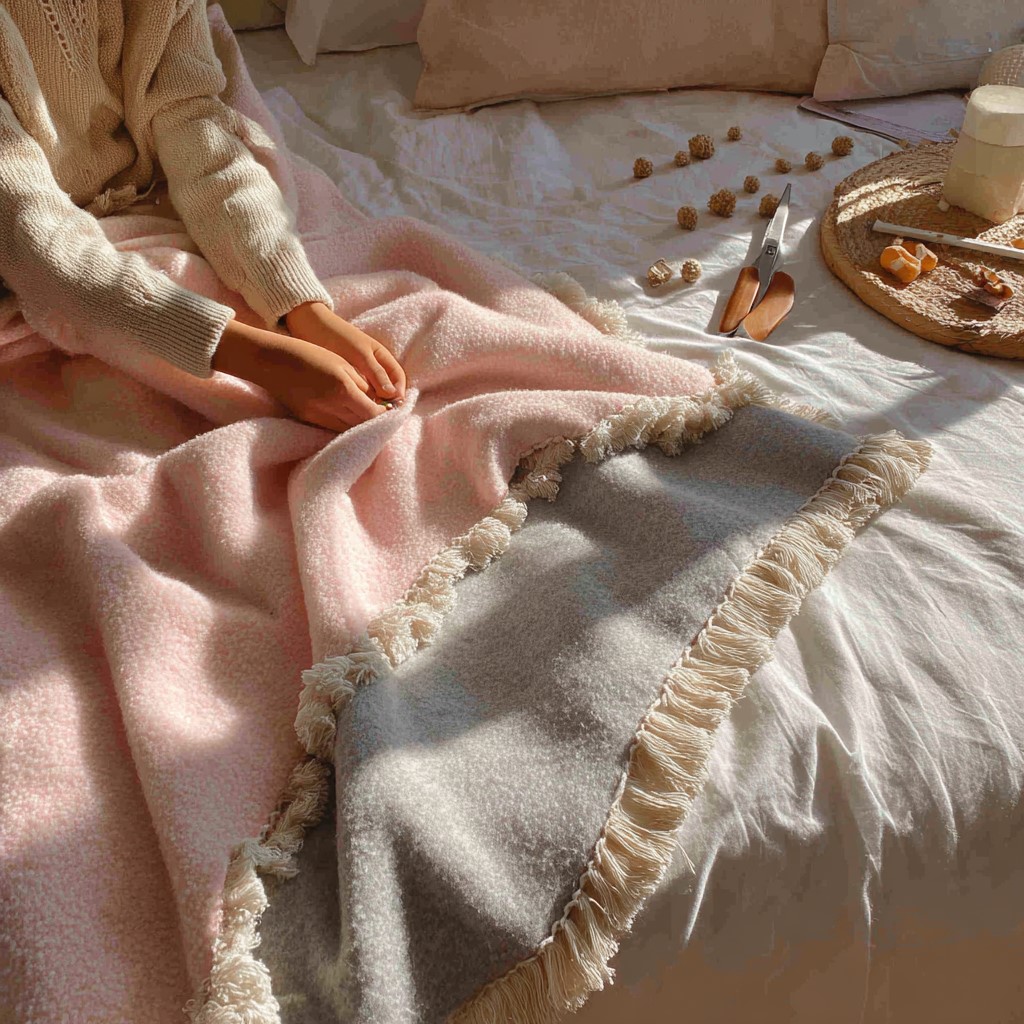
Repeat this process all the way around the blanket consistently. Every single pair of strips gets a knot. When you’re completely done, you’ll have a fluffy, knotted fringe running all the way around the perimeter. It looks casual, cozy, and very handmade in the most charming and genuine way possible.
Option Two: The Loop Knot
This method, on the other hand, creates a slightly more refined and polished look overall. It does take a little more dexterity to execute well, so it’s better suited to older kids and adults.
Take one pair of matching strips. Fold them together and push the folded loop up through the gap between the two fabric layers. Then pull the loose ends of the strips through that loop and pull tight. This creates a neat, consistent loop knot that looks almost like a deliberately decorative edge.
The loop knot takes a bit more practice to get consistently tight and even. However, once you get into a rhythm it actually moves quite quickly. Moreover, the finished edge looks incredibly clean and intentional almost like something you’d buy rather than make at home.
Try this next: How to Create a Mini Herb Garden Planter Craft With Kids
Which Method Should You Choose?
Honestly, you can absolutely mix both methods on the same blanket. Some people do loop knots on most of the blanket and basic knots on the trickier corner sections. Others start with basic knots and switch to loop knots once the kids have fully warmed up to the process. There are truly no rules here. Use whatever works best for your group on that particular day.
Working With Different Age Groups
I want to spend a specific moment on this because it genuinely matters for making the experience enjoyable for absolutely everyone involved.
Ages 3 to 5: These little ones can participate in meaningful ways, but they need tasks that are properly scaled to their current abilities. Let them help choose the fabric at the store. Let them hand you strips as you cut. During the tying phase, sit closely with them and guide their hands gently through each knot. They won’t produce perfect results, and that’s completely fine. Their participation is what matters here, not the precision of the finished product.
Ages 6 to 9: This age group can handle the tying independently once you’ve shown them the technique clearly. They may need occasional gentle reminders to keep their knots snug rather than loose. They can also help with marking the strips before cutting, as long as you remain nearby supervising the scissors at all times.
Ages 10 and up: Older kids can manage most of this project with very minimal help from you. Show them the technique clearly once. Then step back and let them run with it completely. This age group often genuinely enjoys the meditative, repetitive rhythm of working around the blanket strip by strip. They might actually surprise you with how quickly and neatly they pick it up.
Making It a True Team Activity
If you have multiple kids working together on the same blanket, divide it into clear sections first. Each child takes ownership of one side or one corner. This simple step prevents the squabbling that can happen when everyone is simultaneously reaching for the same part of the project.
Additionally, you can easily make it into a friendly game. Who can tie the neatest knot? Who can finish their section first? A little friendly competition tends to keep both energy and focus remarkably high, especially with kids in the middle age range who thrive on a bit of challenge.
Finishing Touches That Elevate the Blanket
Your blanket is tied and essentially complete. Before you call it fully done, though, here are a few optional finishing touches that can genuinely take it from cute to impressively beautiful.
Trim any uneven fringe. After all the knots are tied, hold up the blanket and examine the fringe carefully. Some strips may have stretched slightly during the tying process. A quick trim with sharp scissors evens everything out immediately and gives the fringe a clean, uniform, and intentional look.
Add fringe embellishments. For an extra decorative touch, thread wooden beads onto a few of the fringe strips before tying the final knot on each one. This adds a lovely boho feel to the finished blanket. Kids especially love choosing which specific strips get beads and which bead colors to use on each one.
Personalize it meaningfully. Use fabric paint or iron-on letters to add the child’s name or initials to a corner of the blanket. This simple step transforms it from a craft project into a genuine keepsake. Fabric markers also work wonderfully for drawing small designs directly on the fleece before the blanket is fully assembled.
Give it a final gentle wash. After all that handling, a quick wash on a gentle cycle freshens everything up beautifully. Tumble dry on low afterward. The fleece comes out soft, fluffy, and looking absolutely wonderful.
This is worth a look: How to Make the Cutest DIY Butterfly Mobile With Your Kids This Weekend
Care Instructions for Your Fleece Blanket
This section is genuinely worth covering carefully because a blanket that’s properly cared for will last for many, many years.
Wash your no-sew fleece blanket in cold water on a gentle cycle every time. Hot water can cause the fleece to pill much faster than it otherwise would. Use a mild detergent without fabric softener and this one surprises most people, fabric softener can actually reduce the softness of fleece over time rather than improving it. So skip it entirely.
Dry on low heat or air dry whenever possible. High heat in the dryer will mat the fibers down and make the fleece feel rough and flat rather than fluffy and soft as it should be.
Never iron fleece directly under any circumstances. The fibers will literally melt. If you absolutely need to smooth out a stubborn crease, use a very low setting with a pressing cloth placed firmly between the iron and the fleece.
With the right care consistently applied, a well-made no-sew fleece blanket can stay beautiful and cozy for many years. In fact, children often keep these blankets well into adulthood. I’ve heard from more than a few people who still have blankets they made as children sitting right on their beds today.
You can also try this: How to Start Crafting with Kids as a Beginner
Creative Variations Worth Trying
Once you’ve made one blanket and gotten genuinely comfortable with the process, there are so many fun directions you can confidently take this craft next.
Mini blankets for stuffed animals. Use small scraps of fleece about half a yard of each color to make tiny blankets perfectly scaled for stuffed animals and dolls. Kids who are deeply attached to their toys absolutely love this variation. It’s also a great practical way to use up any leftover fabric from your main blanket.
Pillowcase version. Instead of tying all four sides closed, tie only three sides and deliberately leave one side open to create a pillow cover. Stuff it with a standard pillow insert and then tie the final side closed. You end up with a beautifully matching pillow and blanket set that looks incredibly put together and intentional.
Themed blankets as heartfelt gifts. Let kids pick a themed fleece featuring a favourite sports team, a beloved character, or a favorite animal. Then make blankets specifically as gifts for friends or family members. Handmade gifts hit differently than anything store-bought ever could. A child personally giving a grandparent a blanket they made themselves creates a memory that lasts far longer than the craft afternoon itself.
Classroom or community group project. If you work with kids in a school or organized group setting, this makes a phenomenal collective project. Each child makes their own individual blanket. You can even donate the finished blankets together to a local shelter or children’s charity nearby. Combining creativity with genuine community giving is one of the most powerful and memorable experiences you can ever offer a child.
One Final Thought Before You Go
Here’s the single most important thing I want you to take away from this entire post. The blanket itself is lovely. Truly, it is. But the blanket isn’t actually the real point of any of this.
The real point is an hour of genuine, focused, screen-free time with your kids. No phones buzzing. No shows playing in the background. Just hands working together, voices chatting and laughing, and something real and tangible being created side by side. Those hours are rarer than we often realize. And they are far more valuable than we regularly give them credit for.
So ultimately, go buy the fleece. Pull out the scissors. Put on a playlist you all love. And spend one hour making something genuinely beautiful together.
The kids will use that blanket for years and years. But what they will always remember long after the blanket has worn soft at the edges is the afternoon they made it with you.
Leave a Reply